Posted March 18th, 2019 at 4:25 pm by Dan Musick
With everyday use, springs on a steel rolling door will eventually wear and break. This tutorial provides step by step instructions on how to replace steel rolling door springs.
Disabling the door
- Close the steel rolling door that requires its spring(s) replaced.
- If there is a hood covering the barrel, remove the hood.
- Unwind the spring(s), unless the spring(s) are already broken. Mark the tension wheel and count the number of turns you remove. You’ll need to rewind the spring(s) the same number of turns and possibly a little more.
Disabling the Operator
- Free the drive hand chain if there is no operator.
- If there is an operator, remove the final drive chain.
- Suspend the operator if it is attached to the endplate.
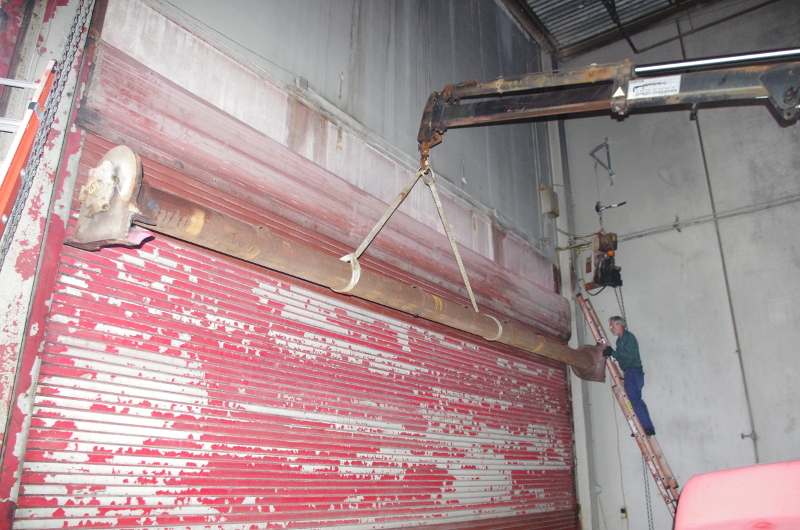
Preparing to Remove the Barrel
- Check to confirm the barrel turns freely.
- Afterward, remove bolts that secure the top of the curtain to the barrel.
- Support the barrel in the middle with forklift blades separated as far as possible, while checking to assure there is adequate clearance above the barrel. If there is not enough clearance, stack pallets and lift these in place to support the barrel.
- Secure the barrel with a rope or strap to prevent it from rolling off the forklift blades or pallets in the following steps.
- Remove the two or three bolts on each side, which secure the endplates to the vertical angle. Then, raise the forks as needed to free the bolts.
Removing the Barrel
- It is now time to lower the barrel. Important! Remember, since the springs are off to one side, the distribution of the door’s weight will be uneven. Additionally, as you pull the barrel away from the header, the winding side will be heavier, and it may possibly drop. To prevent this, support this end as needed with a rope, straps, or by hand as a second person walks this end down a ladder.
- Lower the barrel to the floor with the bottoms of the endplates on the floor and the endplates supporting the barrel.
Checking the Barrel Ends
- Check the drive end to confirm it is OK. This end usually does not have a problem. Also, if it does need repair, support this end of the barrel with blocks or pallets. Then, remove the drive chain, and remove the fasteners that secure the drive end to the end of the barrel. Sometimes this is welded, and you will need to grind off the welds.
- If the drive end is OK, go to the winding end and remove the bolts, screws, or pins that secure the internal cones and winding end plug to the barrel. In fact, there will usually be three at the winding end of the barrel, and three similar fasteners a third to halfway toward the center of the barrel. Then, rotate the barrel as needed to locate the fasteners. If there are two sets of springs, there will be three additional fasteners further toward the other end of the barrel.
In the drawing below is a sketch of what is typically found in a steel rolling door’s barrel. There may be more or fewer springs and parts than what is shown below. Notice that the shafts are not connected.

Removing the Spring
- To confirm that all the internal plugs are free, turn the winding wheel one or two turns and see if the spring assembly spins inside the barrel. Then, tap the end cone away from the bearing as needed to free the cone.
- Remove the pin or other fasteners that secure the winding wheel to the winding shaft.
- Support the winding end with blocks or pallets and remove the endplate.
- Pull the spring assembly out of the barrel. However, it may be necessary to secure the drive end and pull the winding out with a come-along, chain fall, or forklift.
- If you have a broken spring or springs, measure the springs and order replacements.
- While you’re at it, this is a good opportunity to check all the other spring assembly parts for wear or damage.
Feel free to visit our garage door torsion springs database to find and order replacement steel rolling door springs.
Replacing the Spring
- To replace the springs, heat ends of the wire to cherry red and bend the first end as needed to match the shape of the old spring. Afterward, to secure the other end, stretch the spring with a come-along and a strap wrench, and then bend the end properly, so it secures to the cone.
- To complete the job, reverse the order. When sliding the spring assembly into the barrel, align the cone holes with the barrel holes to make them easier to find when securing them.
- This concludes the tutorial on how to replace steel rolling door springs successfully.
Note: For instructions on removing a steel rolling door, view our blog titled, “How to Remove a Steel Rolling Door.” However, if you need to install a new door, our blog titled, “How to Install a Steel Rolling Door,” will provide you with additional support. We also offer in-house training for garage door technicians.
This entry was filed under Technical Support. You can follow any responses to this entry through the RSS 2.0 feed.
