Posted March 23rd, 2018 at 3:29 pm by Dan Musick
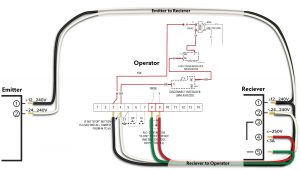
In 2016 we showed the critical wiring connections on our blog titled How to Install Omron E3JM Photo Eyes on PowerMaster Operators. The diagram shown below should help you understand how to connect the wires.
In this blog, I’ll show how I performed the installation of the Omron Photo Eye on a job nearby.
I used a four-strand wire. The emitter has two screws for power, while the receiver has four screws – two for power and two to reverse the operator travel when there is an obstruction. The black and white wires on terminals 1 & 2 go to the power, usually to the PowerMaster operator, but any other source will work. The green and red wires go from the receiver to the operator to reverse the door when an obstruction blocks the eyes.
Installation Directions
First, turn off the power to the operator before mounting the eyes or hooking up any of the wires.
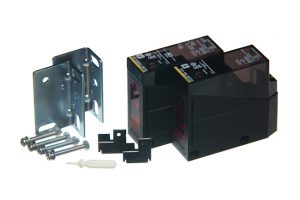
Then use angle or brackets to mount the eyes four to six inches off of the floor, and point them toward each other. If the sun shines into the building, mount the emitter so that the sun shines on it. Sunshine on the receiver will often prevent the PowerMaster operator from closing the door. The eye with 2 screws is the emitter.
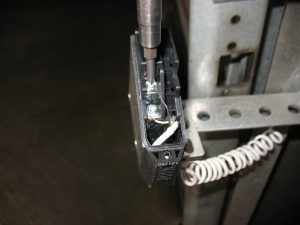
Then, secure a black and white wire to the #1 & #2 screws of the emitter. Run the wires up over the door and down to the receiver on the other side.
Here you will connect eight wires from two wiring harnesses. Twist the black and white wires from the emitter to the black and white wires going to the operator, and secure these wires to the same #1 & #2 screws of the receiver.
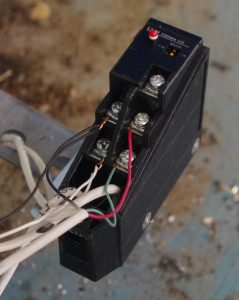
Notice on the right side of the receiver that there are three screws. The #3 above is not used.
In the wiring strand, going to the PowerMaster operator are an additional green and red wire. Connect the red wire to #4 and green wire to #5.
Run all four wire strands to the operator terminal.

Connecting Power to the PowerMaster Operator
For power, connect the black and white wires to terminals #3 and #4. When the power is on, there should be 24 -28 volts on these two terminals. Connect the green and red wires to terminals #8, and #9.
Turn on the power to the PowerMaster operator and test the eyes. Important: Running a jumper and shorting the #8 and #9 contacts will reverse the door when it is closing. It will also keep the door from closing.
In the same manner, when power is going to the eyes these contacts are normally open. When the eyes are blocked, or when there is no power going to the eyes, the contacts from the receiver eye close and the door will not close, or the door will reverse if it is in the process of closing.
We also have a YouTube video titled, “How to Install Omron E3JM Photo Eyes on PowerMaster Operators” that can be helpful. With the information provided, your installation of the Omron Photo Eye should be successful.
This entry was filed under Technical Support. You can follow any responses to this entry through the RSS 2.0 feed. You can skip to the end and leave a response. Pinging is currently not allowed.

Leave a Reply