TorqueMaster Cone and Spacer Replacement
In this tutorial, you will learn how to replace the cone and spacer in your TorqueMaster torsion spring. Often customers confuse TorqueMaster One with TorqueMaster Plus and they order springs with the incorrect winder cones. The quickest fix for this is to remove the cones from the old springs and install them in the new springs. Otherwise, the shipping cost to return the incorrect springs and to ship the new springs is more than the cost of the springs.
Some of the older TorqueMaster springs had black winder cones for .721 inch ID springs and these are not compatible with the new .65 inch ID springs. When this occurs we can provide just the winder cones and save on the shipping costs for the customer.
On international shipments we can sometimes remove the cone and spacer and ship the spring in the less expensive USPS packages. In these cases the customer reuses his existing 3/8 inch diameter spacer tube. If you decide to do this please get from us the length needed for cutting your old spacer.
This process is best completed with a vise, a hammer, a punch or screwdriver, a pair of vise grips, a pipe wrench, and a cloth for cleaning grease off the winder cone.
1. First, if your spring has a plastic cover on it, remove it and lay it aside.
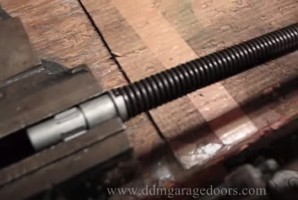
2. Next, position the winding cone inside the vise so that the top of the spring wire is just back from the end of the vise.
3. Because the wire is close to the stop on the cone, it cannot be removed right away with just a pipe wrench. You need to take a screwdriver or punch and a hammer the wire on the end of the cone until the end of the wire separates from the stop. This step is necessary only when you can't readily grip the end of the spring with a wrench.
4. Once you have the spring loose from the end, move the spring foward in the vise so that the cone and five to seven coils of the spring are sticking out past the end of the vise.
5. Next, grip the winder cone with a vise grip while grabbing and hooking the spring from the opposite direction with the pipe wrench. If you have this hooked correctly on the spring, it will not take much effort to remove the cone. If you don't, you can hurt yourself and possibly break parts off of the spring.
6. While holding the pipe wrench stationary, turn the vise grip to unwind the cone from the spring. Be careful as you do this, as the cone with the vise grip attached will shoot out about six inches once it is loose enough because of the spacer inside of it.
7. If you are replacing just the cone, take the old cone off of the spacer and skip ahead to step 10.
8. If you are replacing the spacer, pull that out after you removeit, and push it back inside the spring. You should feel it hit the stationary cone, and it will be difficult to push it in any further. The spacer should stick out about six inches from the end of the spring.
9. Once the spacer is in place, grab the new cone and place it on the end of the spacer.
10. In order to get the new cone onto the spring, push on the end with the palm of your hand. You will feel a lot of resistence when you do this; this is to be expected. It is best to push with your left hand, and turn the winding cone back onto the spring with your right hand. Turn it as far as you can by hand, and then turn the cone into the spring with a vise grip.
11. The final step of the process is to slide a new plastic shield over the spring. This keeps the spring quiet as it rotates inside the tube as the door opens operates.