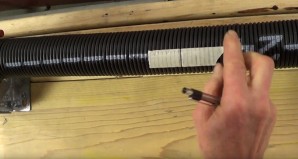
How to Install an S3 Winder and Torsion Springs
Winding springs is a risky business. There are many dangers and perils involved, and one can never be too careful while undertaking a task such as this. If you do not have the right winding bars for the holes of your springs, as we have stated many other places, you should not wind your springs. Without a snug fit, you have so many more ways that this project could turn from a two hour job to a hospital trip.
There are so many safety measures that need to be taken in order to ensure that you are not in danger when undertaking a task such as this, and even then things can happen. This winder is a huge benefit to those who do not wish to go up against any of the risks when winding these springs yourself with winding bars.
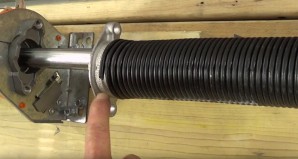
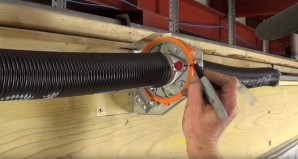
The S3 winder is specifically made so that you can connect both springs to a centerpoint over the door and put the necessary winds on your door to get the springs to lift it without risking damage to yourself or your surroundings by winding it up with winding bars. These winders work with both the 1 3/4" and 2" inside diameter springs. Unfortunately, these are not compatible with any of our springs with bigger inside diameters.
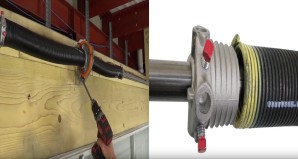
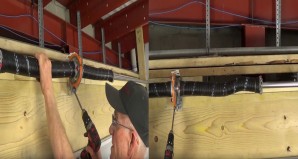
This winder also doubles as a spring anchor bracket, as both springs attach in the middle of the shaft. It is recommended that this winder be used with 3-3/8" offset end bearing plates, which are normal residential plates. This winder is not recommended for use with other end bearing plates. Included with the original kit from the manufacturer are red bolts which bolt the springs into the winder. These are painted red to remind you that when you are going to take your springs off to replace them, you need to take the tension out of the springs by unwinding them before you remove the stationary side that is attached to the winder. With the winder, we also include a center bearing, as a spring anchor bracket would have, as well as fasteners with which to fasten your winder to the wall above your door. Make sure to fasten your winder to the structurally sound boards in your wall, and not simply to the drywall, as it could just pull out of the wall while your springs are raising the door.
Once you have fastened your winder, make sure to line up your spring with the right holes to tighten it to. There are holes on either side of the winder so that you can connect both springs to the winder. As you apply the drill to the winder, it will turn both springs in different directions. As with winding bars, you need to make sure you give your spring the right amount of turns to lift your door properly, and balance it properly. Too many winds, and the door will bounce back up when you attempt to close it. Too few winds, and the door with slam itself on the ground because the weight of the door isn't being lifted at all.
The winder can be used a few times to wind up your springs, making it an investment not only for your immediate project, but unsable again for when you change your springs in the future. It is recommended that you use them for three complete wind and unwind cycles, replacing them after the third use. It is likely, if you use higher cycle life springs, that you will not have to replace this winder in your lifetime.
After you have wound the springs and balanced the door, you will want to make sure that you install a locking bolt into your winder. These winding parts are spaced out at 90 degree angles from each other. You will want to lock this winder into place so that the winder doesn not move again until you want to take down those springs, and replace them with a new pair.
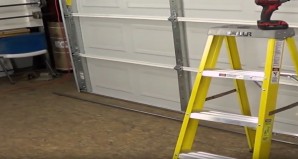
This tutorial assumes that you have already taken your old springs off of the door, and are starting with just the bare shaft above the door with the old spring anchor bracket.


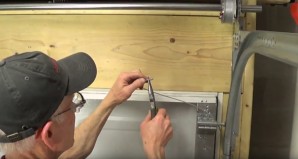
1. Step up the ladder and remove the vice grips that are holding the shaft in place on the spring anchor bracket.
2. Remove the shaft from the end bearing plates so that it is free to move.
3. Set the shaft on the ground so that it doesn't pose a safety risk as you ready the door to install your winder. This should be placed right in front of the door, and between the door and the ladder, so that safety risks are mitigated.
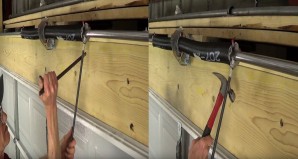
4. Next, remove the lag screws that secure the spring anchor bracket to the header above the door. Usually, you will want to use an impact wrench with an extended 7/16" nut driver or socket.
5. You will want to make sure that your end bearing plates are installed correctly. These should have a 3-3/8" distance from the header to the center of the bearing: this is called the centerline. This centerline needs to be the same as that of the winder.
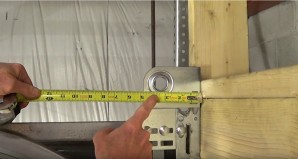
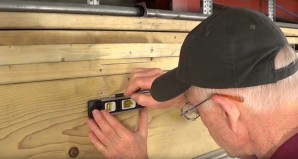
6. To mount the winder the correct height from the door, you will also need to determine the centerline of the shaft from the top of the door. To do this properly, position one end of a level in the center of an end bearing. Raise or lower the other end to get the bubble in the center, and mark the header.
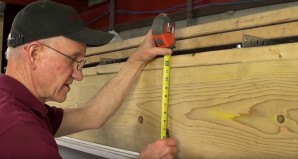
7. Next, measure from the top of the door to the mark you just made. Usually, this is an uneven surface, and you can measure from the highest part of the door, or the lower groove; either is fine as long as you are consistent and use the same spot to measure from again later.
8. Repeat the same steps, checking the measurement on the other end of the door as well. If the measurements differ, add them together and divide by two to get an accurate centerline from the top of the door to the center of the shaft above the door. This will help to ensure that the shaft is straight and parallel to the top of the door.

9. Move your ladder to the center of the door. Locate the lower groove of the top section, and measure the amount that you got from the last two steps to mark where your centerline should be. If there is an opener rail in the way, you can move one foot to either side, but at the same height that you would have directly in the center of the door. This is where the center of the shaft will be.
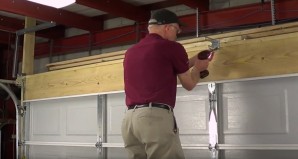
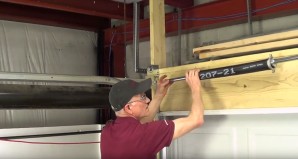
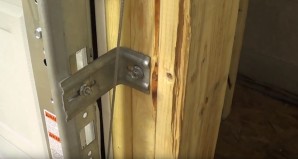
10. You may have to install extra wood to the top of the door to install the winder bracket to something that will not allow it to move. Without extra support, the torque could cause the winder to loosen and unwind the springs prematurely.
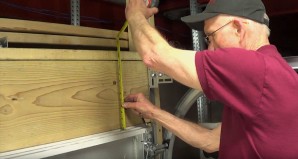
11. To minimize the possibility of error, extend the mark that you made previously in the center of the door with a level to make sure that your line is even.
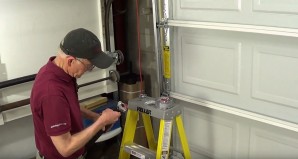
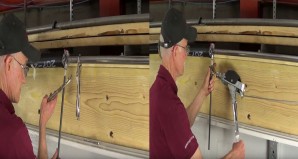
12. Since the bottom of the S3 winder is 3-1/4" below the centerline of the shaft, measure down that amount with a tape measure from the line you just made. While the manufacturer's instructions show 3-3/4", 3-1/4" has been found to be more accurate. Extend this mark with a level as well: this is where you'll mount the bottom of the bracket.
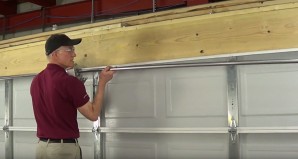
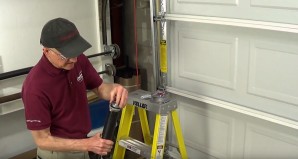
13. Position the bottom of the bracket on the line, plumb the line, and then mark for drilling. Make sure you have the bracket facing the correct way, with the word 'top' and the arrow pointing up. Since most of the torque pulls the bottom of the winder, you'll want to secure the bracket with two screws on the bottom, which need to be in different grains of the wood. The top of the bracket normally gets secured with just one screw. Recheck the hole marks in the bracket to ensure that it will be plumb when secured.
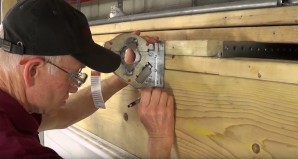
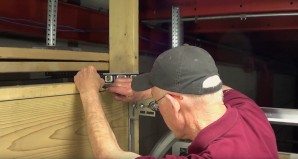
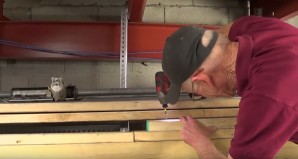
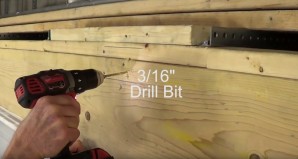
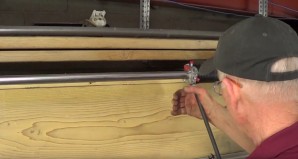
14. To minimize the risk of wood splitting, predrill the holes that you just marked in the previous step. This should be done with a 3/16/" drill bit. Make sure to keep screws 1/2" from the sides, and two inches from the top and bottom of the springboard.
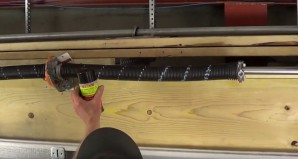
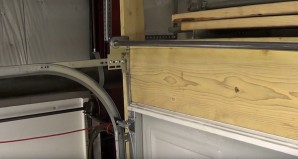
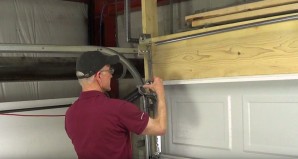
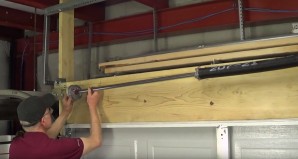
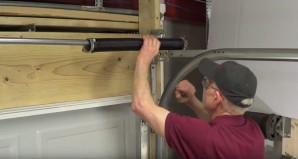
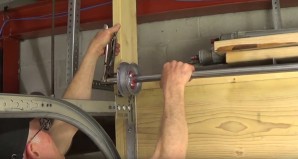
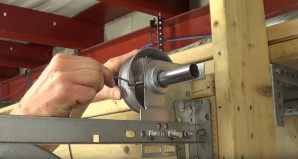
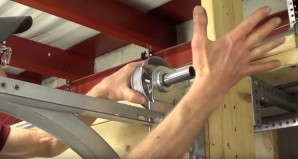
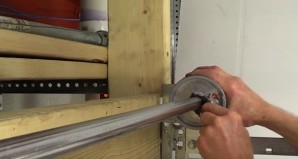
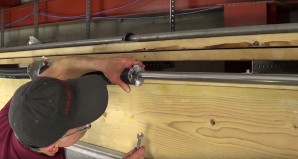
15. Slide the winder onto the end of the shaft. Position the bracket so that the top is still facing up, as before. Slide the winder to the middle of the shaft and position it next to the door.
16. Reposition the ladder closer to the door. Raise the shaft above the ladder, and move the ladder again closer to the door. Raise both ends of the shaft above the horizontal track on both sides.
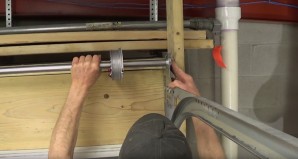
17. Slide the left end of the shaft into the end bearing plate on the left side of the door.
18. Slide the shaft further to the left so that there is enough room to slide the shaft into the end bearing plate on the right side of the door. Even this out if needed, so that both ends of the shaft stick out about three inches from the end bearings.
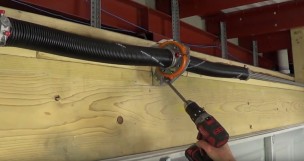
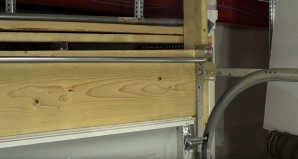
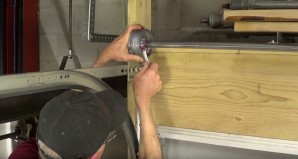
19. Position the bracket in place, confirm that the bracket is plumb, and secure the bracket to the header. Adjust this as needed, taking care not to damage the winder. Recheck to see if the bracket is plumb.
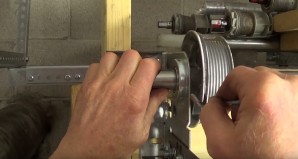
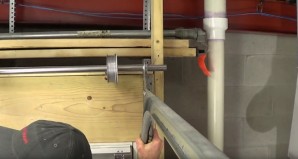
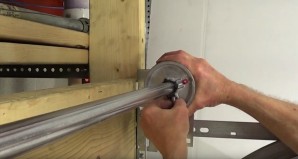
20. Now, you will install the rest of the torsion spring hardware, starting on the left side of the door. First, find the cable drum with a red marking and loosen the set screws. Find the spring with a red marking on the winding cone and loosen the set screws on it as well. The red winding cone should go with the red cable drum. This right wind spring should go on the left side of the winder.
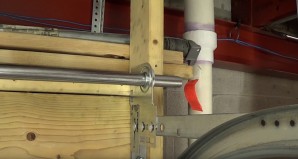
21. Fit the bearing in the stationary cone so that you will know how it goes on the shaft. Torsion assemblies with springs mounted in the center get only one bearing, and not one bearing in each spring.
22. Slide the shaft to the right about a foot or so. Install the bearing in the stationary end of the spring first, before putting the spring up on the shaft, to make sure that you have the bearing facing the correct way.
23. Slide the bearing on first, followed by the spring with the stationary end going on first. Once you have the bearing and spring on the shaft, slide the bearing into the stationary end. Then, slide the spring towards the center of the shaft.
24. Once you have slid the spring towards the center of the shaft, install the cable drum with the red mark and set screws facing inward towards the spring.
25. Next, slide the left end of the shaft towards the left end bearing and continue sliding it until the right end of the shaft comes out of the right end bearing.
26. Go to the right side of the shaft. Loosen the set screws on the cable drum with a black marking. This should match up with the black mark on the winding cone of the spring.
27. Loosen the set screws on the winding cone of the spring. Feel the inside of the winding cone to make sure that it will sit on the shaft without damaging it.
28. Reposition the ladder closer to the end bearing plate, and slide the spring onto the shaft. Check to make sure that the spring is left wind before doing so. Because only one bearing is needed, this side doesn't get a bearing before the spring goes on the shaft.
29. Slide the cable drum onto the shaft. Slide the shaft into the right end bearing plate and move the shaft so that the shaft is flush with the bearing.
30. Go to the left side of the door, and measure the amount of shaft extending beyond the left bearing. The shaft should be hanging off on either side of the end bearing plates by three inches. Adjust this accordingly in order to get this distance on the ends. Instead of a tape measure, you can use three or four fingers wrapping around the shaft to estimate.

31. Slide the cable drum on the left side of the door over until it touches the left end bearing plate. On this side, you will first tighten the set screws and then install the cable. You will want to tighten the set screws to finger tightness, and then tighten a half turn each with a wrench. On heavier doors weighing over 200 pounds, you will want to tighten the set screws by an extra quarter turn.
32. Now, install the cable on the left side of the door. Bend the end of the cable 90 degrees, and insert the cable and tip into the slot of the drum. Check to make sure the cable isn't sticking out of the side of the drum. Wind the cable on the drum as you turn the shaft and cable downward. Continue gripping the drum and shaft to keep the cable tight.
33. Vice grip the shaft with the top tight against the jamb or header. The cable should now be tight. Test it by plucking it: if it vibrates, it's tight.
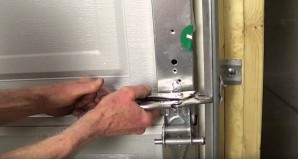
34. Confirm again that the right wind spring is on the left side of the door, and slide the spring towards the winder in the middle of the door, taking care not to damage it.
35. Go to the right side of the door, and check to see that the cable is free. You need to make sure it's not stuck under the door and that it is free from the bottom all the way to the top. A common mistake is that the cable can wrap itself around one of the track brackets, not allowing it to have the tension to lift the door properly.
36. Before installing the cable, check the shaft to see if the left drum is against the bearing, as on the left side of the door. Check this by sliding the shaft as far left as you can; this will eliminate a number of possible issues that could happen from things not being lined up properly.
37. As on the left side of the door, bend the cable 90 degrees first before installing it in the cable drum. On this side, instead of tightening the set screws before you install the cable, install the cable first before tightening the set screws.
38. Start by inserting the end of the cable into the drum. Rotate the cable drum downward to wrap the cable in the outermost channel of the cable drum, and move to the left as the cable begins to wrap around the drum, twisting and gripping the drum to keep the cable tight.
39. Tap the end of the shaft to make sure that the left cable drum is up against the race of the bearing in the end bearing plate. Press the right drum against the end bearing plate, twisting the drum as you do so to keep the cable tight.
40. Finger tighten the set screws, until they are touching the shaft.
41. Next, tighten the set screws three quarter turns each while continuing to pull down on the drum to keep the cable tight. Check the tension on the cable and check the shaft to see that it doesn't slide horizontally. This will prevent a number of problems.
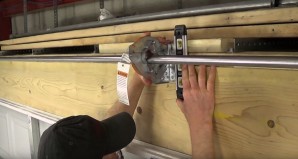
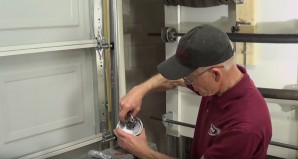
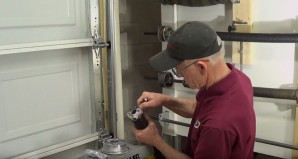
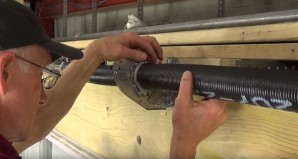
42. Now you will secure the stationary cones to the winder. Start with the left side first. The stationary cone should be bolted to the plate in the middle of the winder that looks like the stationary cone.
43. Before assembling the hardware, lubricate the bearing. Then, align the cone holes with the bolt holes.
44. Install and finger tighten one of the 3/8" by 3/4" red head bolts in the hole that is closer to the header. Lift the spring and shaft with your left hand and twist the spring until the hole aligns. Then, insert and finger tighten the other bolt. Then, gently tighten each bolt with a 7/16" socket or other type of wrench. Eighteen pounds of pull on each bolt should be enough to tighten this well.
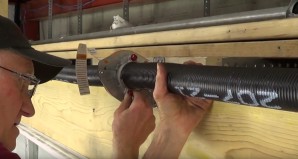
45. Looking on the right side of the winder, you will see only two bolt holes for the spring to attach to the winder: this is part of the mounting bracket. If you turn the wire so that it faces you, it will point downward. This will mean that you have mounted the springs correctly, with a left wind spring on the right side of the bracket.
46. Align the holes of the cone to the holes of the mounting plate. Slide the spring towards the bracket, lifting up on the spring to line the cone up correctly so that the bolt fits properly. Insert and finger tighten this top bolt.
47. Next, lift the spring, insert and finger tighten the bottom bolt until the cone is flush against the mounting plate. Tighten both bolts with a wrench as you did on the left side, with a 7/16" socket or other wrench.
48. Next, you need to stretch the springs and tighten the set screws before winding the springs. To do this properly, you'll want to calculate how far you need to stretch the springs. If you know your wire size and door height, refer to the chart in the picture next to this step. Otherwise, you will need to measure coils on one or both springs.
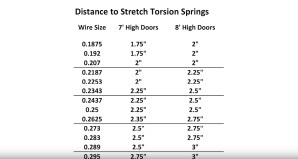
49. On a seven foot high door, the stretch is the wire size of the spring, multiplied by eight; then you add a quarter inch. On an eight foot high door, the stretch is wire size multiplied by nine, then add a quarter inch. There are a number of ways to measure your springs.

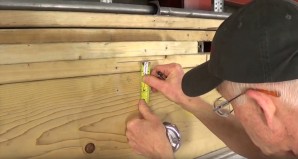
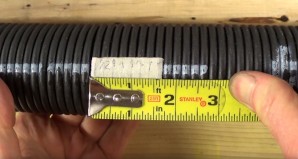
50. One way to measure is using masking tape. Cut between the coils on one end, and mark between the coils on the tape. On seven foot high doors, mark eight coils and on eight foot high doors mark nine coils. Mark and count from the left side of the first coil to the right side of the ninth coil. Cut the other end off, and you will have the width of eight or nine coils.
51. You can now measure the coils. You can also measure the eight or nine coils, depending on your door height. On this spring, we get a measurement of 1-11/16." Transfer the tape to the shaft just beyond the winding cone. Measuring will confirm this 1-11/16." From this eight or nine coil measurement, you will need to measure and mark an extra quarter inch. This will provide the 1-15/16" measurement necessary to stretch the spring properly. Once you have done this, move the tape to the left spring side. Measure the distance again and add another 1/4" off the end of the tape.
52. Since the springs used in our tutorial are a matched pair, they both need to be stretched the same distance. If they are different sizes, they should be stretched different distances.
53. There are many ways to stretch the springs: we will go over four. The first is to stretch the springs by hand; this can be done easily with smaller wire sizes, but when you go up in wire size this gets much more difficult. If you have trouble with the spring staying on the mark, finger tighten the set screws. Then, once you've gotten it to stay, tighten the set screws the one closest to the wall first, tightening it 1/2 to 3/4 turns after the tip of the set screw meets the shaft. Tighten the second set screw as you did the first.
54. Another way to stretch the springs is to insert a 1/2" rod, winding bar, or a long socket extension into the winding cone. Pull the bottom of the bar towards the center of the door. Tap the bar just under the winding cone with a winding bar, while pulling on the one this bar that is in the winding end of the spring. If you let go of this winding bar, the spring will loose its stretch, and you'll have to stretch the spring again. You can also tap the top of the bar with a hammer, while pulling the bottom of the bar towards the center of the door.
55. On larger springs with a wire size bigger than .225 wire, a fourth option is possible, using clamps or vice grips. You can vice grip the shaft a few inches from the cone, insert a 1/2" rod into the cone, and squeeze the top of the rod and cone towards the vice grip while pulling the bottom of the rod towards the center of the door. This may be a two step process that involves tightening one of the set screws to allow you to adjust the vice grip on the shaft. After you reach the mark, continue to pull the bottom of the bar towards the center of the door to maintain the stretch. Then, tighten the set screws. Another option for the .262 to .295 wire springs is to use a come along or cable winch to stretch the spring. Hook the end of the cable to the horizontal track angle, and insert a 1/2" rod into the winding cone. Next, pull on the bar with the cable winch while pulling on the bottom of the bar with your hand and keeping it plumb. A short socket extension will not work, because it causes the cone to pitch and bind on the shaft. Then, tighten the set screws.
56. Once you've stretched the spring on the right side of the door, move to the left side and complete the same procedure depending on what the wire size of the spring is. Tighten the set screws.
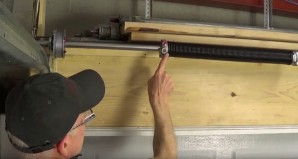
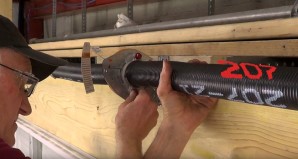
57. Now that you've stretched the spring, it's time to wind them. Before you do, however, you will want to vice grip the track on one side above the middle roller to avoid an accident or injury.
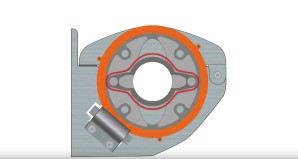
58. Next, mark the stationary cone and the orange rim so that you can count the number of turns you wind the springs.
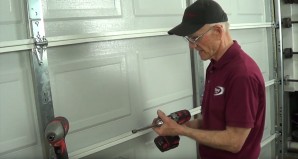
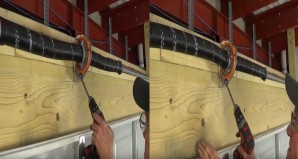
59. To wind the springs, use a 7/16" nut driver or socket in a drill, NOT an impact wrench. Set the drill on low speed and set it to slip if there is too much torque. This will also protect your wrists from possible injury. Also, set the drill to wind counterclockwise to wind the springs.
60. Wind the spring by turning the 7/16" bolt head at the bottom of the winder. Count the number of turns as you wind the spring, one for each time the mark on the stationary cone passes the mark on the orange rim of the winder. The stationary cones will turn downwards if you have your drill set going the right direction. If they turn upwards, you have your drill set the wrong direction. You're turning the cones as if you were trying to take them off the springs, which is counterintuitive. If the cones do come off after about six turns of rotation, you either have the springs on the wrong sides of the winder or you're winding the wrong direction.
61. If the door begins to pull up before you've counted the proper number of turns, you may have miscounted the number of turns or the springs may be too strong. The vice grips on the track should prevent the door from rising more than three inches. A second safety is the vice grip attached to the shaft: this one limits the lift to around eight inches. If the spring binds, you may not have enough stretch on the spring. The middle of the spring will rise, and the coils will be very tight. If you see this happening, exercise caution, because winding the spring furture could destroy the winder.
62. After winding the springs, the coils should be flexible and loose, and not tight. If the springs snake when you finish winding them, they may have too much stretch.
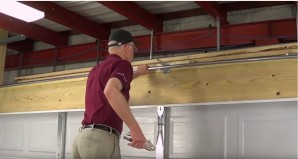
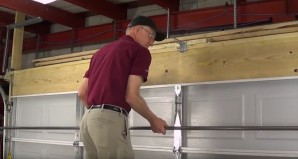
63. After winding the springs, check to see if the door balances. First, check the door and remove any tools or parts you may have set on it while you we working, as they could fall and hit you when you're bringing the door up and down. Check to see if the door stays on the floor without holding it down by hand. If it does, remove the vice grip that is secured to the track on the right side of the door. Then, remove the vice grip on the left side of the shaft.
64. The door should stay on the floor when closed. If you open it halfway, it should stay without you having to hold it. When you open the door all the way, it should stay without you holding it open. Then, check to see if the door seals evenly across the floor.
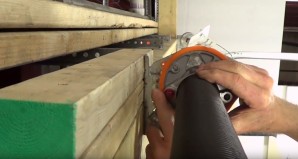
65. The last step is to secure the winding mechanism. On the right side of the winder near the bottom, notice the locking slot just to the left of the red head bolt. On the left side of the winder there are four 3/8" threaded locking points. You need to identify the locking point on the left side that is closest to the locking slot on the right side. Using a 7/16" socket wrench, turn the winder to line up the locking point to the locking slot. Insert and finger tighten the locking bolt. Secure the bolt with the same 7/16" wrench you used before.

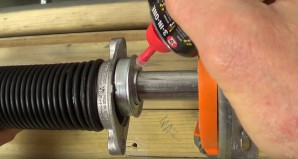
66. To prevent corrosion and possible premature breakage, lubricate each spring. The more viscus the oil, the longer it will last. 40W motor oil is best, but 10W40 will work. Squirt the oil over top of the spring, and rub it into the coils. Do not oil the last inch of the spring on either side by the winding and stationary cones, as this may cause the cones to slip off of the spring. Congratulations! You have just installed your torsion springs with an S3 winder.