How to Replace Garage Door Torsion Springs


If replacing garage door springs seems too risky for you, take a look at our ATL S-3 Winders. Now you can wind your springs with a drill instead of winding bars.
Table of Contents
- Introduction
- Getting Started: Safety First!
- Gather Tools
- Measure Old & New Springs
- Mark Torsion Shaft
- Unwind Old Springs
- Loosen Torsion Hardware
- Replace Springs
- Reinstall Torsion Hardware
- Wind New Springs
- Check & Lube Garage Door
- Reconnect Opener
1. Introduction
How To Replace Garage Door Torsion Springs
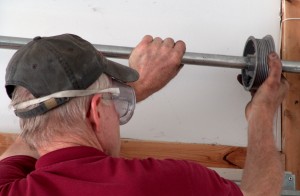
The following instructions for replacing garage door springs are for do-it-yourself homeowners and for maintenance repair men who service their smaller commercial or industrial sectional overhead doors. These directions are designed for torsion springs mounted to both sides of an anchor bracket above the middle of the garage door as pictured above. Instructions for replacing a single torsion spring, for replacing garage door extension springs, and for replacing Wayne Dalton Torquemaster springs are linked to our DIY Instructions page above. You'll also find a link for any other garage door parts you may need while repairing your door.
How much should a garage door spring replacement cost? The national average is between $200 and $300 for a professional to come to your house and replace two springs. On line sources suggest a higher price of over $700 and that you will save $500 or more by replacing springs yourself. This is simply not true. To find the cost for replacing springs in your area look for a reputable company through Yelp or the Better Business Bureau. If clicking a site's BBB logo doesn't take you to the BBB site, we advise purchasing your springs from a different company.
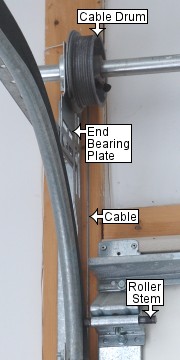
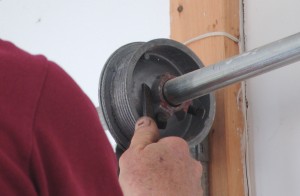
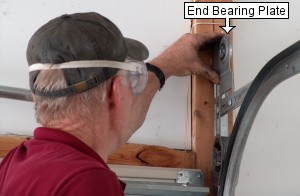
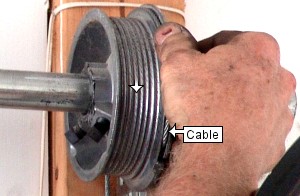
These instructions are for doors with cable drums and cables that look similar to those in the picture below. The next part beyond the end of the spring assembly is the cable drum. The drum is cast aluminum alloy 4" in diameter and 12.6" in circumference around the flat portion. Just beyond the cable drum is the end bearing plate. The cable unwraps off the back of the drum between the drum and the garage wall or jamb and travels down alongside the door, inside the track brackets and behind the roller stems as shown.
If your garage spring assembly is different from this, parts of these instructions may be helpful, but other parts may give dangerous, inaccurate directions which could cost you a lot of time and money should you attempt to replace the springs using standard instructions.
For example, low headroom garage doors often have cable drums on the outside of the end plate and the torsion springs usually wind down rather than up. They normally have left wind springs mounted on the left side of the spring anchor bracket and right wind springs mounted on the right side of the bracket. The first part on the shaft beyond each torsion spring is the end bearing plate. Just beyond the end bearing plate is the cable drum. On these the cable often runs on the front of the cable drum. The bottom of the cable is attached to a bracket that wraps around the front of and outside the vertical track.
Another example is the Ideal or Clopay EZ-Set Torsion Spring System for garage doors. These are distributed at Home Depot and Menards home centers. While the manufacturer has made great strides in developing a safe design for do-it-yourselfers to install their torsion springs, replacing these parts can be very difficult.
On our EZ-Set Torsion Springs page you will find several options for replacing these springs. We also have step by step instructions for EZ-Set Torsion Spring Replacement. In addition, one of our customers has provided excellent EZ-Set Torsion System instructions for removing the spring without wrecking the winding unit that secures the stationary cone. Instead of a spanner tool, you may prefer to use a pipe wrench or large channel locks to hook the end of the spring and remove it from the cones in the last step.
Pictured above is an EZ Set system with oil tempered springs. Many of the newer doors have galvanized garage door springs.
Older Crawford torsion springs are different and the counterbalance hardware is unique. A special Crawford Torsion Spring Conversion page has been provided to use in conjunction with this page.
If one of your door springs just broke and you are looking for instructions to decide if you can change the spring or springs safely and correctly, this page should help. DO NOT OPEN AND CLOSE YOUR GARAGE DOOR. Wooden garage doors are heavy and will probably damage or ruin the opener. The tops of steel doors often bend when operated with broken springs.
For a scholarly introduction to torsion springs and for more information on how to install them I recommend you visit Richard Kinch's page, "How I Replaced Deadly Garage Door Torsion Springs and Lived to Tell the Tale." Richard is a brilliant engineer who has provided a wealth of technical information on fixing torsion springs along with valuable advice regarding some of the schemes unscrupulous garage door companies use to rip people off.
If you have decided to replace your springs, if you are sure your door had the correct springs, and if you are ready to buy new ones, we recommend that you measure your spring or springs following the instructions in Step 4 below. Measuring springs can be difficult; most individuals, even garage door technicians, sometimes have difficulty measuring torsion springs. Ordering incorrect springs wastes time and money.
If you are not sure if your door had the correct springs, we recommend that you weigh your door using an analog scale. From my own field experience I would estimate that at least 10% of the doors have the incorrect springs on them. In addition to this, most manufacturers spring their doors using a 20 pound window. We like to improve the garage door balance.
A third option is to determine the door size and model number.
After you gather the necessary information you can order garage door springs.
2. Getting Started: Safety First!
Before getting started on the replacement, it is essential that we begin these instructions with our sternest warning:
CAUTION! Replacing garage door torsion springs is dangerous because the springs are under tension. If you do not use the right tools and follow safe procedures, you could lose hands, limbs or even your life. You could also damage property. We want your business, but not at the expense of your well being. Doing the job right is your responsibility. If you have any doubts about your ability to safely change your springs, we recommend you hire a professional to repair your garage door. Safety First! Then work.
The following procedures are based on my 30 years in the garage door industry. In spite of my high mechanical aptitude, even after 18 years in the trade I lost the end of my left index finger. A few years later I had five stitches in my right thumb, and a year later five stitches in my left thumb. In 2004 emergency room staffs dug steel out of my eye and sewed up my ring finger with eight stitches. The best I can do is help you minimize the risk of injury; that's all I can do for myself. I am not so naive as to think that I have made my last trip to the emergency room. Repairing garage doors, particularly replacing torsion springs, is dangerous work, whether you are a do-it-yourself homeowner or an experienced technician.
It is impossible to cover every dangerous situation you may encounter. The directions below hopefully will help guide you in safely replacing your springs, but there are no guarantees. Pay special attention to the warnings that appear in red.
ATTENTION! Due to dangerous steps below that can result in bodily injury, we recommend that you carefully study all the instructions below before beginning your work.
| 2.1 Two important assumptions will help you execute this replacement safely. First, assume that the springs are going to break as you unwind or wind them. To avoid injury, clutch the bars firmly on the ends furthest away from the cones and stand securely on a sturdy ladder, not on chairs or cans turned upside down. Keep clothes and body parts away from the springs. Wear safety glasses. | 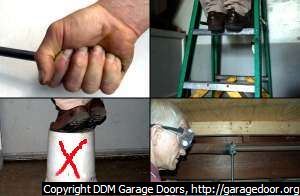 |
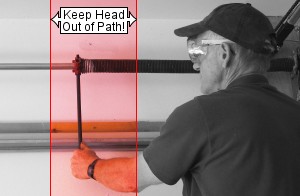 |
2.2 Second, assume that the cone will slip or explode as you unwind and wind the spring. Keep your head out of the path of the winding cone. Keep your hands away from the cones so that if and when the winding bar slips out of the cone and your hand jerks up, the cone doesn't rip your flesh or wrap your clothes and body parts into the spring. |
| 2.3 Beware of older winding cones. These older Crawford and McKee torsion spring cones were made for 5/8" bars. Sometimes, however, the holes are too small for 5/8" bars. Whatever you do, don't use a 1/2" bar; instead, grind down a 5/8" bar to fit. I recently had a McKee spring let loose after winding because I used a 1/2" bar when my 5/8" bar wouldn't fit. Just before it let loose I was telling myself, "This is not safe." And it wasn't. The only safe way to replace these older springs is to make a winding bar for each hole of each cone. | 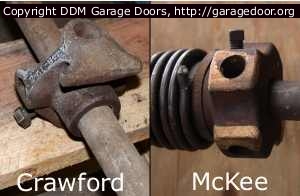 |
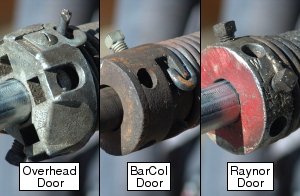 |
2.4 The same is true of Older Overhead, BarCol and Raynor torsion springs that have winding cones with inconsistent hole sizes. If you insert a 1/2" X 18" bar in some of these holes you can move the opposite end of the bar over four inches. Bars in newer cones move less than 1 1/2". I've had many of the older cones spin loose from my bars, the last one generating an $1800 emergency room bill. If your cones are like any of these, or if they have more than 2" of play, leave the job of installing torsion springs to a professional garage door mechanic. |
| 2.5 With the door closed, unplug the power cord to the garage door opener. Some older openers are hardwired and you will need to remove a fuse or flip the circuit breaker. | 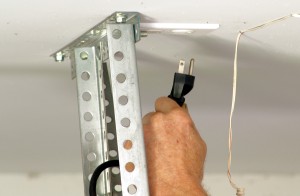 |
 |
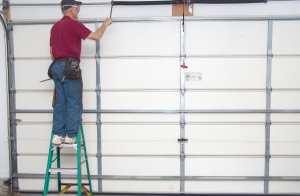
2.6 Disengage the opener from the door. Some garage door openers have a neutral position for the trolley disconnect. On older openers you may need to remove the L-shaped drawbar arm. We do not recommend replacing torsion springs with the garage door open. Opening a door, and failure to keep it securely open, can damage the door or cause serious injury. Stretching the springs the width of eight or nine coils is difficult, and leveling the garage door can also be challenging. |
3. Gather Tools
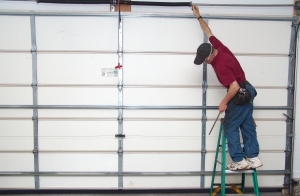
| Gather the supplies and tools needed for changing the springs safely. In addition to the torsion springs you'll need a minimum of one or two 10" vise grips, an adjustable wrench, and two 1/2" X 18" winding bars. Most hardware stores sell 1/2" X 36" steel rods that can be cut in half. You'll also need a firm ladder and a rag for cleaning your hands. A ruler and a file may also be necessary; a socket wrench and sockets would shorten the time required. Finally, make sure your garage is lighted well. | 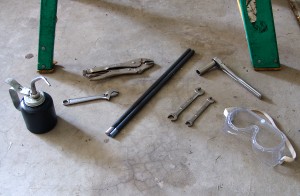 |
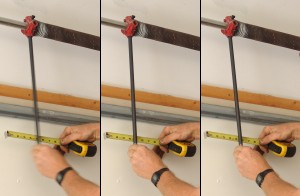
4. Measure Old & New Springs
How To Measure Your Garage Door Torsion Springs Video
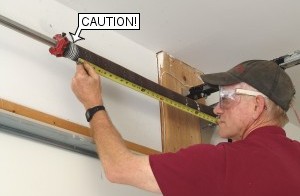 |
4.1 Measure your old and your new springs to make sure you have the correct springs. Don't touch the winding cones on the ends of the springs; don't grasp the springs. Keep the ruler and your fingers on the outside of the springs and away from the winding cone. I've seen torsion springs spin just from touching them. |
| 4.2 Lay the new springs on the garage floor or work bench and measure the lengths, inside diameters, and 20 coils to determine the wire sizes. Check the wind on both springs. Go to our How to Measure Torsion Springs page for additional help. | 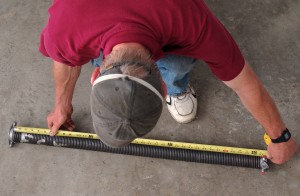 |
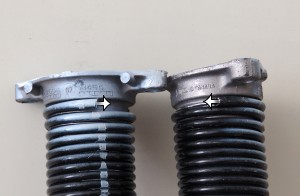 |
4.3 Stand up your new springs against the inside of the garage door as pictured here. Take a close look at the ends of the springs. Position and turn them so the ends on top are facing you and pointing to each other as pictured here. |
| 4.4 Take the spring on the left and place it at the left end of the door as pictured here. Notice that the end of the wire points to the right toward the center of the door. This is a right wind torsion spring. It will go above the garage door on the left side of the spring anchor bracket. The winding cone at the other end of this spring is usually painted red. | 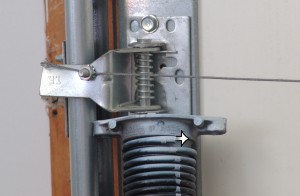 |
 |
4.5 Take the other spring and place it at the right end of the door. Notice that the end of the wire points to the left toward the center of the garage door. This is a left wind spring. It will go above the door on the right side of the spring anchor bracket. The winding cone at the other end of this spring is usually painted black. |
5. Mark Torsion Shaft
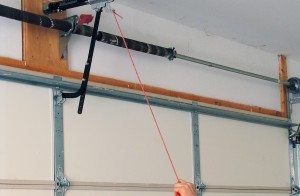
| 5.1 With the cables still tight on the drums, mark the drums and torsion shaft at each end with a file or a marking pen. If at least one of the springs is still wound, don't touch the cable drums and don't grab the shaft. If the cable breaks, the drum could spin and the cable rip through muscle and bone. If the set screws aren't tight enough, the shaft could spin and cause injury. |  |
 |
5.2 If both springs are broken and/or unwound, and if the cables have come off both drums, wrap the cables around each drum and then make the marks. You will need these markings to level the garage door after the new springs are installed. |
6. Unwind Old Springs
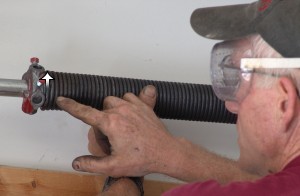
| 6.1 It is time now to unwind the old spring that is not broken. A few warnings are in order. NEVER, NEVER, NEVER touch a set screw without first inserting a properly fitting bar into the winding cone! Also, do not use box or socket wrenches for the set screws. If the cone slips, the wrench could break your hand in 10 spots before unwinding completely. It's my guess that this is the number one cause of trips to the emergency room for inexperienced homeowners fixing or replacing their springs. | 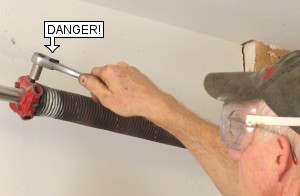 |
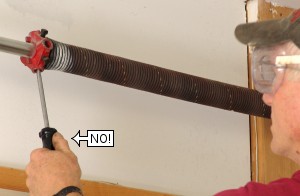 |
6.2 The second cause of trips to the emergency room is probably the use of screw drivers. NEVER, NEVER, NEVER wind or unwind torsion springs with screwdrivers. |
| 6.3 To safely replace torsion springs, use winding bars that are at least 18" long and which properly fit the winding cone. The edges should be sharp, cut at 90 degrees, not rounded. Rods 36" by 1/2" can be purchased at any Lowes or any hardware store and cut in half to use for unwinding the springs. | 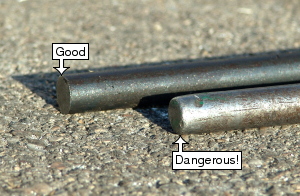 |
 |
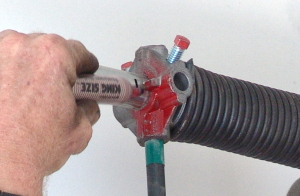
6.4 Test the fit of the bar in the cone before loosening a set screw. Insert one end of your winding bar into one of the holes of the winding cone. Pull down on the bar slightly to make sure the set screws are tight. Position your ruler between the bar and the garage door. Move the bottom of the bar from side to side and measure the play. It should be less than an inch and a half. If it is over 2" either get someone else to change your springs or have someone make some bars that will properly fit the cones. |
| 6.5 A typical problem with DIYers replacing their torsion springs is that the winding bars often are not inserted completely into the winding cones. We recommend that you mark your winding bars with tape. First, insert the bar into the winding cone and tape the bar as pictured. | 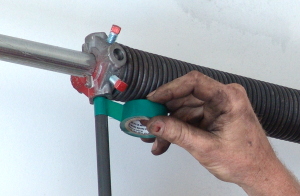 |
 |
6.6 Taping the ends of both winding bars as pictured will let you clearly see just how far your bars are penetrating the holes in the winding cones as you unwind the old springs and rewind the new ones. |
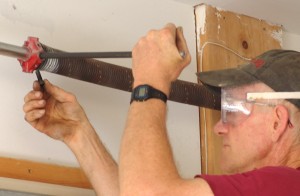
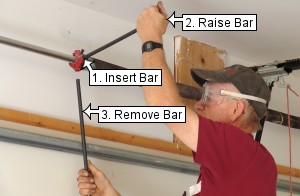
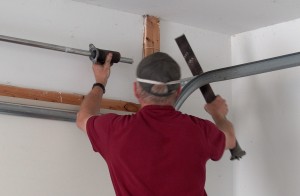
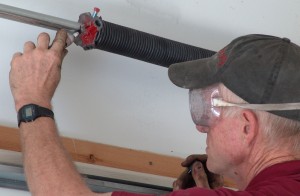
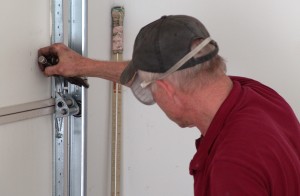
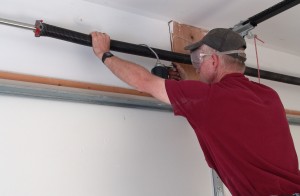
| 6.7 It's now time to unwind the spring. Firmly position yourself on a steady ladder beside the garage door. Next, insert the bar into one of the holes of the winding cone. Make sure it goes all the way in. It should click when your bar hits the core. If you want to test the force you will be handling before loosening the set screws, push up on the bar one quarter turn and bring it back down. Next, while grasping the other end of the bar firmly, loosen the set screws with an open-end wrench or small adjustable wrench loose enough to come free should the cone spin. Be prepared for the torque to be transferred to the bar. | 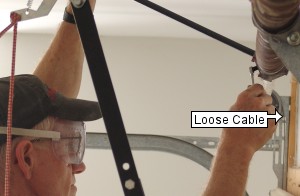 |
 |
6.8 Properly tightened screws will loosen with less than a turn. Once you loosen a set screw, keep at least one bar in the cone AT ALL TIMES until the spring is fully unwound. Many cones have been over-tightened. The spring may unwind 1/4 turn and not unwind any more until one of the set screws is loosened some more. You may need to completely remove the set screws. The shaft may be distorted and the cone still may not unwind at all. |
| 6.9 KEEP A BAR IN THE CONE AT ALL TIMES! If you have removed the set screws and the spring still will not unwind, pull down on the bar, but be prepared for the cone to loosen at any moment. | 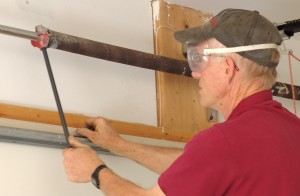 |
 |
6.10 If the garage door comes off the floor when you pull down on the bar, and if the cone still won't loosen, tap the bar next to the cone with a hammer to force the cone beyond the swollen portion of shaft. Maintain a firm grip on the bar; keep it firmly inserted completely into the cone; and be prepared at all times for the cone to slip, break, explode or break free from the shaft and yank the bar down. |
| 6.11 When the cone is free from the shaft, lower the bar and let it rest upon the top of the garage door. | 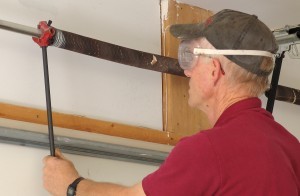 |
 |
6.12 Insert a second bar into the next hole. With one bar in each hand, raise the end of the second bar enough to pull the first bar out of the cone. |
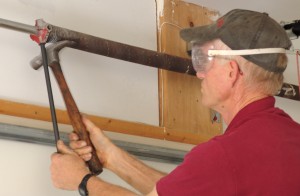
| 6.13 Lower the second bar to the top of the garage door as you did the first bar. If your shaft is distorted inside the cone, you may need to tap the bar with a hammer as you unwind the spring. Maintain a firm grip on the bar; keep it firmly inserted completely into the cone; and be prepared at all times for the cone to slip, break, explode or snap loose from the shaft and jolt the bar down. | 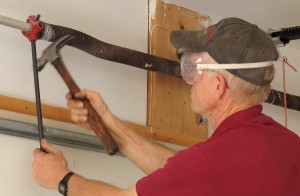 |
 |
6.14 Repeat these two steps until the spring is completely unwound. |
| 6.15 Unwind other spring if it is still wound and is not broken | 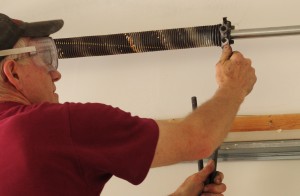 |
7. Loosen Torsion Hardware
 |
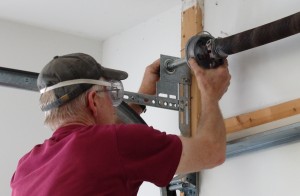
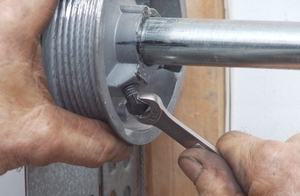
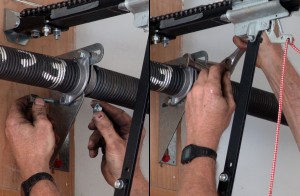
7.1 Loosen and remove the two bolts that secure the center stationary torsion cones to the spring bracket. It is much easier to turn the bolt heads than to turn flanged nuts. |
| 7.2 If the spring bracket is slotted, vise grip the bracket to secure the shaft in the bracket. This will keep the shaft from possibly falling out and causing injury or damaging the garage door or shaft. You can also secure the shaft with a cable tie. Remove the bushing from the cone and leave it on the shaft next to the center spring bracket. Often the bushing gets stuck in the cone and customers will call us about getting a new bushing until they discover it is still in the cone of the spring replaced earlier. | 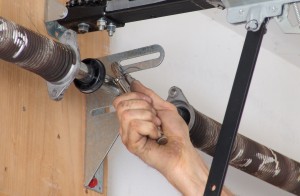 |
 |
7.3 Slide both torsion springs out above the top of the garage door toward the cable drums. Notice that there is only one bushing or bearing between the cones. Sometimes a single bearing is pressed into the bracket; other brackets have a single bearing or bushing that fits in either cone. Do not try to install a bushing or bearing in both of the stationary cones. You will risk breaking a cone. The purpose of the bushing is to keep the shaft from wearing against the spring anchor bracket. Only one bushing is needed to accomplish this. |
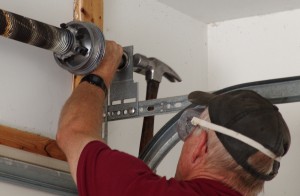
| 7.4 Check to make sure the torsion hardware is secure. If needed tighten the lag screws that attach the spring anchor bracket to the header. If loose, replace with longer or thicker lags. Brackets for doublewide wood doors should have two lags on the bottom, because when the springs are wound the spring torque pulls the bracket from the bottom. Never touch these when the springs are wound. One of my customers removed the screws when the springs were wound. He broke his arm in 14 places and almost died. He spent a month in the hospital. | 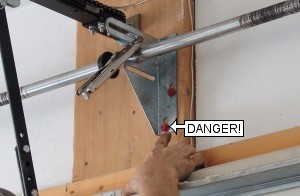 |
 |
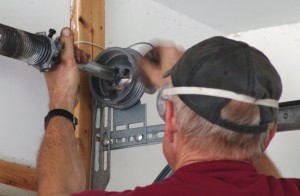
7.5 Slide both springs out toward the cable drums. This is often the hardest part of the job. You may need to file away swollen shaft, set screw burs, drywall or paint. If the shaft is distorted because the garage door installer overtightened the set screws, file the shaft, insert a bar into the cone and tap the bar with a hammer until the cone passes over the enlarged portion of shaft. |
| 7.6 Loosen the set screws on the cable drum above the left end of the garage door until the drum turns freely. Remove the cable from the left drum. | 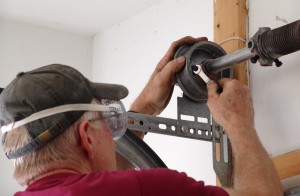 |
 |
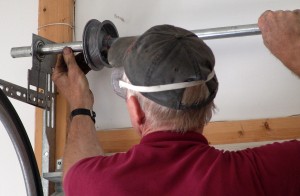
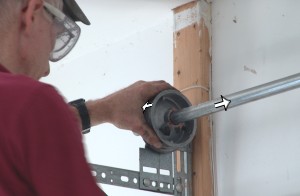
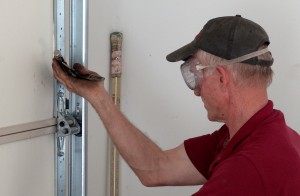
7.7 Slide the drum away from the bearing plate and examine the shaft and bearing. |
| 7.8 If the bearing has worn ridges into the shaft or if the set screws have left raised metal, file the shaft. Corrugations in the shaft indicate worn or dry bearings. You will inspect them later. | 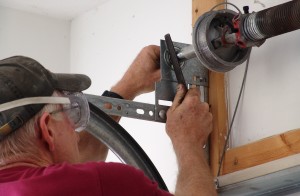 |
 |
7.9 Go to the right side of the garage door and loosen the set screws on the other drum. |
8. Replace Springs
| 8.1 It is now time to replace the garage door springs. To begin, slide the drum away from the bearing plate. | 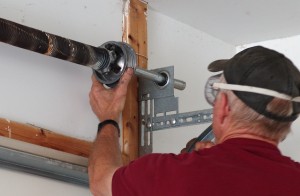 |
 |
8.2 File this end of the shaft as needed. Slide the shaft to the left. If it doesn't move, try sliding it to the right. If needed tap the outside of the headplate with a hammer while pulling the shaft to the right until the shaft slides through the bearing. |
| 8.3 Go the other side of the garage door and pull the shaft out of the headplate if it has not already slid out. | 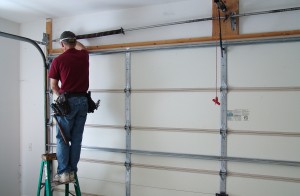 |
 |
8.4 File the shaft more if needed. The cable drum and spring will not slide off if the shaft is rough. |
| 8.5 Inspect the bearing. Lube it with motor oil, spray lithium, or spray lubriplate grease. Do not use WD-40. If the shaft is worn and the bearing is seized and you can't free it, replace the bearing. Or, if you have bearings labeled "ADH" we recommend replacing them. I find very few other bearings that need to be replaced. However, if you do need to replace the bearing and you do not have a new one, you can replace it at a later date. You'll find a quick way to do this at our End Bearing Plate Replacement instruction page. | 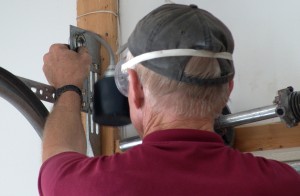 |
 |
8.6 Remove the left cable drum. |
| 8.7 Slide off the old spring. If you are thinking of reusing your cones, read our Torsion Spring Cone Replacement tutorial. | 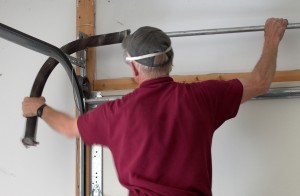 |
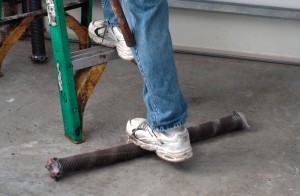 |
8.8 Place the old springs in a garbage can and away from your work area in your garage. My worst ladder accident occurred when I stepped off my two-foot ladder onto a spring and sprained my ankle. |
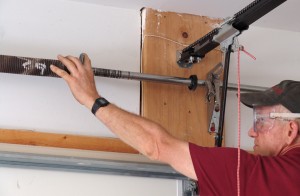
| 8.9 Slide on the new spring. The cone with the bigger hole is the stationary end. It goes on first. You will have to slide the winding cone end over the end of the shaft. | 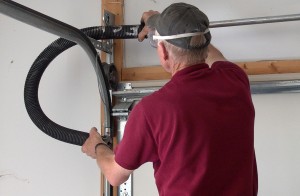 |
 |
8.10 Double-check to make sure you have the correct wind on your new torsion spring. On the left side next to the winding cone the end of the spring wire should be pointing up if it is facing you. Notice, also, that the cone is red which usually designates right wind. Customers frequently call and explain that when they get about six turns on the springs they spin on the cones. This is due to installing the springs on the wrong sides of the center bracket. |
| 8.11 Slide the spring to the spring anchor bracket centered above the garage door. We are often asked why most brackets are mounted six to twelve inches off-center. I do it, and most garage door installers do it as a general installation rule to allow flexibility in opener installation. | 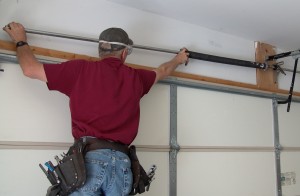 |
 |
8.12 Reinstall the cable drum and slide the shaft into the bearing. |
| 8.13 Follow the same procedure for the other side. Pull the end of the shaft through the bearing and remove the drum. | 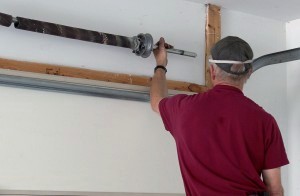 |
 |
8.14 Slide the old spring off the shaft. |
| 8.15 Slide the new spring on the shaft. | 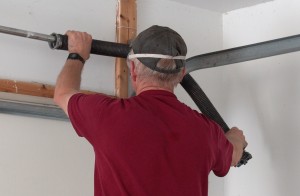 |
 |
8.16 Check to make sure the end of the torsion spring points up when the end is facing you. This is a left wind spring, normally painted black, above the right side of the garage door and mounted to the right side of the spring anchor bracket. |
| 8.17 Slide the spring to the center bracket above the garage door. | 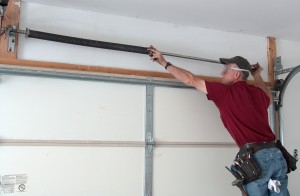 |
 |
8.18 Check to make sure the end bearing plate is not leaning. Sometimes the angle supporting the bearing plate fatigues, causing the bearing to lean. Straighten if needed. On single-spring garage doors an end bearing plate that leans should be braced with angle or lumber. |
| 8.19 Inspect the bearing and lube or replace as needed. | 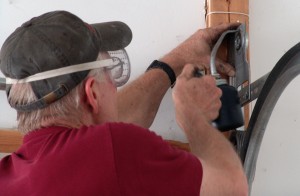 |
9. Reinstall Torsion Hardware
 |
9.1 Slide the drum on the shaft. Slide the shaft into the bearing. Line up the marks made earlier. |
| 9.2 Finger-tighten the set screws into their original indentations. Rotate the drum as needed to find the slots. | 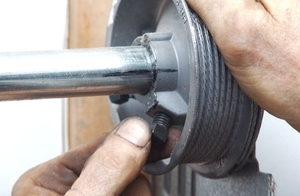 |
 |
9.3 Try to turn the drum on the shaft. It should not turn if you have finger-tightened the set screws properly into the original grooves. If you did not mark your drums and you can't find the original indentations in the shaft, finger-tighten the set screws until the screws meet the shaft. |
| 9.4 Slide the end of the shaft into the end bearing plate. Tighten the set screws an additional 1/4 to 1/2 turns beyond the point you finger-tightened them. Add an additional 1/4 turn if you could not find the original set screw indentations in the previous step. Heavier wooden garage doors may require an additional 1/4 turn. Caution: Under-tightening the drums could cause the drum to slip and the door to cock or fall. Over-tightening the set screws could damage the shaft or drum, resulting in the same problems. This is a critical step. | 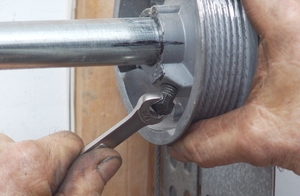 |
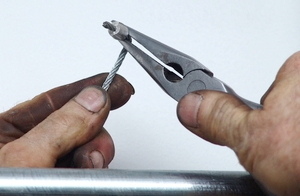 |
9.5 A frequent problem for do-it-yourselfers and inexperienced garage door repairmen is getting the end of the cable to properly seat in the slot of the cable drum. I usually bend the end of the cable 90 degrees with my needle nose pliers as shown. |
| 9.6 Bending the cable will help you avoid problems with the tip at the end of the cable catching on the end bearing plate and causing the cable to come off and the garage door to jam, cock, or fall. Check to make sure the cable is straight in the slot and not sticking out the side. Also the edge of the cable stop should not be pointing to the side as displayed. The cable tip should fit completely inside the drum, with the rounded part facing out so the tip can't scrape the end bearing plate. | 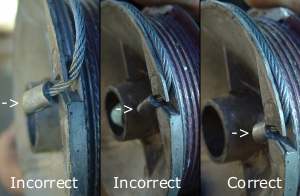 |
 |
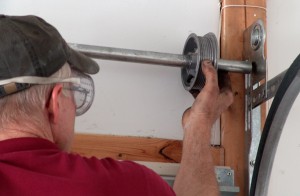
9.7 After inserting the cable in the drum, pull down on the drum to tighten the cable around the outer raised groove of the drum. |
| 9.8 Twist the garage door shaft to tighten the cable on the drum. While twisting, vise grip the shaft as shown to keep the cable tight on the drum. The top of the vise grip should be tight against the garage header. This will keep the cable snug on the first drum while you install the cable on the other drum and position it in place. It also keeps the shaft from turning and the cables peeling off when you wind the springs. That one grip can save many hours of walking back and forth and having to level and re-level the garage door after winding the torsion springs. | 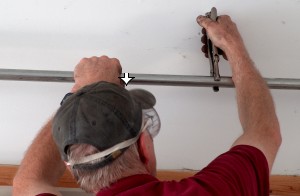 |
 |
9.9 Go to the other side of the garage door and insert the end of the cable into the drum. Rotate the drum until the cable is tight. Slide the drum against the bearing and push the shaft to the right. The marks should line up. If they don't, figure out why and correct the problem. It could be a stuck cable, the garage floor may have shifted, or the vertical angle that helps support the bearing plate may have loosened and shifted. Many garage doors have been installed with a gap between a drum and a bearing plate. The cable drums should always be flush against the race of the bearings. |
| 9.10 Finger-tighten the drum set screws until the drum will not turn. | 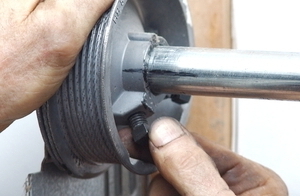 |
 |
9.11 Tighten the set screws an additional 1/4 to 1/2 turns as on the other side. |
| 9.12 It is now time to secure the torsion springs in the middle. For various reasons, many installers will offset the center bracket several inches from the center of the door. Offsetting the bracket makes it easier to work around the opener bracket without causing any problems in the operation of your garage door, but offsetting the bracket is not necessary. If you have a slotted center bracket, remove the vise grip and lube the shaft where it turns inside the bushing. Position the shaft so it is the same distance from the header as it is at each end. The shaft should be straight and parallel to the header. | 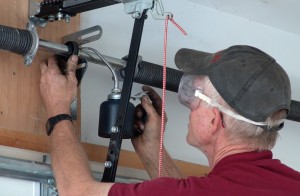 |
 |
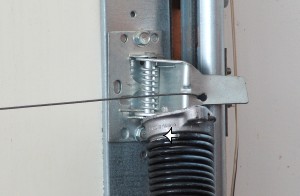
9.13 If you have a spring anchor bracket with a fixed steel bearing, check for wear at the point where the shaft and bearing race meet. The shaft needs to be free to slide sideways inside the bearing. File the shaft if needed. Lube the bearing. Notice that only one bearing is needed for two torsion springs. This bearing keeps the shaft from rubbing against the inside of the stationary cones and on the center bracket. Your garage door may not have a center bearing. If so grease the shaft where it will be rubbing the bracket and the insides of the cones. |
| 9.14 Slide the springs to the bracket. Double-check to make sure you have the right wound spring on the left side and the left wind spring on the right side. Turn the springs until the ends are facing you. The wire at the ends of both torsion springs here at the bracket should be pointing down. At the winding cones at the opposite ends, the spring wire points up. If not, reverse the springs. About once a month we get a phone call from a do-it-yourself customer who begins the conversation with, "I wound the garage door spring to about six turns and the spring came loose from the cone." We normally refer them back to this step and suggest they switch their springs. | 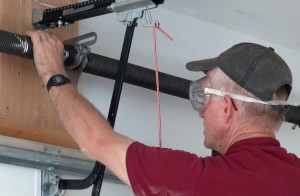 |
 |
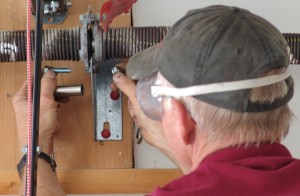
9.15 Install the bolts to secure the stationary center cones to the center bracket. Position the shaft here so it is the same distance from the header as the shaft is at each end. Finger-tighten the nuts until the stationary cones are flush against the center bearing plate. You will not be able to do this if your spring supplier provided a free bushing and you installed it in the stationary cone that didn't have one. You can not install a bushing each cone. You will also not be able to tighten the cones flush against the bracket if the race of the bearing is catching on the spring anchor bracket. Forcing the cones by tightening the bolts may break a cone, Winding torsion springs with cracked cones can cause the springs to spin loose and the bars to fly. When the cones are flush against the bracket, secure the bolts. |
| 9.16 There may be other times when you can't can't' get the stationary cones to finger-tighten against the center bracket. In these cases we recommend installing washers between the winding cone that houses the bearing and the spring bracket. This is a common problem with torsion springs on older Windsor garage doors because their steel bearings are often wider and they extend beyond the stationary cone. Raynor garage doors also have wider bearings that fit properly in their 2 1/4" stationary cones, but washers may need to be installed if their bearings are installed in 1 3/4" or 2" stationary cones, or if some of their older bearings are installed in their newer cones that are installed on older brackets. | 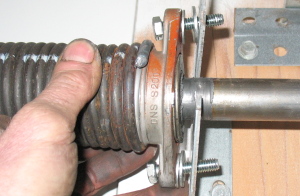 |
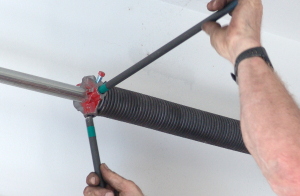
10. Wind New Springs
 |
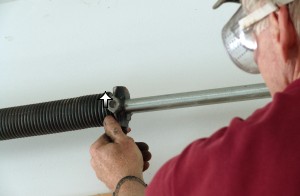
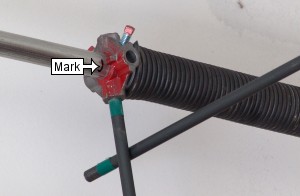
10.1 It is now time to wind the new springs, but before doing so, I recommend marking the shaft just beyond the winding cone. This is a final step taken to assure that you have installed the springs on the correct sides of the center bracket. Torsion springs always grow in length when they are wound in the proper direction. If your spring does not get longer as you wind it, you are winding it the wrong direction probably because it is improperly installed. We recurrently get calls about springs coming loose from the cones at about 6 turns. If this happens, switch the springs. |
| 10.2 Tape your winding bars if you have not done so already, not only to assure that you are inserting the bars completely into the cones as you wind the torsion springs, but more importantly to assure that the bar does not slip out of the cone when you stretch the springs at the end. This has happened to me several times. Professionals always stretch torsion springs after winding them because the shaft floats horizontally between the flexible end bearing plates as the door operates. Although this may be as little as 1/4", the binding of the coils as the garage door closes oftentimes keeps the door from closing completely, especially when the torsion springs and bearings are dry. | 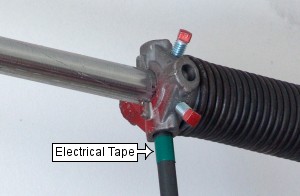 |
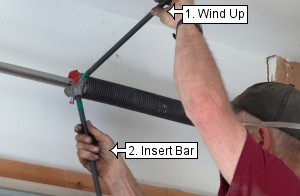 |
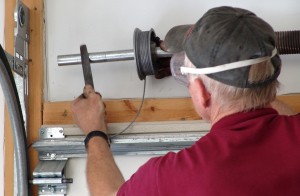
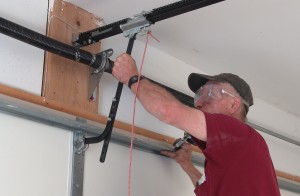
10.3 At this point you will wind the spring. Notice that the end of the spring on the winding cone points up when facing you. You will wind both springs up and counter intuitively as if you are trying to unscrew the winding cones from the ends of the springs. Begin by turning the spring up 1/4 turn until it meets resistance. This is your first quarter turn. Count "one." Next, insert the bar and raise it 90 degrees. Insert the second bar. This is "two." As you wind the spring it should grow in length the thickness of one coil for every turn. The cone should cover your mark after the first couple turns. Many garage door tradesmen mark the torsion springs with chalk or paint, but this often generates confusion. |
| 10.4 Raise the second bar 90 degrees and insert the first bar. This is "three." Continue winding. If the spring shortens in length, unwind the spring and switch sides - the springs are on backward. Otherwise, continue winding until you reach a count of "30." This is 7 1/2 turns, which is normal for most 7' doors. Longer life springs are wound the same number of turns. Newer steel doors with only one strut on top often need only 7 1/4 turns. On 8' doors count to 34. Each time you insert a bar into the winding cone, listen for the click to let you know the bar is in all the way. Not inserting the bar all the way could cause the cone to explode. | 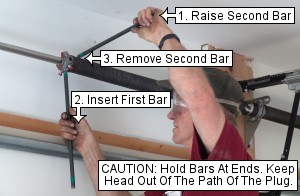 |
 |
10.5 If the spring comes loose from the cone at about 6 turns, you are probably winding the spring backward because the springs are on the wrong sides. Switch the springs. Otherwise, after winding the torsion springs, you will need to stretch the springs and secure the winding cone. First, mark the shaft 1/4" beyond the winding cone with tape or with a file. We stretch the springs because the shaft floats horizontally between the flexible end bearing plates as the garage door operates. Although this may be as little as 1/4" the binding of the coils as the door closes often keeps the door from closing completely, especially when the springs and bearings are dry and need lubrication. |
| 10.6 Here you will need to do three things at once. With your left hand, lift the bar just off the top of the door and pull it toward the center of the garage door. While lifting up and back, tap the top of the bar just under the winding cone with your other bar. Pulling the bar back toward the center of the door as you tap causes the spring cone to bind on the shaft and not slip back. | 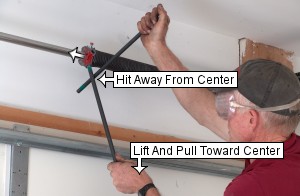 |
 |
10.7 Continue tapping until the cone moves out to the mark on the shaft. Continue holding the bar off the garage door and pulling back toward the center of the door. If the cone slips away from the mark, repeat this step. Keep an eye on the tape to make sure the bar doesn't slip out of the cone. If it does start to slip, rest the bar against the top of the garage door, insert a bar in the next hole and turn the cone up enough to make it possible for you to push the marked bar back into place. |
| 10.8 After the cone reaches the mark, continue pulling the bar off the garage door and back toward the middle of the door with your left hand. Tighten both set screws 1/2 to 3/4 turns each after each screw first meets the shaft. This is the point at which you will feel the screw meeting resistance. If the garage door spring snakes after tightening the set screws, repeat the process and stretch the spring half as much as before. Residential torsion springs are stretched 1/8" to 1/4". Larger commercial and industrial overhead garage door torsion springs are stretched as much as an inch. | 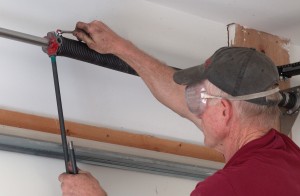 |
 |
10.9 Carefully test the set screws by pulling down on the bar. The winding cone should be tight enough so that when you pull down on the bar, the garage door should begin to lift. If the bar starts to slip when you pull it down, add 1/4 turn to each set screw. |
| 10.10 Remove the vise grip from the shaft. | 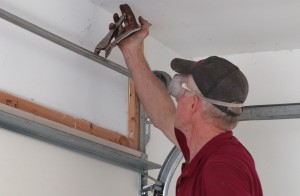 |
 |
10.11 Vise grip the vertical track about 3" above one of the rollers. If you have installed the wrong springs, or if you have over-wound the springs, this will prevent the garage door from flying up and knocking you off your ladder after winding the second torsion spring. This has happened to me on more than one occasion. |
| 10.12 Follow the same procedure for winding the second spring, stretching it 1/4", and securing the set screws. CAUTION: Before removing the bars from the cones after securing the winding cone, you must run an important test of the door. Many of the accidents that occur while fixing springs are due to installing springs that are too strong. | 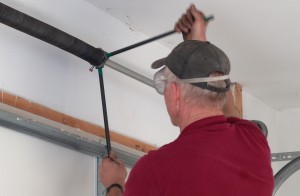 |
 |
10.13 Slowly pull down on the winding bar until the garage door rises 3" and the roller hits the vise grip on the track. The door will usually drop back down and raise the bar. If it doesn't, lift the end of the bar until the door closes. If the door comes up by itself when you hold the bar lightly, the springs are either over wound or they are too strong. You may need to remove 1/4 to 1/2 turns from the springs. If the door comes up on its own, you either have to many turns on the springs or you have the wrong springs. This can be very dangerous. We recommend getting professional help. Removing the winding bar could cause the garage door to knock you off the ladder. |
| 10.14 If the door stays on the floor when you raise the bar, remove the bar from the cone. | 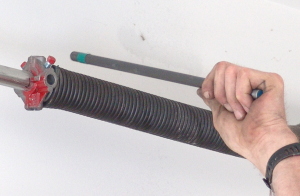 |
11. Check & Lube Garage Door
 |
11.1 Many torsion spring replacement accidents occur from springs that are too strong. If the garage door stays on the floor by itself, remove the vise grip from the track. If the door is off the floor and the roller is against the vise grip, close the door with one hand and remove the vise grip with the other. If the springs are too strong, you have to restrain it from flying into the open position. |
| 11.2a Raise the garage door slowly. Check the door balance. If you have the correct springs the door should stay down when closed, half way when opened half way, and open when opened. If the door will drop to the floor by itself from the halfway point, add 1/4 turn of tension to each of the torsion springs. If the garage door won't stay on the floor, and if it pulls itself up when stopped halfway, close the door and remove 1/4 turn of tension from the springs. | 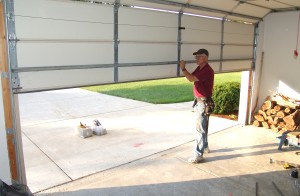 |
|
11.2b If the springs you installed are too strong, and if you wind the springs the correct number of turns, the door will not stay down nor half way. The garage door will be hard to close. DO NOT REMOVE MORE THAN HALF A TURN OF SPRING TENSION TO CORRECT THE PROBLEM. Here's why. If you remove 3/4 of a turn to get the door to stay closed, and then if you open the door, it will get heavier as you open the door, and once open, the cables will come off the drums. This could create as much as a day's extra work. It could also cause door damage and/or result in serious injury. Do not use the door! Get different springs! |
| 11.2c If the springs you installed are too weak, and you wind the springs the correct number of turns, the door will be heavy at the floor, and it will not stay open half way, but it will stay open if raised completely. If tension is added to the torsion springs to lighten the garage door and to get it stay open half way, the door will be harder to close; openers often damage the new steel garage doors when they are too hard to close. | |
 |
11.3. Oil the springs. The more viscous the oil the longer it will last. I normally use 40 wt. motor oil, but 10W40 will do if that is all you have. Squirt a stream of motor oil across the tops of the torsion springs and rub the oil into the coils. Do not oil the last inch of the springs that is wound around the cones. |
| 11.4 Check the garage door at the floor. It should seal all the way across. If it doesn't you may need to adjust the drum on the higher side to get the door to level. We have a separate tutorial to help in leveling your garage door. | 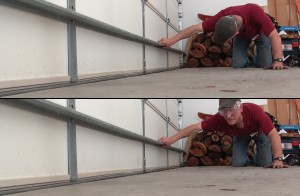 |
12. Reconnect Opener
 |
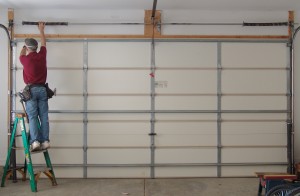
12.1 Re-engage the opener. |
| 12.2 Plug in the power cord. Adjust the opener force and travel as needed. | 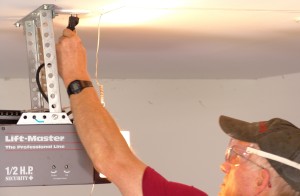 |

Greetings. I hope this tutorial has been helpful, either in helping you evaluate whether to replace your own torsion springs, or in helping you through the step by step process of actually replacing them.
These instructions were first posted in 2005, and they were updated in August of 2008. I have been frank about the hazards of garage door repairs and about my own accidents incurred while replacing torsion springs. For what it's worth, you might be surprised to know that I, too, have benefitted from producing these instructions. I have not had any garage door accidents since we first published these on the web in 2005. And, in as much as I have helped keep other DIY-ers out of the emergency room, I consider myself somewhat of a medical practitioner.
If you have found this tutorial helpful please feel free to link your blog, message board or other type of web page to this one. But please remember that these instructions are copyrighted. They are not to be copied, repackaged or redistributed; both text and images are protected by international copyright law.
Dan Musick, Owner
DDM Garage Doors, Inc.