Vertical Lift Garage Door Conversion
Table of Contents
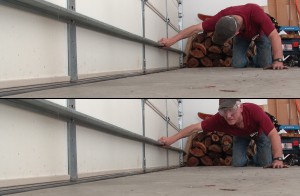
- Introduction to Vertical Lift Conversions
- Measurements and Calculations for Conversions to Vertical Lift
- Getting Started: Safety First!
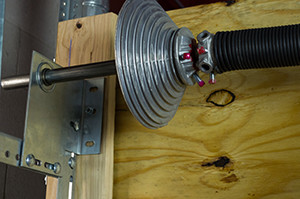
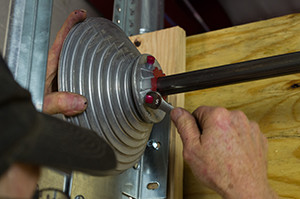
- Remove Your Torsion Hardware
- Install the Upper Vertical Track and Hardware
- Install Your Right Track and Bearing Plate
- Install the Torsion Spring and Cable
- Check & Lube Garage Door
1. Introduction to Vertical Lift Conversions
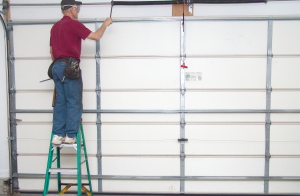
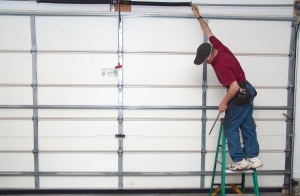
The following instructions for converting your garage door to a vertical lift system are written only for the confident mechanic. The task is more complex than installing a garage door from start to finish. The average "DIY-er" should not attempt this. These instructions should act more as a guide; they do not include all the necessary steps.
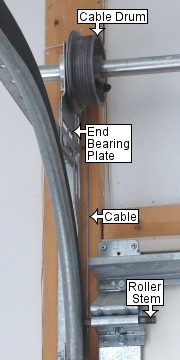
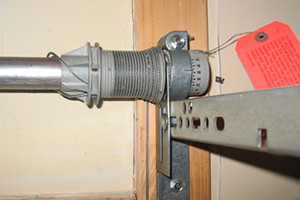
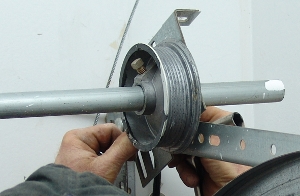
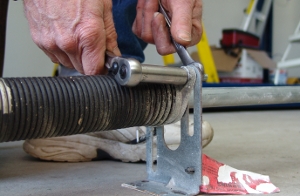
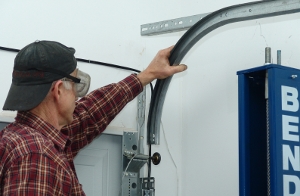
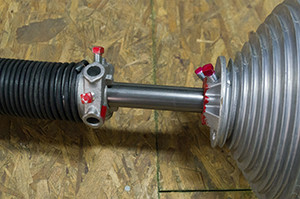
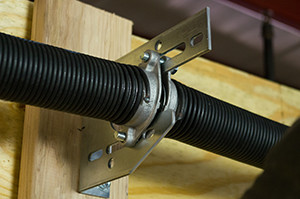
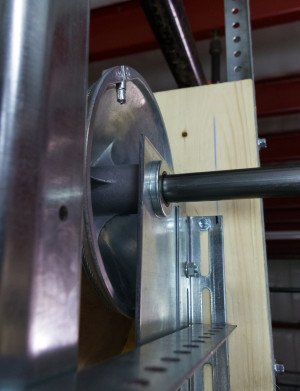
1.1. These instructions apply only to the standard type of residential garage door. The next part, beyond the end of the spring assembly, is the cable drum. The drum is cast aluminum alloy 4" in diameter and 13" in circumference around the flat portion. Just beyond the cable drum is the end bearing plate. The cable unwraps off the back of the drum between the drum and the wall and travels down beside the door, inside the track brackets, and behind the roller stems, as you will see below.
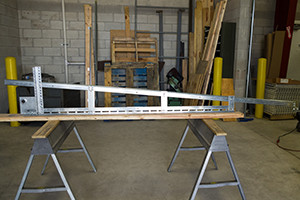
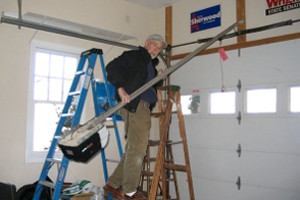
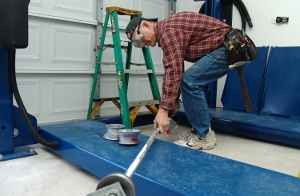
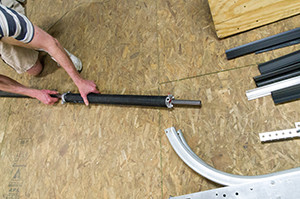
1.2. Assembly of the vertical lift tracks is best done on a bench. As you can see, the track extension is pitched on the left to prevent the door from binding on the header as the door opens and closes.
1.3. If you have a Clopay or Ideal EZ-Set torsion spring system, you may need an extra spring anchor bracket kit if you have a coupled shaft.
1.4. The third type of door system needing additional parts is the Wayne Dalton Torquemaster torsion spring assembly. Besides the parts above, you'll need a shaft.
2. Measurements and Calculations for Conversions to Vertical Lift
Before installing the upper vertical track and hardware, you must first assemble the vertical lift tracks. Click here for instructions on assembling the tracks.
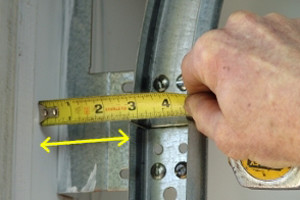
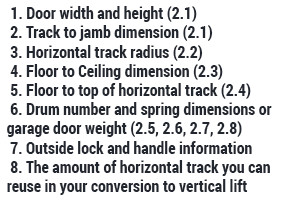
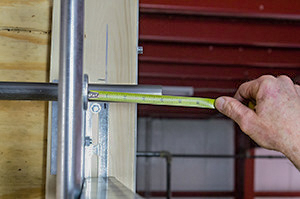
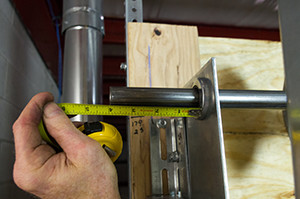
2.1. In order to fabricate a custom vertical track assembly and to determine the cable length and springs needed, you will need to provide us with the information in this and the following steps. Measure the width and height of your door. Measure the distance from the jamb to the back of the top of the vertical track. This is your track-to-jamb dimension. Note: Parts will be provided to replace the flag bracket with a new track bracket, but many customers reuse their existing flag bracket.
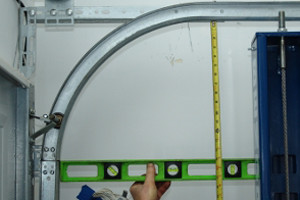
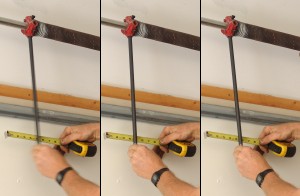
2.2. Measure the radius of the curved portion of the horizontal track. This can be done by placing a level at the junction of the horizontal and vertical track, holding it level, and measuring the distance between the bottom of the horizontal track and the level as shown. This is normally 12 or 15 inches.
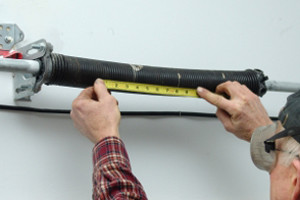
2.3. Measure your existing torsion springs. For more information on how to do this, go to our How to Measure Torsion Springs page. If you provide your spring dimensions, door height, and cable drum information, we will determine the weight of the door. This method will work only if you are certain of the dimensions and that the door worked fine with the existing spring or springs.
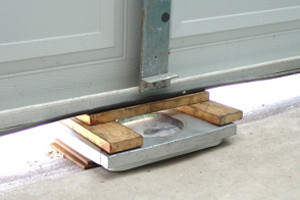
2.4. The second way to determine the weight of your garage door is to weigh it. Use an analog scale. Digital scales tend to be less accurate because they usually do not change the displayed weight after it makes the initial calculation. As pictured, you may need to place boards under the scale to have a level surface. It would be easier to do this with the spring unwound. See our How to Weigh a Garage Door instructions for more information.
2.5. Shake the garage door. Sometimes the door gets stuck on the track, and shaking the door will give you the proper weight. Read the weight of the garage door off of the scale. This helps us determine the springs that you need. Check also for outside handles or locks. If these are present, can they be removed? If they cannot be removed, additional parts and labor will be needed to provide clearance for the handles.
2.6. In summary, you need to supply us with the following information when you fill out the information for the Garage Door High Lift & Vertical Lift Inquiry or if you contact us for a price for a vertical lift conversion kit for your garage door:
3. Getting Started: Safety First!
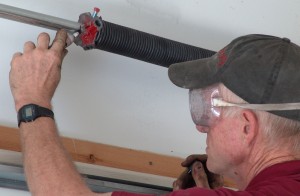
3.1. Two important assumptions will help you perform this work safely. First, assume that the spring is going to break as you unwind or wind it. To avoid injury, clutch the bars firmly on the ends furthest away from the cones and stand securely on a sturdy ladder, not on chairs or cans turned upside down. Keep clothes and body parts away from the spring. Wear safety glasses.
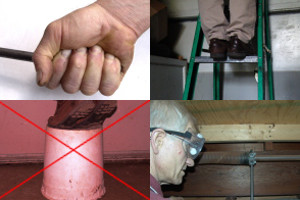
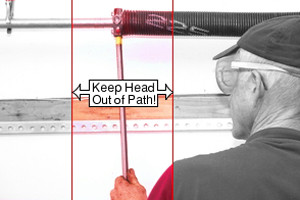
3.2. Second, assume that the cone is going to slip or explode as you unwind and wind the spring. Keep your head out of the path of the winding cone. Keep your hands away from the cones so that if and when the winding bar slips out of the cone and your hand jerks up, the cone doesn't rip your flesh or wrap your clothes and body parts into the spring.
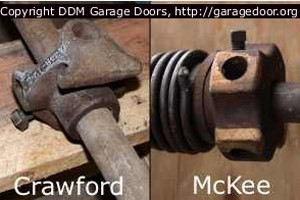
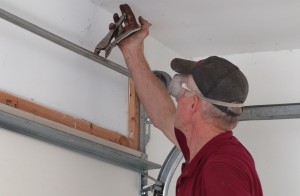
3.3. Beware of older winding plugs. These older Crawford and McKee spring cones were made for 5/8" bars. Do not try to unwind or wind one of these springs with 1/2" bars.
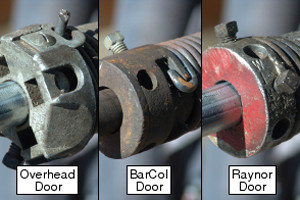
3.4. Older Overhead, BarCol, and Raynor winding cones often have inconsistent hole sizes. If you insert a 1/2" X 18" bar in some of these holes, you can move the opposite end of the bar over four inches. Bars in newer cones move less than 1 1/2". I've had many of the older cones spin loose from my bars, the last one generating an $1800 emergency room bill. If your cones are like any of these, or if they have more than 2" of play, leave the job of installing torsion springs to a professional.
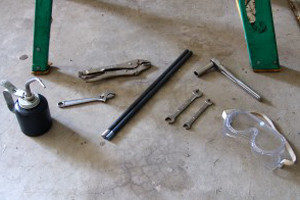
3.5. To begin, gather the tools you'll need. You'll need a minimum of one or two 10" vise grips, an adjustable wrench, and two 1/2" X 18" winding bars. Most hardware stores sell 1/2" X 36" steel rods that can be cut in half. You'll also need a firm ladder. A ruler and a file may also be needed, and a socket wrench and sockets would shorten the time required. You will also need a hacksaw, a drill, and an electric impact wrench, if available.
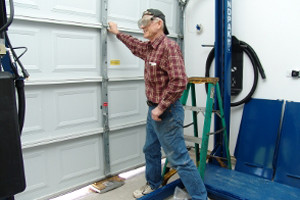
3.6. If you already had an operator on your garage door, dismount it and remove it from the garage door. If you have a drawbar opener on your garage door, remove it before converting your door to high lift hardware.
3.7. It is time now to unwind the old spring that is not broken. A few warnings are in order. NEVER, NEVER, NEVER touch a set screw without first inserting a properly fitting bar into the winding cone! Also, do not use box or socket wrenches for the set screws. If the cone slips, the wrench could break your hand in 10 spots before unwinding completely. It's my guess that this is the number one cause of trips to the emergency room for inexperienced homeowners fixing or replacing their springs.
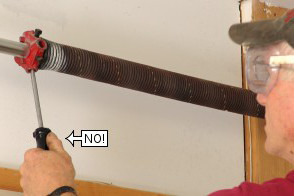
3.8. The second cause of trips to the emergency room is probably the use of screwdrivers. NEVER, NEVER, NEVER wind or unwind torsion springs with screwdrivers.
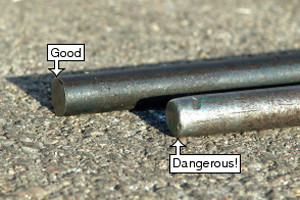
3.9. To safely replace torsion springs, use winding bars that are at least 18" long and which properly fit the winding cone. The edges should be sharp, cut at 90 degrees, not rounded. Rods 36" by 1/2" can be purchased at any Lowes or any hardware store and cut in half to use for unwinding the springs.
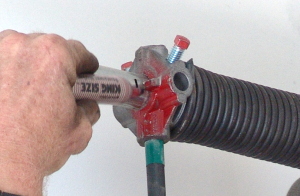
3.10. Test the fit of the bar in the cone before loosening a set screw. Insert one end of your winding bar into one of the holes of the winding cone. Pull down on the bar slightly to make sure the set screws are tight. Position your ruler between the bar and the garage door. Move the bottom of the bar from side to side and measure the play. It should be less than an inch and a half. If it is over 2" either get someone else to change your springs or have someone make some bars that will properly fit the cones.
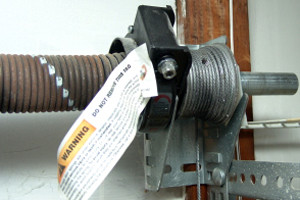
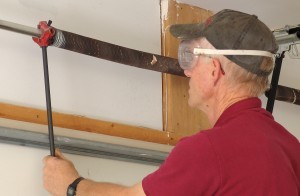
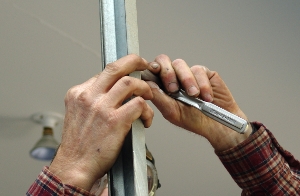
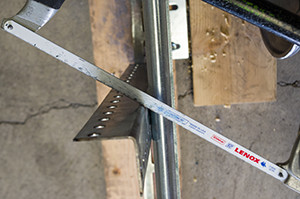
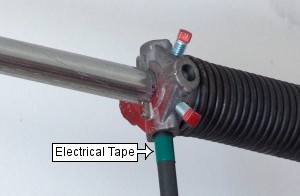
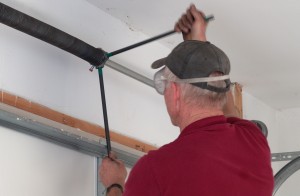
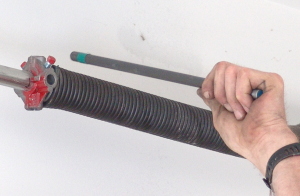
3.11. A typical problem with DIYers replacing their torsion springs is that the winding bars often are not inserted completely into the winding cones. We recommend that you mark your winding bars with tape. First, insert the bar into the winding cone and tape the bar as pictured.

3.12. Taping the ends of both winding bars as pictured will let you clearly see just how far your bars are penetrating the holes in the winding cones as you unwind the old springs and rewind the new ones.
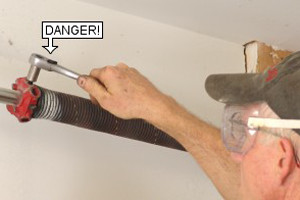
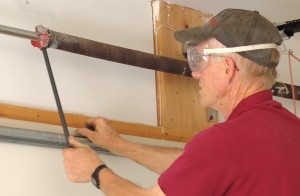
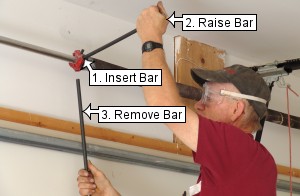
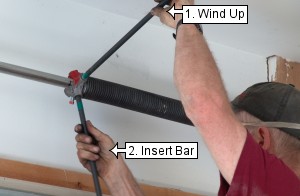
3.13. It is now time to unwind the spring. Firmly position yourself on a steady ladder beside the garage door. Next, insert the bar into one of the holes of the winding cone. Make sure it goes all the way in. It should click when your bar hits the core. If you want to test the force, you will be handling before loosening the set screws, push up on the bar one-quarter turn and bring it back down. Next, while grasping the other end of the bar firmly, loosen the set screws with an open-end wrench or small adjustable wrench loose enough to come free should the cone spin. Be prepared for the torque to be transferred to the bar.

3.14. Properly tightened screws will loosen with less than a turn. Once you loosen a set screw, keep at least one bar in the cone AT ALL TIMES until the spring is fully unwound. Many cones have been over-tightened. The spring may unwind 1/4 turn and not unwind anymore until one of the set screws is loosened some more. You may need to completely remove the set screws. The shaft may be distorted, and the cone still may not unwind at all.

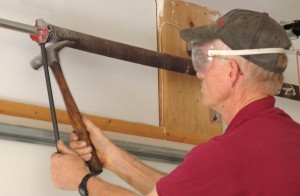
3.15. KEEP A BAR IN THE CONE AT ALL TIMES! If you have removed, the set screws and the spring still will not unwind, pull down on the bar, but be prepared for the cone to loosen at any moment.
3.16. If the garage door comes off the floor when you pull down on the bar, and if the cone still won't loosen, tap the bar next to the cone with a hammer to force the cone beyond the swollen portion of shaft. Maintain a firm grip on the bar; keep it firmly inserted completely into the cone; and be prepared at all times for the cone to slip, break, explode or break free from the shaft and yank the bar down.
3.17. When the cone is free from the shaft, lower the bar and let it rest upon the top of the garage door.
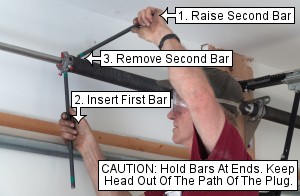
3.18. Insert a second bar into the next hole. With one bar in each hand, raise the end of the second bar enough to pull the first bar out of the cone.
3.19. Remove the spring anchor bracket from the wall.
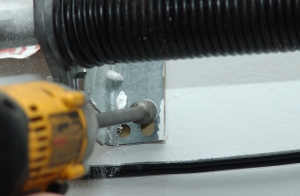
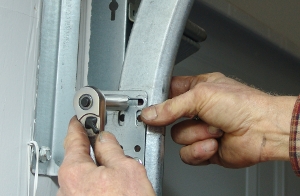
3.20. Remove the carriage bolts that secure the end bearing plate to the horizontal track.
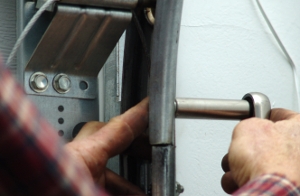
3.21. Remove the lag that secures the end bearing plate to the garage door header. The shaft should sit on the angle connecting the horizontal shaft to the flag bracket, as shown. Remove any other carriage bolts that support the end bearing plate.
3.22. Remove the end bearing plate on the other side of the garage door from the horizontal track and the garage door header.
3.23. Remove the cable from both cable drums if it has not already fallen out.
3.24. Remove the shaft from the garage door.
3.25. Set the shaft on the floor. You will now remove the hardware from the shaft.
3.26. Remove the bolts that secure the stationary cone to the spring anchor bracket. If you do not have a slotted spring anchor bracket, you do not need to remove it from the shaft for the high lift conversion.
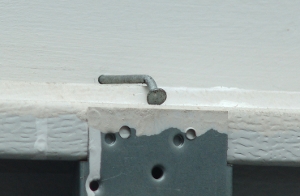
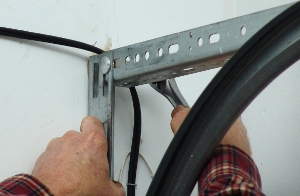
3.27. The nail here will keep the top section of the garage door from falling over when we remove the horizontal track.
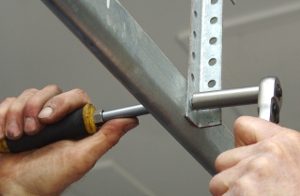
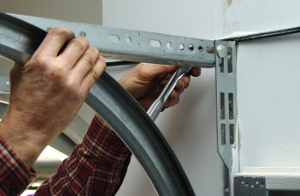
3.28. Loosen the bolt that secures the end of the horizontal track to the angle iron. Do not remove the bolt yet. Do this on both sides of the garage door.
3.29. Remove the bolts that secure the horizontal track to the flag bracket just above the top of the vertical track.
3.30. Remove the bolt that connects the horizontal track to the flag bracket. Caution: Hold on to the horizontal track so it will not fall when you remove this bolt.
3.31. Lift the horizontal track until the bottom is higher than the top roller. Loosen the nuts that secure the top roller to the top fixture.
3.32. Bring the horizontal track down and let it hang from the angle iron.
3.33. Remove the bolt that secures the horizontal track to the angle iron.
3.34. Lower the horizontal track to the floor.
3.35. Move to the other side of the garage door and repeat the process. Start by removing the bolts that connect the horizontal track to the flag bracket just above the vertical track.
4. Remove Your Torsion Hardware
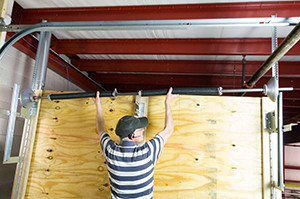
4.1. Remove the bolt that connects the horizontal track to the flag bracket above the garage door. Caution: Hold on to the horizontal track. It will want to fall when you remove this bolt.
4.2. Pull the track out of the flag bracket and above the top roller.
4.3. Swing the track down.
4.4. Remove the bolt connecting the horizontal track to the track hang.
4.5. Remove the track hangs from the ceiling on both sides of the garage door.
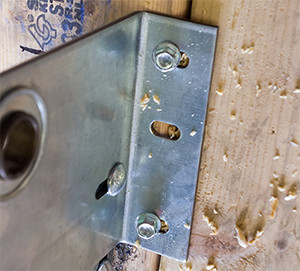
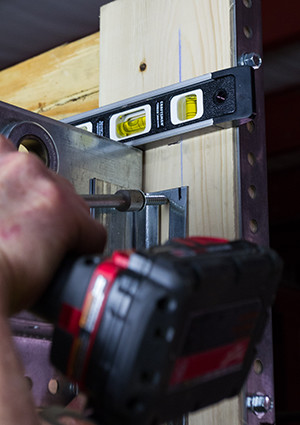
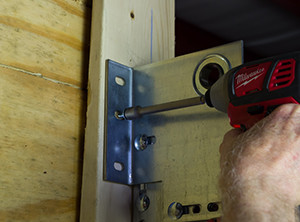
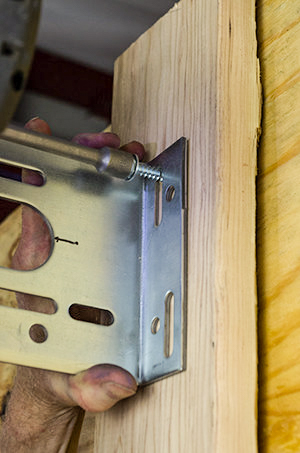
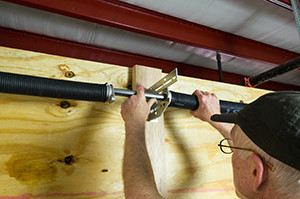
4.6. Bolt the bottom of the upper vertical track to the bracket that connects the long upper track with the vertical track. Align the high lift angle with the vertical mark made earlier and secure the top of the angle and end bearing plate to the jamb. If drywall covers your jambs be sure to order three-inch lag screws when ordering your vertical lift conversion kit.
4.7. Check the clearance of the door to see if it can pass the shaft and cable drum. If the door clears, click here to skip ahead. If the door does not clear, follow this procedure:
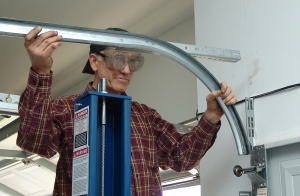
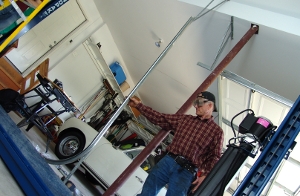
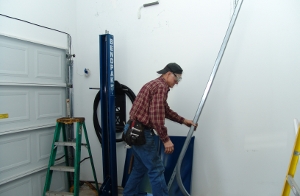
5. Install the Upper Vertical Track and Hardware
5.1. Measure the distance from the cable drum to the top of the door and write down the measurement.
5.2. Loosen the bolts that secure the bottom of the track to the #10 splice fixed plate.

5.3. Lower the top of the track 2 holes on the punched angle. Vice grip the top of the track to the punched angle.
5.4. The remaining long punched angle may be used for different applications, but if you are concerned about aesthetics, then cut the angle with a handsaw.
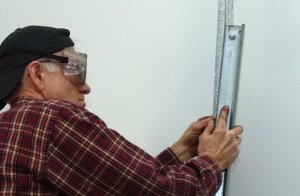
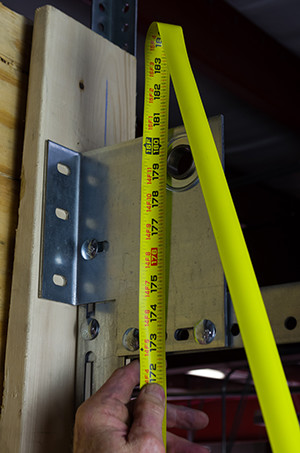
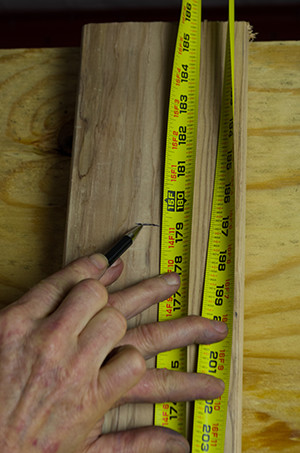
5.5. Use the previously noted floor-to-shaft dimension to measure and mark the wall next to the left end bearing plate.
5.6. Measure from the floor to the top of the left end bearing plate. Record the dimension.
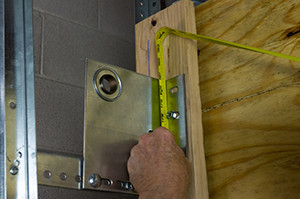
5.7. Measure and mark the right side of the wall with the same dimension.
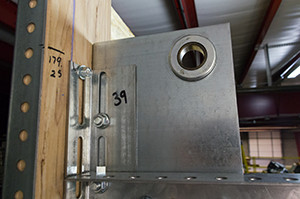
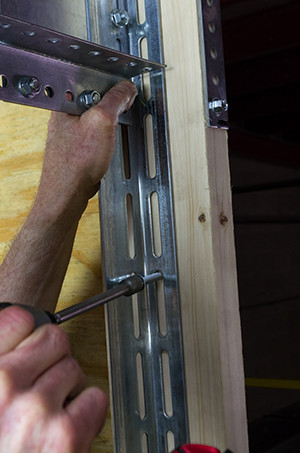
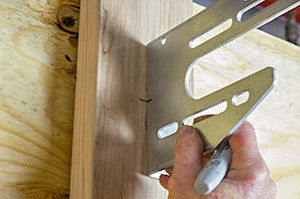
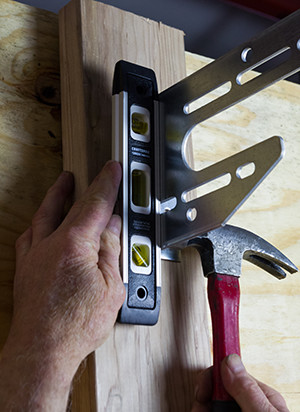
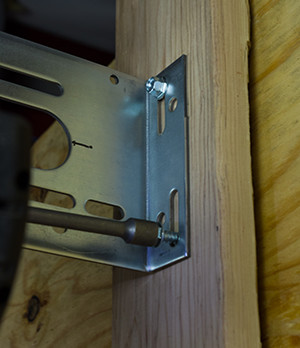
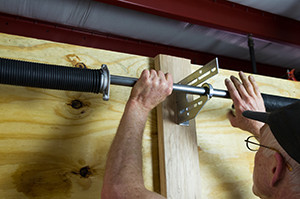
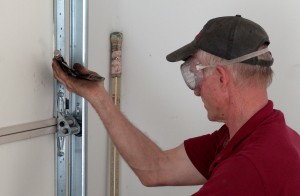
5.8. Place the second end bearing plate on the right side of the wall. Align the plate horizontally using a level and vertically using the plumb blue chalk mark.

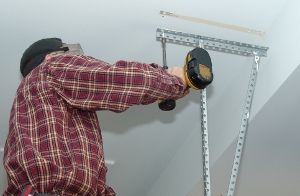
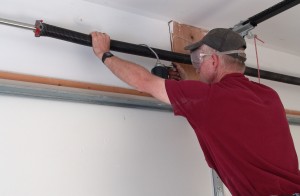
5.9. Secure the top of the slotted angle with a long screw and an impact wrench.
5.10. Secure the middle of the slotted angle with a second screw.
5.11. Remove the top screw from the wall.
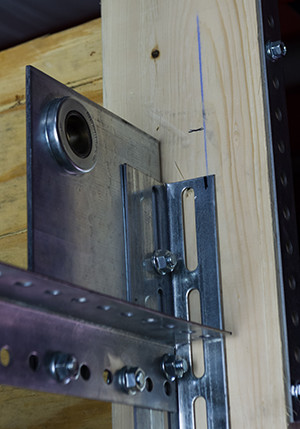
5.12. At this time, you will mount your center support bracket, also called the spring anchor bracket. The shaft in the center must align with the end bearings. Measure from the floor to the middle of the bearing plate to make sure the floor-to-shaft dimension is correct.
5.13. Insert a long bolt into the middle slot on the end bearing plate.
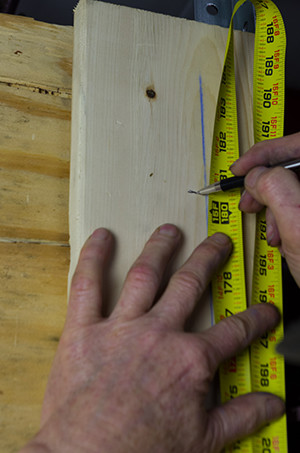
5.14. Measure from the floor to the floor-to-track dimension in the center of the wall and mark it.
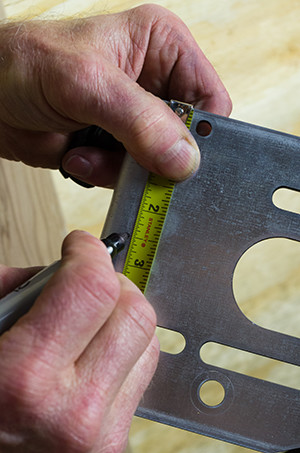
5.15. Mark 2 1/2" from the top to the middle of the spring anchor bracket.
5.16. Align the mark on the spring anchor bracket with the mark on the middle of the wall.
5.17. Insert a long screw into the top slot of the spring anchor bracket.
5.18. Plumb the spring anchor bracket with a hammer and level.
5.19. Insert a second screw into the top slot of the spring anchor bracket. All holes across the three plates should be lined up.
5.20. Prepare to assemble the spring assembly on the floor. Slide the shaft through the first spring.
5.21. Insert the bearing into the end of the shaft.

5.22. Slide the shaft through the second spring.
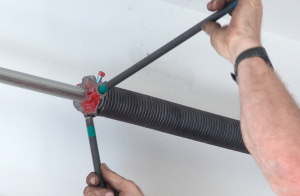
5.23. Insert the red vertical-lift cable drum into the red right wind spring.
5.24. Insert the black vertical-lift cable drum into the black left wind spring.
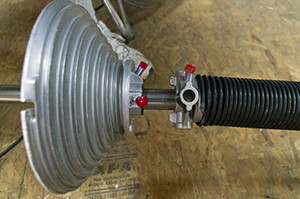
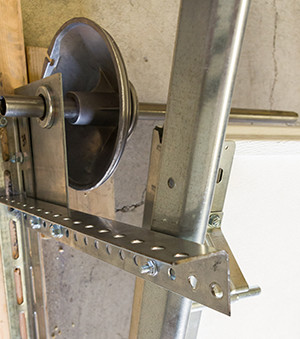
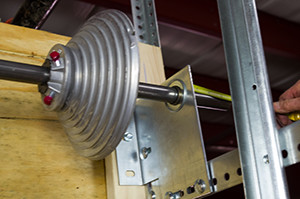
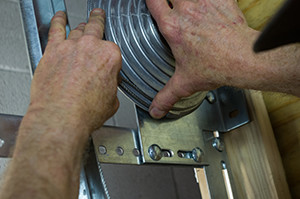
5.25. Carefully lift the torsion spring assembly and bring it to the three brackets.
5.26. Insert the left end of the shaft into the left end bearing plate.
5.27. Insert the middle of the shaft into the spring anchor bracket.
5.28. Vise grip the top part of the spring anchor bracket, preventing the shaft from exiting the bracket.
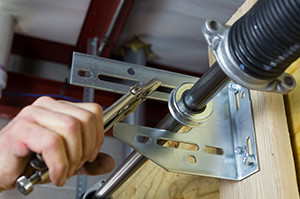
5.29. Insert the right end of the shaft into the right end bearing plate.
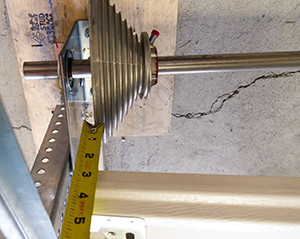
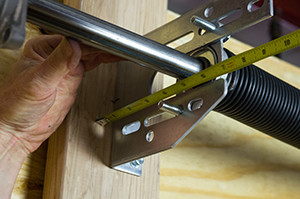
5.30. At this point, you need to center the shaft. If there is not enough room on one side, having only an inch of shaft stick out of the bearing is fine. In this application, the shaft sticks out four inches on each side. Measure from the outside of the right end bearing plate to the end of the shaft.
5.31. Measure from the outside of the left end bearing plate to the end of the shaft and slide the shaft as needed to center it.
5.32. Remove the vise grip, keeping the other hand on the shaft.
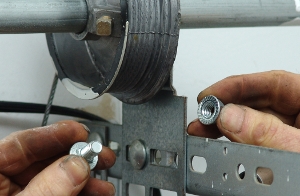
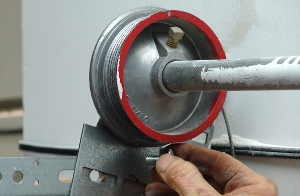
5.33. Secure the cone in the bearing with two bolts.

5.34. Measure 5" from the wall to the shaft.
5.35. Secure the two springs together. Make sure that the two bolts go through both cones.
5.36. Insert a nut onto each bolt.
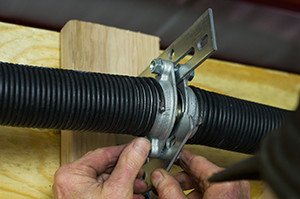
5.37. Tighten each nut completely with a hand wrench.
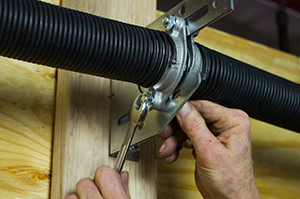
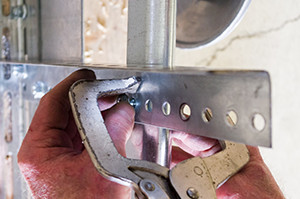
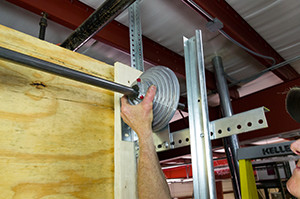
5.38. This would be a good point to install a vise grip on the track about three inches above the center roller. This could prevent the door from rising later and knocking you off the ladder.

5.39. Push the left cable drum to the end of the shaft. The cable drum MUST press against the bearing.
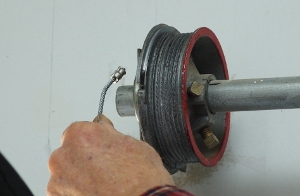
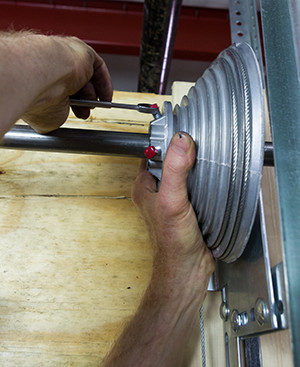
5.40. Finger tighten each set screw on the left cable drum until it hits the shaft, then turn each set screw an additional 1/2 to 3/4 turns.
5.41. Insert the end of the cable in the slot of the drum and rotate the drum until the cable is tight.
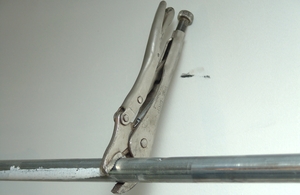
5.42. While gripping the shaft to keep the cable tight on the left drum, vise grip the shaft as pictured to keep the keep it from turning when you install the cable on the other side. After gripping the shaft, the cable should be tight. Check it and adjust the grip as needed.
6. Install Your Right Track and Bearing Plate
6.1. Push the right cable drum to the end of the shaft. The cable drum MUST press against the bearing. NOTICE: The procedure on the right side of the door is different from the procedure on the left side.
6.2. Measure the left cable from top to bottom and insert it into the cable drum. Vise grip the cable to the left vertical track.
6.3. Tighten the set screws on the right cable drum with a hand wrench. Keep turning the set screws until it hits the shaft, then turn it a final 3/4" more.
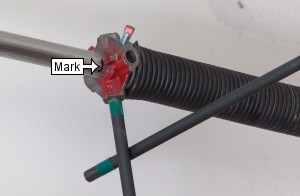
6.4. It is now time to wind the new springs, but before doing so, I recommend marking the shaft just beyond the winding cone. This is a final step taken to ensure that you have installed the springs on the correct sides of the center bracket. Torsion springs always grow in length when they are wound in the proper direction. If your spring does not get longer as you wind it, you are winding it the wrong direction, probably because it is improperly installed. We recurrently get calls about springs coming loose from the cones at about six turns. If this happens, switch the springs.
6.5. Paint a white or light-colored line across the torsion spring. If you lose count of how many turns your have on the torsion spring as you wind it, you can count the number of times the white paint strip wraps around the spring.
6.6. Tape your winding bars if you have not done so already, not only to assure that you are inserting the bars completely into the cones as you wind the torsion springs, but more importantly to assure that the bar does not slip out of the cone when you stretch the springs at the end. This has happened to me several times. Professionals always stretch torsion springs after winding them because the shaft floats horizontally between the flexible end bearing plates as the door operates. Although this may be as little as 1/4", the binding of the coils as the garage door closes oftentimes keeps the door from closing completely, especially when the torsion springs and bearings are dry.
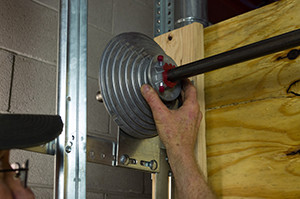
6.7. At this point, you will wind the spring. The number of turns will be found in an earlier email you received from one of our salesmen. Notice that the end of the spring on the winding cone points up when facing you. You will wind both springs up and counter intuitively as if you are trying to unscrew the winding cones from the ends of the springs. Begin by turning the spring up 1/4 turn until it meets resistance. This is your first quarter turn. Count "one." Next, insert the bar and raise it 90 degrees. Insert the second bar. This is "two." As you wind the spring, it should grow in length the thickness of one coil for every turn. The cone should cover your mark after the first couple turns.
6.8. Raise the second bar 90 degrees and insert the first bar. This is "three." Continue winding. If the spring shortens in length, unwind the spring and switch sides - the springs are on backward. Otherwise, continue winding until you reach the correct number of turns for your garage door. Each time you insert a bar into the winding cone, listen for the click to let you know the bar is in all the way. Not inserting the bar all the way could cause the cone to explode.
6.9. If the spring comes loose from the cone at about 6 turns, you are probably winding the spring backward because the springs are on the wrong sides. Switch the springs. Otherwise, after winding the torsion springs, you will need to stretch the springs and secure the winding cone. First, mark the shaft 1/4" beyond the winding cone with tape or with a file. We stretch the springs because the shaft floats horizontally between the flexible end bearing plates as the garage door operates. Although this may be as little as 1/4" the binding of the coils as the door closes often keeps the door from closing completely, especially when the springs and bearings are dry and need lubrication.
6.10. Here you will need to do three things at once. With your left hand, lift the bar just off the top of the door and pull it toward the center of the garage door. While lifting up and back, tap the top of the bar just under the winding cone with your other bar. Pulling the bar back toward the center of the door as you tap causes the spring cone to bind on the shaft and not slip back.
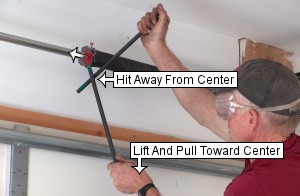
6.11. Continue tapping until the cone moves out to the mark on the shaft. Continue holding the bar off the garage door and pulling back toward the center of the door. If the cone slips away from the mark, repeat this step. Keep an eye on the tape to make sure the bar doesn't slip out of the cone. If it does start to slip, rest the bar against the top of the garage door, insert a bar in the next hole and turn the cone up enough to make it possible for you to push the marked bar back into place.
6.12. After the cone reaches the mark, continue pulling the bar off the garage door and back toward the middle of the door with your left hand. Tighten both set screws 1/2 to 3/4 turns each after each screw first meets the shaft. This is the point at which you will feel the screw meeting resistance. If the garage door spring snakes after tightening the set screws, repeat the process and stretch the spring half as much as before. Residential torsion springs are stretched 1/8" to 1/4". Larger commercial and industrial overhead garage door torsion springs are stretched as much as an inch.
6.13. Wind the torsion spring. You should have received information about the number of winds needed. For instructions on winding a single torsion spring, go to step 65 of our Single Torsion Spring Replacement tutorial. If you are installing two springs, see section 10 of our Torsion Spring Replacement tutorial.
6.14. Carefully test the set screws by pulling down on the bar. The winding cone should be tight enough so that when you pull down on the bar, the garage door should begin to lift. If the bar starts to slip when you pull it down, add 1/4 turn to each set screw.
6.15. Remove the vise grip from the shaft.
6.16. Vise grip the vertical track about 3" above one of the rollers. If you have installed the wrong springs, or if you have over-wound the springs, this will prevent the garage door from flying up and knocking you off your ladder after winding the second torsion spring. This has happened to me on more than one occasion.

6.17. Follow the same procedure for winding the second spring, stretching it 1/4", and securing the set screws. CAUTION: Before removing the bars from the cones after securing the winding cone, you must run an important test of the door. Many of the accidents that occur while fixing springs are due to installing springs that are too strong.
7. Install the Torsion Spring and Cable
7.1. Slowly pull down on the winding bar until the garage door rises 3" and the roller hits the vise grip on the track. The door will usually drop back down and raise the bar. If it doesn't, lift the end of the bar until the door closes. If the door comes up by itself when you hold the bar lightly, the springs are either over wound or they are too strong. You may need to remove 1/4 to 1/2 turns from the springs. If the door comes up on its own, you either have too many turns on the springs, or you have the wrong springs. This can be very dangerous. We recommend getting professional help. Removing the winding bar could cause the garage door to knock you off the ladder.
7.2. If the door stays on the floor when you raise the bar, remove the bar from the cone.
7.3. Many torsion spring replacement accidents occur from springs that are too strong. If the garage door stays on the floor by itself, remove the vise grip from the track. If the door is off the floor and the roller is against the vise grip, close the door with one hand and remove the vise grip with the other. If the springs are too strong, you have to restrain it from flying into the open position.
7.4. Raise the garage door slowly. Check the door balance. If you have the correct springs the door should stay down when closed, half way when opened half way, and open when opened. If the door will drop to the floor by itself from the halfway point, add 1/4 turn of tension to each of the torsion springs. If the garage door won't stay on the floor, and if it pulls itself up when stopped halfway, close the door and remove 1/4 turn of tension from the springs.

7.5. If the springs you installed are too strong, and if you wind the springs the correct number of turns, the door will not stay down nor half way. The garage door will be hard to close. DO NOT REMOVE MORE THAN HALF A TURN OF SPRING TENSION TO CORRECT THE PROBLEM. Here's why. If you remove 3/4 of a turn to get the door to stay closed, and then if you open the door, it will get heavier as you open the door, and once open, the cables will come off the drums. This could create as much as a day's extra work. It could also cause door damage and/or result in serious injury. Do not use the door! Get different springs!
7.6. If the springs you installed are too weak, and you wind the springs the correct number of turns, the door will be heavy at the floor, and it will not stay open half way, but it will stay open if raised completely. If tension is added to the torsion springs to lighten the garage door and to get it to stay open half way, the door will be harder to close; openers often damage the new steel garage doors when they are too hard to close.

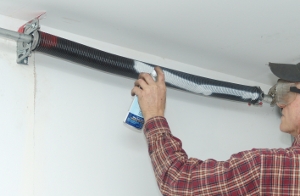
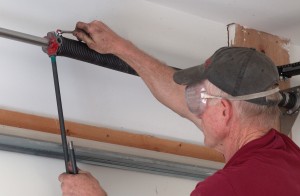
7.7. Oil the springs. The more viscous the oil, the longer it will last. I normally use 40 wt. motor oil, but 10W40 will do if that is all you have. Squirt a stream of motor oil across the tops of the torsion springs and rub the oil into the coils. Do not oil the last inch of the springs that are wound around the cones.
8. Check & Lube Garage Door
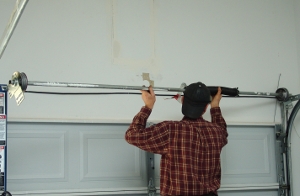
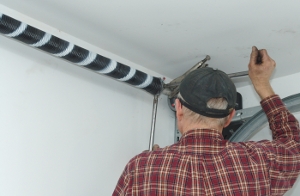
8.1. Check the garage door at the floor. It should seal all the way across. If it doesn't, you may need to adjust the drum on the higher side to get the door to level. We have a separate tutorial to help in leveling your garage door.
We hear from many mechanics who relish the excitement of a challenge like this. Probably more often than not, they are professional people (engineers, doctors, lawyers) who need extra space for their Porsches or Lamborghinis. By the time they order the hardware from us, they have already ordered or located the lift needed to raise their car into that empty space where their opener once was. I salute you, men. I am working hard to help you do what you could have figured out yourself. Hopefully, I can help you save at least one trip to the hardware store. You have my deepest respect and best wishes.
-Dan Musick
Owner, DDM Garage Doors