Double EZ-SET Torsion Spring Conversion
This tutorial is intended to be used in conjunction with our Double Torsion Spring Replacement tutorial. At the conclusion of this tutorial, you will be ready to jump to Section 10 of the torsion spring replacement tutorial.


| 1. To begin, gather the tools you will need for this job. You will need a minimum of one or two 10" vise grips, an adjustable wrench, a ruler, and two 1/2" X 18" winding bars. Most hardware stores sell 1/2" X 36" steel rods that can be cut in half. You will also need a firm ladder. You may also need a hammer, a file, and a 3/8" wrench. A socket wrench and sockets will shorten the time required. Finally, make sure your garage is well-lit. | 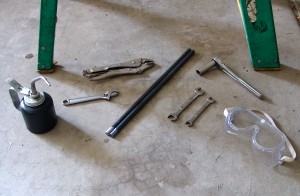 |
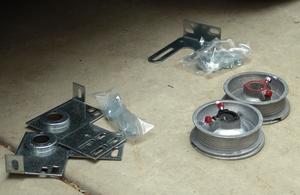 | 2. You will need two kits for this job as well as two new cable drums. The first kit includes the spring anchor bracket, and the second includes the end bearing plates. We sell both kits with the necessary hardware to complete the EZ-SET conversion. |
| 3. Unplug the power cord to the garage door opener. Some older openers are hardwired, and you will need to remove a fuse or flip the circuit breaker. | 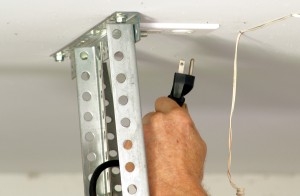 |
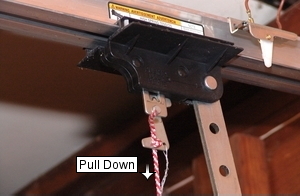 | 4. Disengage the opener from the door. Some door openers have a neutral position for the trolley disconnect. On older openers, you may need to remove the L-shaped drawbar arm. |
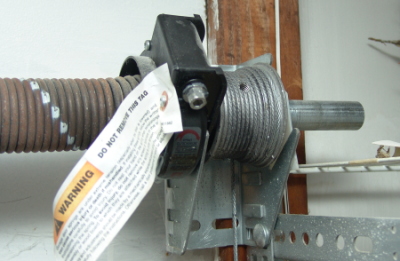
| 5. You are now going to unwind your unbroken spring. If neither spring is broken, you will have to repeat this step for both springs. Count the number of times the paint stripe goes around the spring. Using a drill with a socket extension, insert the socket over the bolt on the winding unit. | 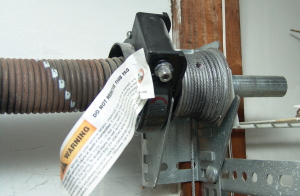 |
 | 6. Run the drill in reverse (counter-clockwise) for 5 seconds and stop. Re-count the number of times the paint stripe goes around the spring. If the number has increased, you are winding the spring in the wrong direction. If the number has decreased, continue to unwind the spring until the stripe no longer winds around the spring. |
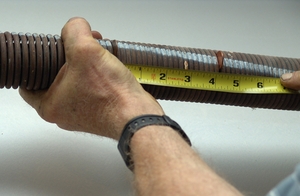
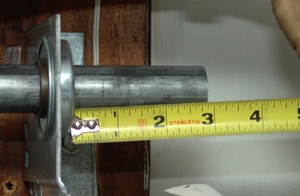
| 7. Measure your old EZ-SET springs. Be sure to measure both springs, as many garage doors have springs with different dimensions. | 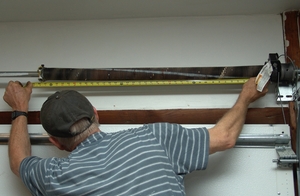 |
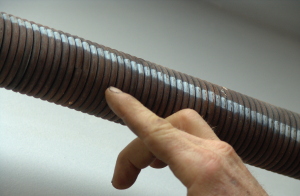
 | 8. To find the 20-coil measurement, you will need to compress the spring. Make sure that there is no space between the coils you are measuring, as shown in the picture. You may also want to insert pennies or small washers between the two points you are measuring. This will increase the accuracy of your measurement and will make it much easier to find when you are compressing the spring. |
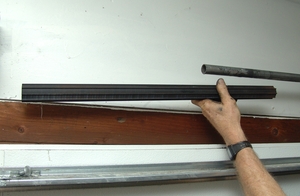
| 9. Lay your new torsion spring on the garage floor or work-bench, and measure the length and inside diameter. Also, measure 20 coils to determine the wire. Check the wind on both springs. | 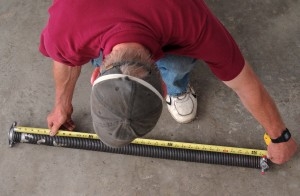 |
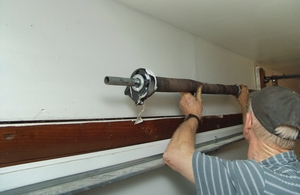
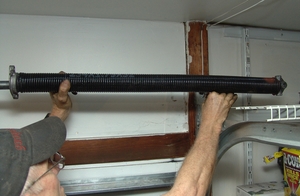
 | 10. Stand up your springs against the inside of the garage door as pictured here. Take a close look at the ends of the springs. Position and turn the springs, so the ends on top are facing you and pointing to each other as pictured here. |
| 11. Take the spring on the left and place it at the left end of the garage door, as pictured here. Notice that the end of the wire points to the right toward the center of the door. This is a right wind spring. It will go above the door on the left side of the spring anchor bracket. The winding cone at the other end of this spring is usually painted red. | 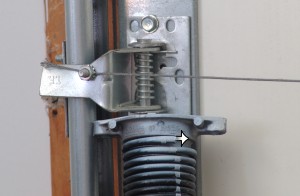 |
 | 12. Take the other spring and place it at the right end of the garage door. Notice that the end of the wire points to the left toward the center of the door. This is a left wind spring. It will go above the door on the right side of the spring anchor bracket. The winding cone at the other end of this spring is usually painted black. |
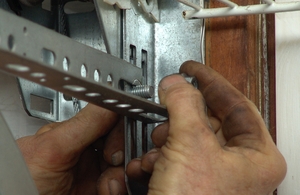
| 13. Grab your ladder and stay on the right side of the garage door. Since there is no longer any tension in the springs, it is safe to disassemble the hardware. Start by removing the carriage bolt that secures the end bracket to the flag bracket. While the flange nut should come off, you may need to wait to remove the bolt until another screw or lag is removed. Remove the plastic shaft retainer as well. | 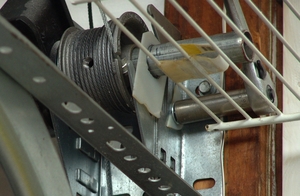 |
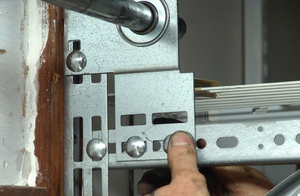
 | 14. Remove the second carriage bolt which secures the end bracket to the flag bracket and the track. |
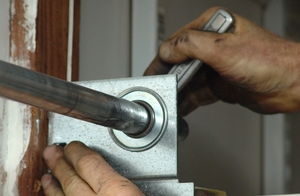
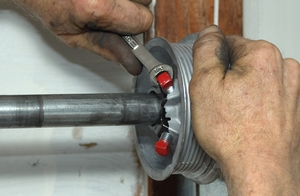
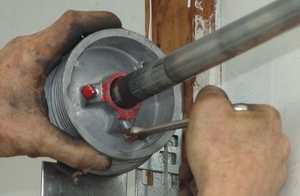
| 15. Using an Allen Wrench (also called a "hex key"), loosen the cable drum from the shaft and end bracket. | 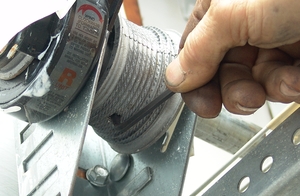 |
 | 16. Pry the shaft and the hardware at the end of the garage door out of the end bracket. This can usually be done by prying the cable drum out of the bracket using a screwdriver. |
| 17. As you can see, there is a lag screw that is holding the bracket into the jamb. | 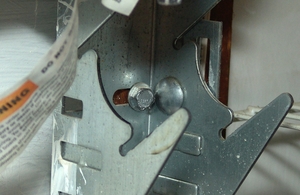 |
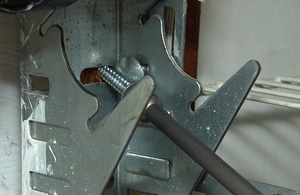 | 18. Hold the shaft and hardware up while you remove the lag. If you could not remove the bolt before, you should be able to take it out now. |
| 19. Remove the end bracket. You do not need this part anymore. | 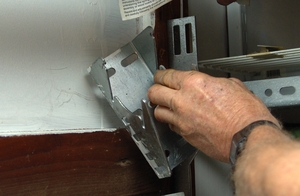 |
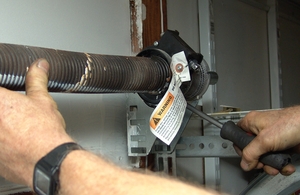
 | 20. Loosen the set screws on the winding cone of the EZ-SET torsion spring. |
| 21. Remove the shaft retainer at the end of the shaft. | 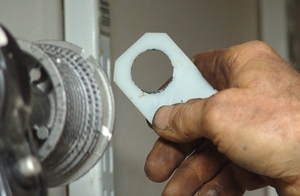 |
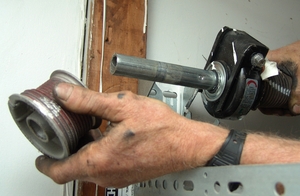
 | 22. Remove the cable drum. You will not need this part anymore. If the cable is still on the drum, remove it as well. You will, however, need the cable again. |
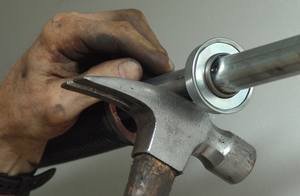
| 23. Hit the winding unit with a hammer until it separates from the torsion spring. Warning: If you are reading these directions and plan to install another EZ-SET torsion spring, do not hit the winding unit with a hammer. This will likely damage the unit. Instead, read our tutorial. You also have the option of leaving the winding unit on the shaft and removing it while it is still installed on the spring. | 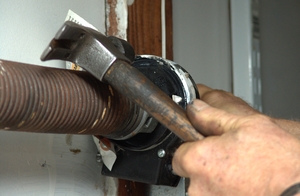 |
 | 24. Slide the winding unit off the shaft. You will not need this part anymore. |
| 25. Slide the EZ-SET torsion spring toward the end of the shaft. This may be very difficult if the shaft has been distorted from overtightened set screws. If that is the case, hit the winding cone with a hammer until the cone passes over the distorted portion of the shaft. If there is not enough side room, loosen the coupler in the middle of the shaft, pull the shaft out of the coupler and lower the shaft and spring to the garage floor. If there is no coupler, lower the entire shaft and springs to the floor after loosening the hardware on the other end. | 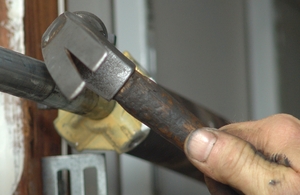 |
 | 26. Remove the torsion spring from the shaft. If this spring is broken, you will also need to remove the spring filler, which keeps the EZ-Set torsion springs from sagging and resting on the shaft. |
| 27. Make sure you throw your old spring in the garbage can. My worst ladder accident occurred when I stepped off my two-foot ladder onto a spring and sprained my ankle. | 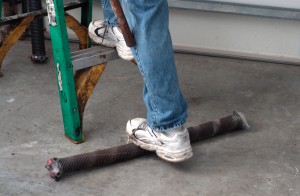 |
 | 28. Re-install the carriage bolt and nut that secure the horizontal track angle to the vertical flag bracket. Tighten the nut. |
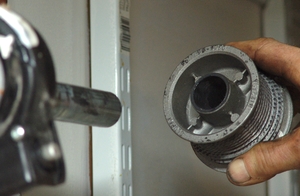
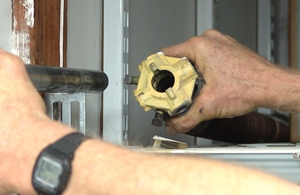
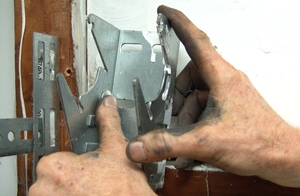
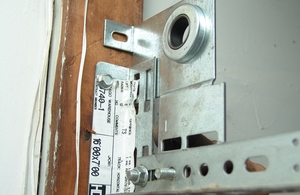
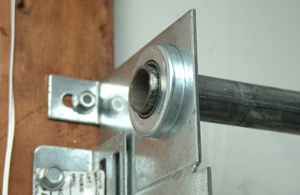
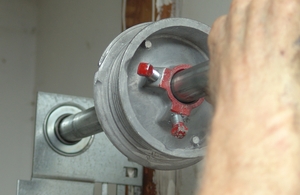
| 29. Slide the new end bearing plate onto the shaft. Make sure the end bearing plate is installed on the inside of the flag bracket and horizontal track angle. The protruding inner race of the bearing faces the inside of the garage as pictured. The new cable drums will press against these inner races of the bearings. | 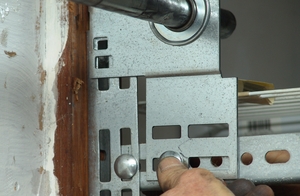 |
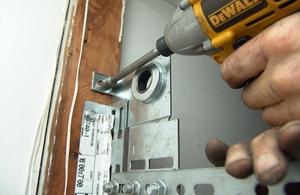
 | 30. Install at least two bolts on the bottom of the end bearing plate to secure it to the horizontal track angle. On 12" radius tracks such as this, the third bolt securing the end bearing plate to the flag bracket is optional if the top of the bracket is to be secured to the jamb. On 15" radius tracks the horizontal track angle connects to the top of the flag bracket and is not supported by the flag bracket. Finger-tighten the flange nuts to find the best placement of the end bearing plate. |
| 31. Secure the top of the end bearing plate to the jamb with a 1 3/4" X 5/16" lag screw. Important! Failure to do this on 15" radius tracks often causes the bracket to lean out, cutting the shaft, wearing out the bearing, and frequently causing the cables to come off the drums. Caution: The wire for the motion sensor eyes typically runs near the end bearing plate. Make sure the wire is not under the metal, so you don't accidentally break the wire. | 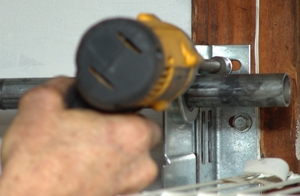 |
 | 32. Tighten the nuts that secure the end bearing plate to the horizontal angle and vertical flag bracket. |
| 33. Measure the distance from the top of the garage door to the center of the shaft. Write this dimension down, as you will need it later. Distance from top of door: ____________ | 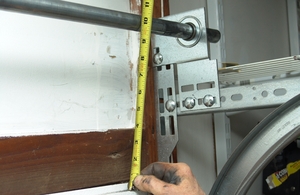 |
 | 34. Move to the left side of the garage door and repeat this process. Start by removing the bolt that secures the end bracket to the flag bracket. You can also remove the shaft retainer under the flange nut. |
| 35. Remove the second bolt, which secures the end bracket to the flag bracket and the track. | 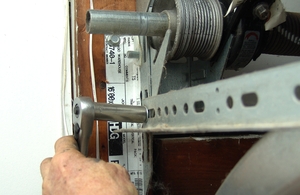 |
 | 36. Using an Allen Wrench, loosen the cable drum. |
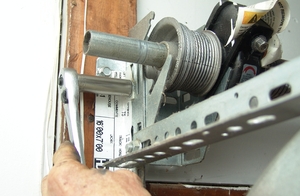
| 37. Pry the shaft and hardware out of the end bracket by lifting up on the end of the screw driver or pry bar. | 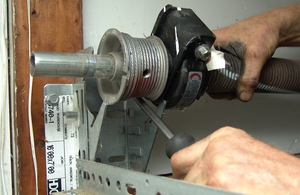 |
 | 38. Remove the old cable drum. |
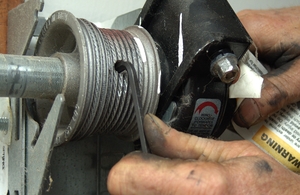
| 39. Loosen the set screws on the winding cone. | 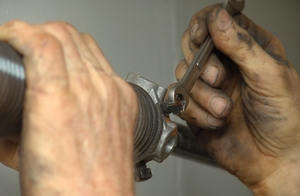 |
 | 40. If you have extra room on the right side of the garage door, slide the shaft to your right. Caution: The shaft can easily come off the center support bracket. Be sure to hold on to the shaft while you are removing the hardware on it if you decide to slide the shaft to the right. If there is not enough side room, and if there is no coupler in the middle of the shaft, lower the shaft and both springs to the floor at this time. |
| 41. Remove the EZ-SET torsion spring and winding unit from the shaft. Again, you may need to hit the spring or winding unit with a hammer if the shaft is distorted from overtightened setsrcews. | 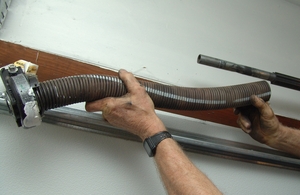 |
 | 42. Slide the spring spacer off the shaft. If the spring is not broken, the spacer will slide off and it will be inside the spring. |
| 43. Remove the lag screw that secures the end bracket to the jamb. | 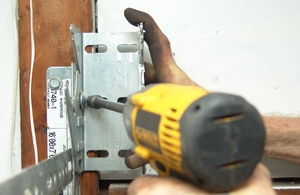 |
 | 44. Remove the end bracket. You will not need this part anymore. |
| 45. Install the carriage bolt and flange nut that secures the horizontal track angle to the vertical flag bracket. Start by finger-tightening the nut, then secure it with a socket wrench. | 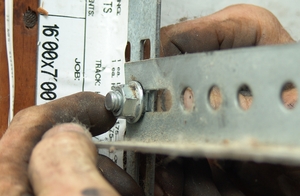 |
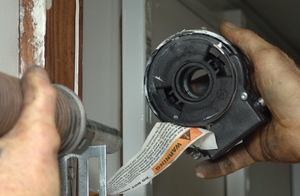
 | 46. Install the end bearing plate. This must be on the inside of the horizontal angle and vertical flag bracket. The narrower outer race of the bearing should face toward the outside of the garage door. |
| 47. Insert two carriage bolts and finger-tighten the nuts to secure the end bearing plate to the track angle as before. | 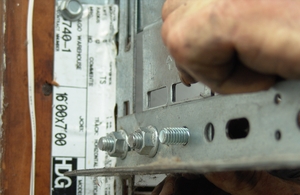 |
 | 48. Secure the top of the end bearing plate to the jamb with a lag screw as before. |
| 49. Tighten the nuts to secure the bottom of the plate to the horizontal angle. | 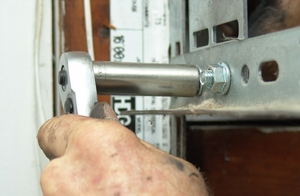 |
 | 50. Insert the shaft into the end bearing plate. |
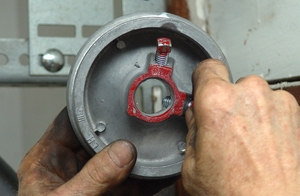
| 51. Move to the center of the door. Notice the center support bracket. Since your new torsion springs will be secured in the middle of the door, you need to install a new center bracket. | 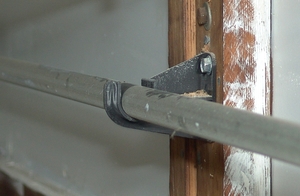 |
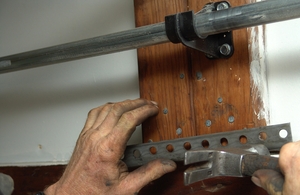 | 52. I also installed a piece of angle iron under the header. This to prevent spring torque from the new spring anchor bracket from pulling the bottom of the 2 X 6 pad toward the inside of the garage. |
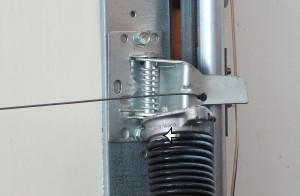
| 53. Remove the two lag screws that support the center support bracket. You can now remove the support bracket and throw it away. | 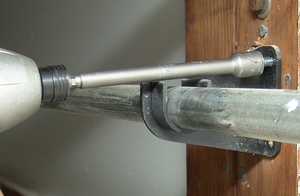 |
 | 54. Find your measurement from step number 33 above. Measure this distance from the top of the door to the header. Make a line at this distance with a pencil or a marker. |
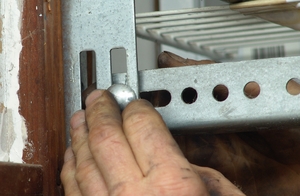
| 55. Hold the spring anchor bracket against the header, as shown. The line you made in the previous step must line up with the notch in the bracket. The longer end of the spring anchor bracket needs to be on top. | 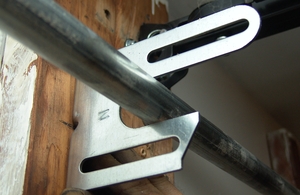 |
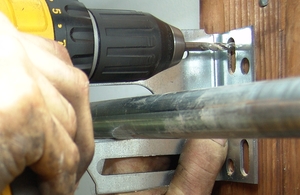 | 56. Pre-drill the top of both adjustable slots in the spring anchor bracket. Additionally, pre-drill the stationary hole in the bottom of the bracket. |
| 57. Secure the spring anchor bracket to the garage door header where you pre-drilled using lag screws. Notice that I moved the spring anchor bracket a little to the left. Since the bolt on the right side of the garage door header was in the way of the bracket, I had to move the bracket. Though it is not quite centered, this will not affect the performance of the garage door. If you do this, make sure you secure the bracket in the middle of a board on the header. | 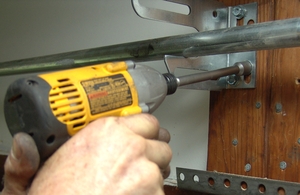 |
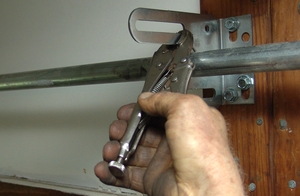 | 58. Vise grip the spring anchor bracket, as shown. This will keep the shaft from possibly falling out and causing injury or damaging the garage door or shaft. |
| 59. Move to the left side of the garage door. Slide the shaft out of the end bearing plate and slide a bearing on the shaft, as shown. Note: the bearing should face the same direction as the end bearing plate on the left. | 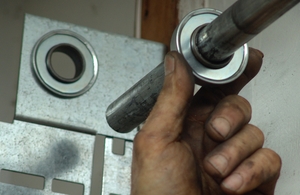 |
 | 60. Slide the spring that you placed on the left side of the door at the beginning onto the shaft, as shown. The stationary cone must be toward the center of the garage door while the winding cone must be toward the outside of the door. |
| 61. You may need to loosen the set screws for the spring to slide onto the shaft. | 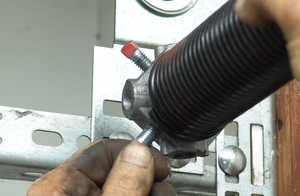 |
 | 62. If the shaft is swollen from overtightened set screws, you may need to tap the bearing with a hammer. Do not hit the bearing too hard, as you may damage it. |
| 63. Slide the spring and bearing toward the center of the door. | 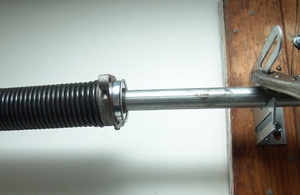 |
 | 64. Loosen the set screws on the cable drum. |
| 65. Slide the cable drum on the shaft as pictured. | 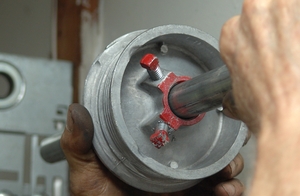 |
 | 66. Insert the shaft back into the end bearing plate. |
| 67. Move to the right side of the garage door and repeat this process. Start by pulling the shaft out of the end bearing plate. | 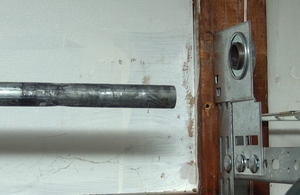 |
 | 68. Slide the spring on the shaft and to the center of the door. Since only one bearing is needed for two springs, you do not need another bearing. This bearing keeps the shaft from rubbing against the inside of the stationary cones. It also keeps the spring anchor bracket from cutting the shaft in half over a period of time. |
| 69. Slide the cable drum on the shaft, as shown. Insert the shaft back into the end bearing plate. | 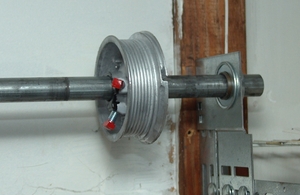 |
 | 70. Measure to see how far the shaft extends beyond the end bearing plate on each side of the garage door. Center the shaft by equalizing this distance. |
| 71. Slide the cable drum toward the end bearing plate until the cable drum is flush against the race of the bearing. Finger-tighten the set screws on the cable drum. | 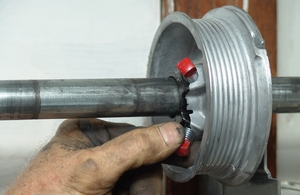 |
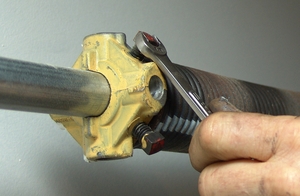
 | 72. Tighten each set screw an additional 1/2 to 3/4 turn. Caution: Under-tightening the drums could cause the drum to slip and the door to cock or fall. Over-tightening the set screws could damage the shaft or drum, resulting in the same problems. This is a critical step. |
| 73. A common problem for do-it-yourselfers and inexperienced garage door repairmen is getting the end of the cable to properly seat in the slot of the cable drum. I usually bend the end of the cable 90 degrees with my needle nose pliers, as shown. | 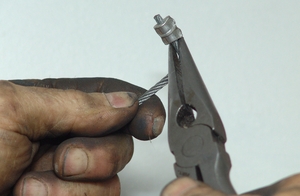 |
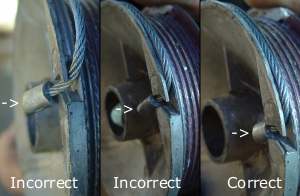 | 74. Bending the cable will help you avoid problems with the tip at the end of the cable catching on the end bearing plate and causing the cable to come off and the garage door to jam, cock, or fall. Check to make sure the cable is straight in the slot and not sticking out the side. Also, the edge of the cable stop should not be pointing to the side, as shown. The cable tip should fit completely inside the drum, with the rounded part facing out so the tip can't scrape the end bearing plate. |
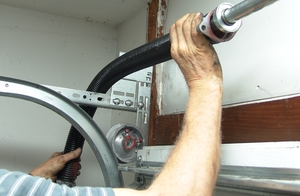
| 75. After inserting the cable, pull down on the drum to tighten the cable around the outer groove on the drum. | 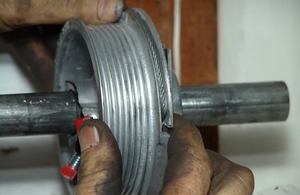 |
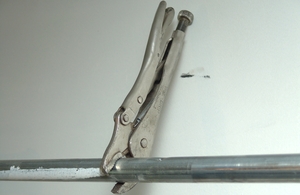 | 76. Twist the shaft to keep the cable tightly on the drum. While twisting, vise grip the shaft as shown to keep the cable on the drum. The top of the vice grip should be tight against the garage header. This will keep the cable snug on the first drum while you install the cable on the other drum and position it in place. It also keeps the shaft from turning and the cables peeling off when you wind the springs. That single grip can save many hours of walking back and forth and having to level and re-level the door after the springs are wound. |
| 77. Move to the left side of the garage door. Insert the cable on the drum. Pull down on the cable drum to tighten the cable on the drum. While pulling down on the drum, push the shaft to the right to make sure the right cable drum is butted snugly against the inner race of the right end bearing. Push the left drum against the race of the left end bearing. | 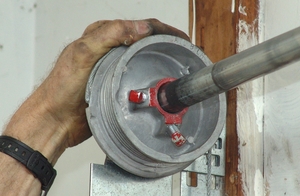 |
 | 78. While continuing to pull down on the drum, finger-tighten the set screws and follow with 1/2 to 3/4 additional turns with a wrench. Properly following these two steps will result in both cables having the same tension. After the springs are wound, the garage door will level properly, and it will not have a gap under one end. |
| 79. Remove the vise grip from the center bracket. | 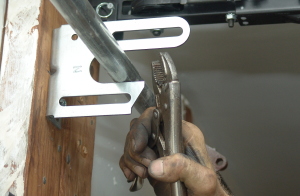 |
 | 80. Lube the bearing and the shaft with 2-3 drops of oil. |
| 81. Bring the two springs together at the center bracket, as shown. Double-check to make sure you have the right wound spring on the left side and the left wind spring on the right side. Turn the springs until the ends are facing you. The wire at the ends of both springs here at the bracket should be pointing down. At the winding cones at the opposite ends, the spring wire points up. If not, reverse the springs. About once a month, we get a phone call from a customer who begins the conversation with, "I wound the spring to about six turns, and the spring came loose from the cone." We normally refer them back to this step and suggest they switch their springs. | 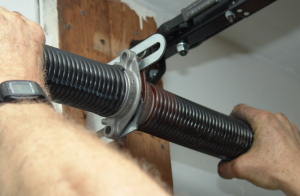 |
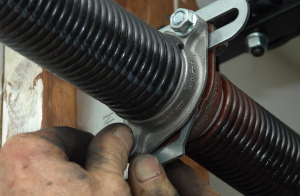 | 82. Install the bolts to secure the stationary center cones to the center bracket. Finger-tighten the nuts until the stationary cones are flush against the center bearing plate. If you installed a free bushing from your spring suplier, and if you have a bushing in each stationry cone, you will not be able to tighten the bolts without breaking a cone because there's not enough space for two bushings. Also, forcing the cones by tightening the bolts may break a cone if the bearing is catching on the bracket. Winding a spring with a cracked cone could cause the spring to spin loose and the bar to fly. |
| 83. Secure the bolts. | 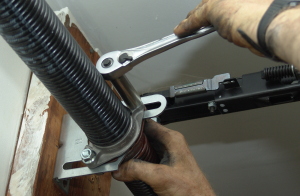 |
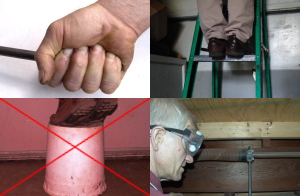 | 84. The next step is to wind your springs. Two important assumptions will help you perform this task safely. First, assume that the garage door spring is going to break as you wind it. To avoid injury, clutch the bars firmly on the ends furthest away from the cones and stand securely on a sturdy ladder, not on chairs or cans turned upside down. Keep clothes and body parts away from the spring. Wear safety glasses. |
| 85. Second, assume that the cone is going to slip or explode as you wind the spring. Keep your head out of the path of the winding cone. Keep your hands away from the cones so that if and when the winding bar slips out of the cone and your hand jerks up, the cone doesn't rip your flesh or wrap your clothes and body parts into the spring. | 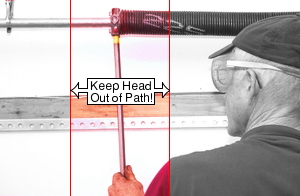 |
You are now prepared to wind your new torsion springs. Go to our torsion spring replacement tutorial, carefully review the safety issues, and follow the directions to complete this project.