Torsion Spring Cone Replacement
"Hi Mr Dan you had save me a lot of trouble. I tried to remove the torsion spring cone last night with all my tools include hack saw, blow torch,hamer,ect.. It took me 4 hour to remove it. I was so tired, this morning you sent me the picture of "how the cone should be remove." It took me 2 minutes to get both off. I was so happy how easy it is, thank you very much for your help. Now everything is working fine. I had learned alot on your web site and Richard kinch web site. The next time, I will not be any trouble. Once again, Thank you very much for your support and say HI to Jean for me."
-Andy Nguyen (01-19-07)
We have many customers who ask about how to replace the cones at each end of the torsion springs. The first time I did it 28 years ago, it took me at least 2 hours. Hopefully, these instructions will help you avoid the same sweat and strain. IMPORTANT: We recommend removing your existing cones before ordering torsion springs without cones to assure you can remove them successfully.
Due supply line shortages in our industry a torsion spring with the cones already installed often costs as mutch as 50% more than a spring without cones. To avoid this extraordinary cost we recommend buying springs without cones and reusing your old cones. You can pocket the extra savings or invest part of the savings in longer life springs.


Remove the Cones.
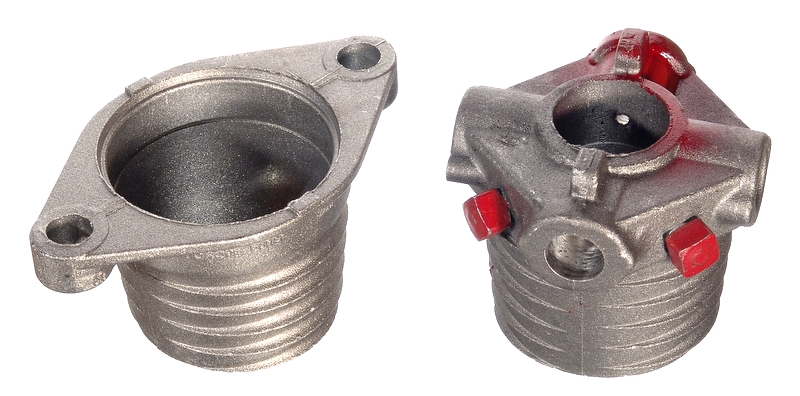
At one end of the spring is the winding cone; at the other end is the stationary cone. We will begin with the stationary cone.
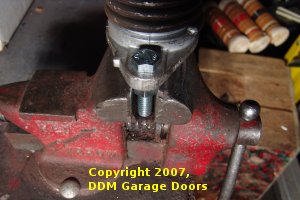
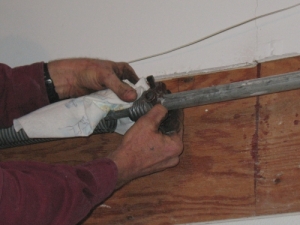
First, install the bolts and nuts from the spring anchor bracket in the stationary cone and finger-tighten them as pictured here.

Next, grip both nuts in a vise. If you grip the bolt threads, you will probably strip the threads and have to make a trip to the hardware store to get new bolts.
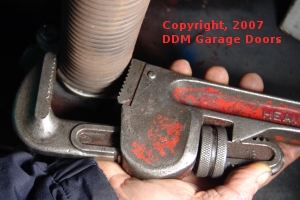
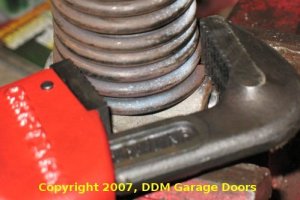
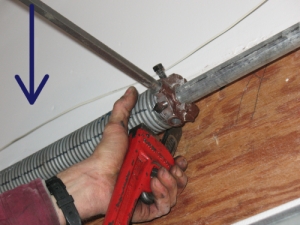
The third step is the critical one for removing the spring from the cone. Hook the end of the spring wire, not the outside of the coils, with a pipe wrench or large channel locks, and turn the wrench until the spring comes off the cone. With a 16" pipe wrench, it should require about 10 pounds of pressure.

Note: Hook the end of the wire; DO NOT grab the outside of the coils with the pipe wrench. If you grab the coils, no amount of pressure will remove the cone from the spring. You will break parts before removing the cone. If you are unable to hook the end of the spring wire, try hitting the end of the wire with a chisel or a punch.
If you do not have a vise, position the spring on the floor and place a bar between the bolts. Hook the end of the spring wire with the pipe wrench and lift up on the winding bar while pushing down on the end of the wrench. Repeat this process until the cone is loose.
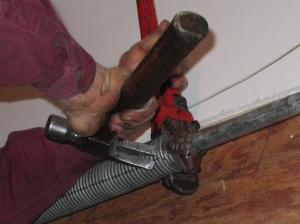
To remove the winding cone, secure the cone in the vise, hook the end of the wire, and turn the wire off the cone in the same manner. If you do not have a vise, use the same procedure above, with the only difference being that you will insert the bar into the winding cone.
After removing the cones and before installing the new springs on the cones, remove any oil that may be on the cones.
Reinstall the Cones.
The next step is to reinstall the cones in the springs. This can be done in a vise, but I have always found it easier to do this with the springs and cones on the shaft.
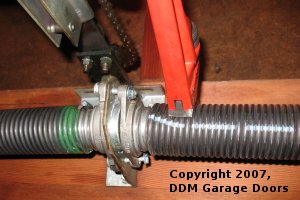
To install, the cones, begin by turning each spring onto the cones by hand. Next, grip the 4th, 5th, 6th, and 7th coils from each end with the pipe wrench or large channel locks. You will need to adjust your pipe wrench a couple of times to get a good grip on the spring.
Press the spring into the mouth of the jaws of the wrench with your thumb, and rest the other end of the wrench on the top of the door. Next, pull down on the winding cone with a winding bar. Continue reinserting the bar and pulling down on the winding cone until the cone is all the way at the end of the spring.
Since most cones are dual threaded, be sure the end of the spring wire follows the proper grooves on each cone. This tends to be more difficult with smaller wire such as the .207, .218, and .225. It may be necessary to tap the end of the wire into the proper groove of the cone.
At the stationary ends, grip the 4th, 5th, 6th, and 7th coils from each end with the pipe wrench and pull down on the pipe wrench and carefully turn each spring onto the cones. Loosen the spring anchor bolts as needed to allow the coils to wind onto the cones.
If the spring won't wind onto the cone when pulling down on the wrench, it is probably because the springs are on the wrong sides of the center bracket. Check the details at our Torsion Spring Replacement Page, especially step 9.14.