How to Measure Garage Door Torsion Springs
In order to process your order for springs, please provide the following information about each spring: (1) length, (2) wire size, (3) inside diameter, (4) spring wind, and (5) type of ends.
If you have two springs on a residential or commercial door, it is critical that you measure both springs. Approximately 30% of manufacturers and service companies mix wire sizes. Following the steps below will help in getting the correct dimensions.
Likewise, if you have a linear system on a commercial door, make sure that you measure each of your springs. If you have a duplex or triplex system, make sure that you know the inside diameter and wire size for the inner spring(s) and all five characteristics of the outer spring.
How To Measure Garage Door Torsion Springs Video


Measure the Length of the Spring
You need to determine the length of the unwound spring, but you don't need to unwind the spring to measure the length.
If your torsion spring is unbroken and unwound, simply measure the length of the spring. Measure from the first coil on one end of the spring to the last coil on the other end of the spring. Do not include the cones themselves in your measurement, but include the coils that are on the cone.
If your torsion spring is broken, loosen the setscrews on the winding cone. Caution: If the torsion spring is still wound, do not touch the setscrews on the winding cone. Do not touch the bolts that secure the stationary cone to the spring anchor bracket. Once the winding cone is free to slide on the shaft, slide the two parts of the spring back together. The coils should be touching, and there should not be a gap anymore. As with the unwound spring above, measure the distance from the first coil on one end to the last coil on the other. Do not include the cones, but include the coils that are on the cones.
Torsion springs grow one coil in length, with each turn of tension applied to them. The gain in the spring length is replaced with small gaps between the coils when you open your garage door because the setscrews do not move on the shaft, so you cannot open your door to measure the spring length. Measuring a wound spring requires determining the number of turns on the spring.
To determine the unwound length of a wound spring, it is imperative that you exercise caution. Caution: Keep your fingers out of the spring and away from the winding cones - the spring could suddenly unwind at any time.
If there are paint, chalk, or crayon marks wrapping around the spring, this will be easy. The mark originally traveled across the length of the spring and did not wrap around. The torsion spring has one turn for each time the paint stripe comes back to the front of the spring.
Also, if you have a residential garage door with standard 4" cable drums, simply deduct from the total spring length the number of coils added when the spring was originally wound. On seven-foot high doors, this would be eight coils, and on eight-foot high doors, it would be nine coils.
For example, on a seven-foot high garage door, a 34" spring comprised of .250 wire would grow eight coils when it is wound and stretched. The spring will grow 7.5 coils, or 7.5 X .250 for the coil size, or 1 7/8". Springs are usually stretched an extra 1/8", so the total addition to the spring length is eight coils or two inches. The 34" spring will measure out at thirty-six inches. Deducting eight coils from the total length will provide an accurate length of thirty-four inches.
There is another way to determine the number of turns on the springs on larger standard lift industrial doors or residential doors with non-standard drums. Measure the circumference of the cable drum, and measure the height of the garage door in inches. Divide the height of the garage door by the cable drum circumference, then add one. This is the number of turns that are on your spring. For example, a 14' high door is 168" high. Many of these have drums with 17" circumferences. Dividing 168" by 17" would give you 9.88. Add one to this, and you get 10.88 turns, and with a little stretch, a total of 12 coils. Deducting 12 coils from the total length will give you an accurate length of the spring when it is unwound.
If you measure springs on a larger commercial or industrial door and there is not a paint stripe, and if you have a vertical-lift or high-lift garage door, it will probably be easier for you to unwind the springs than to calculate the length of the spring.
Regardless of how you determine the number of turns on a wound spring, count off one coil for each turn and measure the remaining length of the spring to determine the unwound length of the spring.
Determine the Wire Size
| 10-Coil Measurement | 20-Coil Measurement | Wire Size | |||
| in | cm | in | cm | ||
| 1 3/4" | 4.50 | 3 1/2" | 8.99 | 0.1770 | |
| 1 7/8" | 4.76 | 3 3/4" | 9.53 | 0.1875 | |
| 1 15/16" | 4.88 | 3 7/8" | 9.75 | 0.1920 | |
| 2" | 5.08 | 4" | 10.16 | 0.2000 | |
| 2 1/16" | 5.26 | 4 1/8" | 10.52 | 0.2070 | |
| 2 3/16" | 5.55 | 4 3/8" | 11.11 | 0.2187 | |
| 2 1/4" | 5.72 | 4 1/2" | 11.45 | 0.2253 | |
| 2 3/8" | 5.95 | 4 11/16" | 11.90 | 0.2343 | |
| 2 3/8" | 6.02 | 4 3/4" | 12.04 | 0.2375 | |
| 2 7/16" | 6.19 | 4 7/8" | 12.38 | 0.2437 | |
| 2 1/2" | 6.35 | 5" | 12.70 | 0.2500 | |
| 2 5/8" | 6.67 | 5 1/4" | 13.34 | 0.2625 | |
| 2 3/4" | 6.93 | 5 1/2" | 13.87 | 0.2730 | |
| 2 13/16" | 7.19 | 5 5/8" | 14.38 | 0.2830 | |
| 2 7/8" | 7.34 | 5 3/4" | 14.68 | 0.2890 | |
| 2 15/16" | 7.49 | 5 7/8" | 14.99 | 0.2950 | |
| 3 1/16" | 7.79 | 6 1/8" | 15.57 | 0.3065 | |
| 3 1/8" | 7.94 | 6 1/4" | 15.88 | 0.3125 | |
| 3 3/16" | 8.12 | 6 3/8" | 16.23 | 0.3195 | |
| 3 5/16" | 8.41 | 6 5/8" | 16.81 | 0.3310 | |
| 3 7/16" | 8.73 | 6 7/8" | 17.46 | 0.3437 | |
| 3 5/8" | 9.21 | 7 1/4" | 18.42 | 0.3625 | |
| 3 3/4" | 9.53 | 7 1/2" | 19.05 | 0.3750 | |
| 3 15/16" | 10.00 | 7 7/8" | 20.01 | 0.3938 | |
| 4 1/16" | 10.32 | 8 1/8" | 20.63 | 0.4062 | |
| 4 7/32" | 10.71 | 8 7/16" | 21.43 | 0.4218 | |
| 4 5/16" | 10.93 | 8 5/8" | 21.87 | 0.4305 | |
| 4 3/8" | 11.11 | 8 3/4" | 22.23 | 0.4375 | |
| 4 17/32" | 11.51 | 9 1/16" | 23.02 | 0.4531 | |
| 4 5/8" | 11.72 | 9 1/4" | 23.44 | 0.4615 | |
| 4 11/16" | 11.90 | 9 3/8" | 23.81 | 0.4687 | |
| 4 7/8" | 12.45 | 9 3/4" | 24.89 | 0.4900 | |
| 5" | 12.70 | 10" | 25.40 | 0.5000 | |
| 5 5/16" | 13.49 | 10 5/8" | 26.98 | 0.5312 | |
| 5 5/8" | 14.29 | 11 1/4" | 28.58 | 0.5625 | |
| 6 1/4" | 15.88 | 12 1/2" | 31.75 | 0.6250 | |
The wire size is the thickness of the wire used to make the spring.
When it comes to measuring torsion spring wire, calipers and micrometers are simply not reliable. This is because of four reasons. First, the coil is bent; measuring the curved part of the coil with a micrometer will get you a larger reading. Sometimes there is a straight piece of wire you can measure, but there are other problems. A second problem with calipers and micrometers is corrosion. Rust initially increases the wire size and later reduces it. The third reason you can't measure an individual coil is that many of the springs in recent years have been coated with a thin layer of paint. The fourth problem is that older calipers measured 64ths and 128ths, and many mistakes have been made converting to thousandths of an inch. We recommend using calipers and micrometers only to confirm your 20-coil measurements.
The only accurate way to measure the wire size is to measure 10 and 20 coils. Since the coils rub together when the garage door operates, the sides of the coils are less impacted by corrosion. In addition, when springs are painted, the paint does not get between the coils. The 10 and 20 coil measurements are highly accurate.
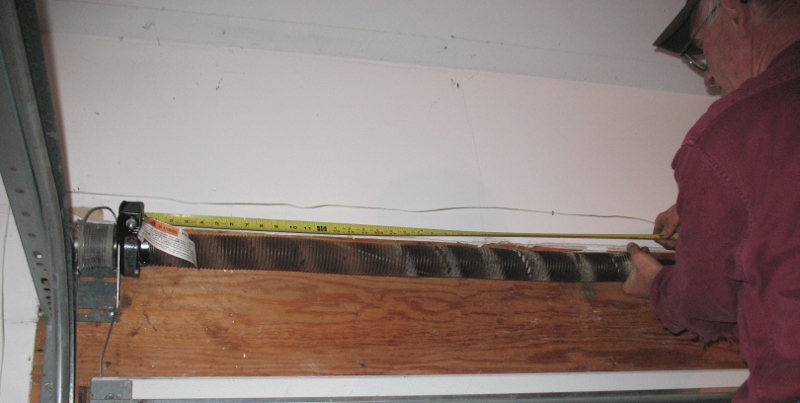
To measure 10 coils, insert the end of a tape measure between two coils or hook the tape on the end of the spring if it does not have a cone on it. Then, count 10 coils and pull the tape to the point where the 10th and 11th coils meet. Measure to the nearest 16th of an inch. Note that the hook on the end of the tape is slotted for measuring outside dimensions as well as inside dimensions. Since you are measuring the outside dimensions of the coils, you will need to pull the tape away from the end to get the correct length. Pushing the tape into the end of the ruler will give you a longer length, often 1/16" more. Record this measurement on a piece of paper.
When measuring, make sure all the coils are compressed. If there are gaps between the coils, you will measure incorrectly and order the wrong spring.
Next, measure the width of 20 coils. We measure 20 coils because it is more accurate, and to eliminate errors from counting coils. Record the 20 coil measurement. This reading should be twice as long as your 10 coil reading. If it is not, go back and remeasure 10 and 20 coils.
If you have one spring that is broken and one that is still wound, you will need to measure 10 and 20 coils on the wound spring as well. Caution: Do not touch the setscrews on the winding cone. Do not touch the bolts that secure the stationary cone to the spring anchor bracket. Do not grab the spring.
The spring wire remains the same size after it is wound, so the measurements will not be affected. We measure both springs because about a third of the garage doors installed have unmatched springs on them. Manufacturers do this to minimize cost; service companies do it to minimize inventory. Replacing with matched torsion springs will allow you to maximize cycle life.
With the 10 and 20 coil measurements, you can determine the wire size from the chart above. Note that the dimensions are not exact, but rounded to the nearest 16th of an inch. For example, 20 coils of .177 wire will measure to be 3 1/2" to the nearest 16th of an inch, but not exactly 3 1/2". Dividing 3 1/2" by 20 will give you 0.175, not 0.177.
Note: Wire sizes .200 and .237 are no longer used. If you have springs with these sizes, contact us, and we will calculate replacements for these. The specs generally fall between the wire sizes before and after them on the chart. The .289 was not included in our price list because of its low usage, but springs with that wire can still be made. Just contact us for prices.
If you look at the chart above, you'll notice that there are several items in bold. These measurements are nearly equivalent to the naked eye if you measure them improperly. It is absolutely necessary that you do the 20 coil measurement for accuracy on this particular measurement. If you don't measure properly, you can get a spring that is not strong enough for your garage door.
Determine the Inside Diameter (ID)
| Inside Diameter | Door Manufacturer |
|---|---|
| 1 19/32" | Crawford only |
| 1 3/4" | Most manufacturers except for BarCol, Crawford, Raynor & Wagner |
| 1 13/16" | Older Raynor and BarCol only |
| 2" | Most manufacturers except for BarCol, Crawford, Kinnear, Raynor, Rowe & Wagner, |
| 2 3/16" | Kinnear only. Raynor springs often measure 2 1/8" or 2 3/16," but they are regarded as 2 1/4." |
| 2 1/4" | Raynor & Rowe Way only |
| 2 7/16" | Overhead Door only |
| 2 1/2" | Wagner only |
| 2 5/8" | Most manufacturers except for Crawford, Raynor & Wagner |
| 2 3/4" | Raynor & Rowe Way only |
| 2 25/32" | Crawford only |
| 3" | Overhead Door only |
| 3 1/8" | Kinnear only |
| 3 3/8" | Overhead Door only |
| 3 1/2" | Raynor Only |
| 3 3/4" | Most manufacturers except for BarCol, Crawford, Overhead, Raynor, Rowe & Wagner |
| 3 25/32" | Crawford only |
| 4" | Wagner only |
| 4 1/8" | Kinnear only |
| 4 3/8" | Overhead Door only |
| 4 1/2" | BarCol & McKee only |
| 4 7/8" | Rowe Way only |
| 5 1/8" | Kinnear only |
| 5 1/4" | Most manufacturers except for BarCol, Crawford, McKee, Overhead, Raynor, Rowe & Wagner |
| 5 1/2" | Raynor only |
| 5 3/4" | BarCol only |
| 5 7/8" | Overhead Door only |
| 6" | Most manufacturers except for BarCol, Kinnear, Overhead, Raynor, Rowe & Wagner |
| 6 1/2" | Kinnear only |
| 7 5/8" | Overhead Door only |
| 8 1/2" | Kinnear only |
The inside diameter of a torsion spring can be difficult to measure when the spring is on the shaft, so it is better to look for markings on the winding and stationary cones. You will need a flashlight to see these.
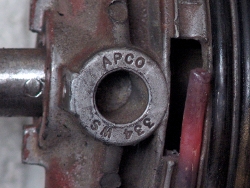
The more common inside diameters for residential doors will have "175" or "134" for 1-3/4", as pictured below. Some light commercial doors may also use a 1-3/4" inside diameter spring.
You can usually read markings on the winding or stationary cone. This winding cone says P175W*4 for a 1-3/4" inside diameter, though it could have said "134" instead. The stationary cone should have a similar marking as well.
Embossed on springs with larger inside diameters will be the numbers "2.0," "200," or "2000," corresponding to 2," as pictured below. Raynor 2 1/4" cones are marked with the numbers "1264," "1265," "1266," and "1267." Larger 2-5/8" cones are marked with "258" or "263." Residential torsion springs rarely have an inside diameter greater than 2-5/8".

This stationary cone says P200S*5 for a 2" inside diameter. The winding cone should have a similar marking as well. Many cones, like this one, are difficult to read.
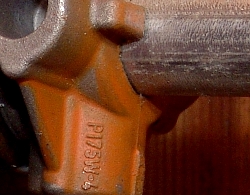
This winding cone says "334 WS" for a 3-3/4" inside diameter, though it could have said "375" instead.
Commercial and industrial doors, depending partly on their weight, use torsion springs with inside diameters all the way up to 8-1/2". The markings on these cones are similar: "334" or "375" refers to 3-3/4", "600" corresponds to 6", etc.
If you cannot find any of these markings, measure the inside diameter with calipers or a ruler to the nearest 1/16". Be careful: if you bend your tape measure to get it around the shaft, you will most likely come up with the wrong measurement, and the spring you order will not work properly.
Once you come up with an inside diameter for your springs, confirm this dimension with the manufacturer of the garage door from the chart above if there are any identifying marks on the door.
Determine the Wind of the Spring

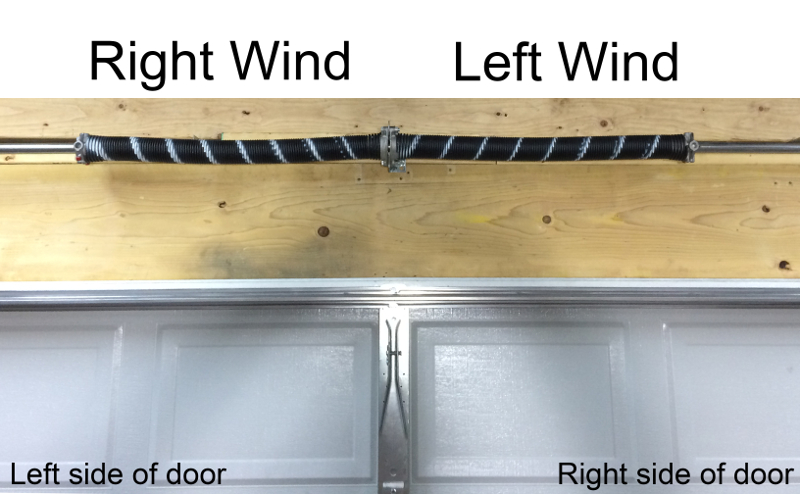
Left wind torsion springs have the wire ending on the left when viewed from the end of the spring.
This is the most confusing part of measuring springs, so you will need to be careful. Examine the drawing to the right. Notice that when the end of the coil is on the bottom, it points to the left. The spring on the left in the drawing is left wind. This is one way to identify the wind.

Another way to determine spring wind is to make a fist, as shown to the left. Notice that the thumb points down and into the "spring," and the index finger curls in the direction of the end of the "spring." A spring following this image of the hand is a right wind spring. A spring following the mirror image created by the left hand is a left wind spring.
Caution: Do not wrap your hand around a wound torsion spring.
On most residential garage doors, the spring to the left of the center support bracket is right-wind, and the spring to the right is a left-wind spring. In other words, the right wind spring is typically on the left side above the garage door, and the left wind spring is above the right side of the door as you view the door from inside the garage.
Special Types of Spring Ends
Most torsion springs have standard ends that are bent out slightly. If the spring you are ordering needs special ends, let us know. Otherwise, you will receive a spring with standard ends.
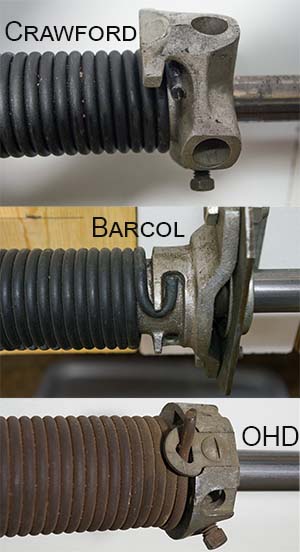
For example, Crawford and older BarCol springs pictured use end cones that are no longer available. If you would like to reuse your cones, you can order springs without cones.
Measuring Clopay and Ideal EZ-Set Springs
The most challenging torsion springs to measure are the EZ-Set springs because there are gaps between the coils. In order to measure the length of a broken spring, you will need to press the ends of the spring together. Often the black spacer will prevent full compression, so you will need to measure the length of each piece separately while pressing the ends together to remove the gaps between the coils. After that, add the lengths of the two pieces.
In order to measure 10 and 20 coils on a broken spring, you will need to press the coils together while pulling the opposite direction on your tape measure to measure the 10 and 20 coils. It is best to mark the 10 and 20 coils before squeezing the ends of the spring together to measure the coils.
In order to measure an unbroken spring, you will need to place a coin between two coils in the middle of the spring. Next, push the coils to the left and measure the length of the left side of the spring. Then push the coils to the right of the coin to measure the spring length to the right of the coin. If the spring is still wound, you will need to deduct the width of a coil for every turn of tension on the spring.
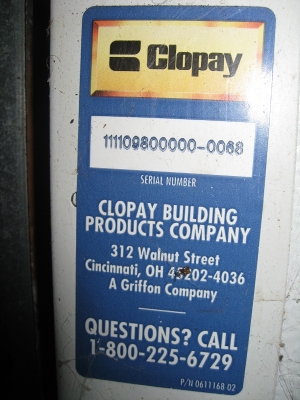
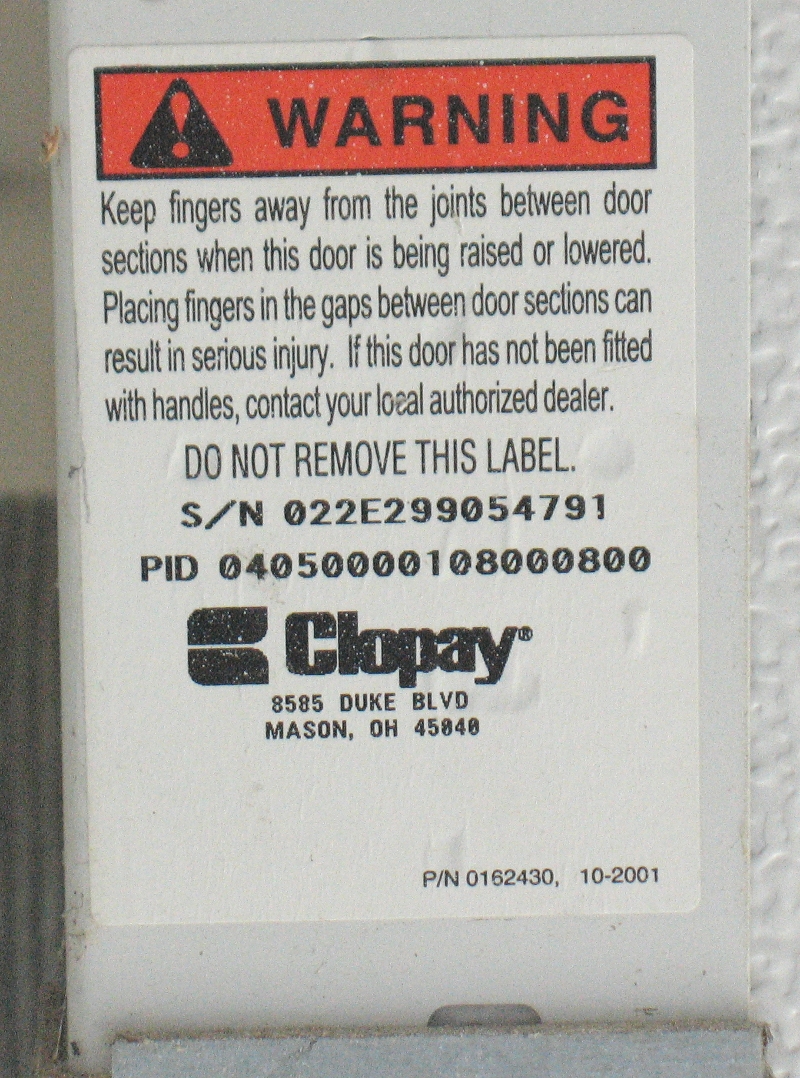
Since measuring the springs can be so difficult, many customers prefer to provide the garage door width, height, and model number. The model number is often embedded in the serial number or PID number located at one end of the garage door.
 |
 |
If you call us with information from the stickers, we can usually determine the springs you need.