How to Convert from One Garage Door Spring to Two
Many homeowners decide to convert their garage door from one standard torsion spring to two springs. Many people do not understand why they would want to add a second spring, while many view this DIY repair as a daunting task.
Installing the Second Spring
How it Works: Two Springs
Determining What Springs You Need
Benefits of Using Two Springs
Other Important Links:
Benefits of Using Two Torsion Springs
Many garage door installers avoid using two torsion springs when they install a new door in order to save money at the time. Typically, using a single spring instead of two will save just two or three dollars. The installers also know that they can install a single spring with fewer cycles and get more money a few years down the road when the garage door is damaged.
Preventing Garage Door Damage
Whenever a torsion spring is installed, it is stretched horizontally along the shaft to keep the coils from binding. As the garage door opens, the spring loses about 7 coils as the ends of the spring pull together. Since the spring anchor bracket is secured to the wall, the winding cones pull the shaft through the bracket. This often forces the cable drum into the end bearing plate. Older-style end bearing plates were not reinforced, causing the supporting angle to bend. As a result, the cable drum scrapes and the cable to peel off the drums.
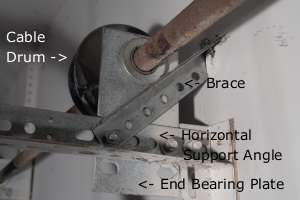
A brace on the end bearing plate, like this one, can keep the cable drum from scraping.
One solution for garage doors that use the older-style flat end bearing plates is to brace the plate to the header with angle iron or wood. This will usually prevent the drum from scraping the end bearing plate. If you have a single spring with a wire size of 0.273 or larger, the extra pull may wear out the bearing. The extra cost of replacing the bearing is worth it to switch to two springs if there is enough room on the shaft for a second spring. If you have a second spring on the door, it will pull the shaft in the opposite direction. These forces, for the most part, cancel out and minimize cable, cable drum, bearing, and bearing plate damage.
Other problems frequently ensue when a single spring is used on a double-car garage door. Many manufacturers have cut costs by using a single spring on a double-wide 16' steel garage door. If the spring breaks near the stationary cone, a large portion of the spring spins loose with the winding cone secured to the shaft. This causes a strong force to pull on the cables, often leading to one or two broken cables. If the opener up force is set too strong, it is more likely to wreck the top section if not the whole door. A second spring helps to keep the tension when the first spring breaks, resulting in fewer broken cables and less damage to the garage door itself.
Safety when a Spring Breaks
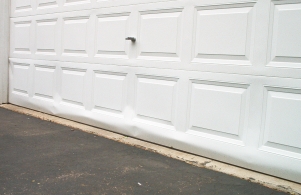
The bottom section on this garage door was damaged when the spring broke and the door fell.
If the spring breaks as your garage door is closing, or if the door is disengaged from the opener when the spring breaks, the door often slams down like a guillotine. Even if your opener is equipped with eyes to keep the door from closing when someone is underneath it, the opener is often unable to stop the door. A broken spring can endanger life as the door falls, and can also crinkle the door sections like an accordion.
Because we are often in a hurry when we walk into the garage are do not always wait for the garage door to fully open, a broken spring while the door is opening could lead to huge medical bills, if not death. Installing a second garage door spring will minimize this risk. When one spring breaks, the second will usually minimize the damage to property and life.
Cycle-Life Options
Each time you open then close your garage door, you remove one cycle from the life of your torsion spring. In the garage door industry, we refer to the expected number of cycles for a spring as the cycle life. Most garage doors have the space for springs with a longer cycle life.
Because of the design of springs, the homeowner tends to have more cycle life options when he installs two torsion springs instead of just one. In purchasing a single spring, for example, you may only be able to get a 30,000 cycle spring or a 60,000 cycle spring when you would prefer 40,000 cycles. Switching over to two springs, you are more likely to be able to purchase a pair of 40,000 cycle springs that will be cheaper than the 60,000 cycle spring and give you more cycles than the 30,000 cycle spring.
Installing the Second Spring
For many do-it-yourselfers, figuring out how to install the second spring can be a daunting task. Winding one spring is stressful enough - winding a second spring? That's just crazy!
The second spring really is not as bad as it may sound. You will not need any special tools for the job in order to install the second spring. Despite the fact that you will be winding two springs instead of just one, each spring is only half as strong as a single spring would be. Thus, you do half the work for two springs.
The Steps to Installation
The entire job of installing a second torsion spring when you replace your single broken spring is just a combination of our single torsion spring replacement and double torsion spring replacement instructions. Note: the description below does not cover the safety precautions that must be followed when installing springs or repairing your garage door. Refer to the aforementioned tutorials for complete safety warnings and instructions.
Since your torsion spring is already broken, there is no tension pulling on the shaft. You can unplug your opener, disengage it from the door, and vise grip the track to keep the door for jumping up when you wind the springs. You can loosen both the winding and stationary cones from the shaft and bracket, as there is no tension in the spring.
Once you mark the shaft and cable drums, you can loosen the drums and slide the shaft out of one of the end bearing plates and remove the broken spring. You can then slide on the new spring, making sure that it is the same wind. After sliding the cable drum back on the shaft, you can reinsert the shaft into the end bearing plate. This takes you through the first 33 steps of the single garage door spring replacement tutorial.
You are now ready to slide the second spring on the shaft. You can pick up at step 8.13 of the double-spring replacement tutorial. Following the same logic, you slide the shaft out of the end bearing plate, remove the cable drum, slide the new spring on the shaft (stationary cone first), reinstall the cable drum, and slide the shaft back into the end bearing plate.
Next, you reset the cable drums and install the cable. You can then secure the stationary cones together at the spring anchor bracket. Depending on the setup of your garage door, you may need to move the position of your spring anchor bracket. All you have left is to wind the torsion springs, secure the set screws to the shaft, and reengage and plug in the opener.
Compared to replacing your broken spring with a single spring, installing two springs does not take much extra work. You will have to slide the second spring on from the opposite side of the shaft, and you will have to wind two springs instead of one. In some cases, you may also have to move the location of the spring anchor bracket if it is located near an end bearing plate.
Moving the Spring Anchor Bracket
Customers often ask if the spring anchor bracket should be centered above the door when converting to two springs. Other than the aesthetic appeal there is no mechanical advantage to centering the bracket. There may be situations, however, where the bracket is off to one side and there is not enough space to install the second spring. If this is the case, reposition the spring anchor bracket closer to the center of the header.
The Extra Parts
After your single spring breaks and you convert to two torsion springs, you will naturally be needing one more spring than you used to have. Customers will occasionally also need longer bolts to secure the stationary cones to the spring anchor bracket. Since the bolts pass through both stationary cones with the spring anchor bracket in the middle instead of just passing through one cone and the bracket, the threaded part of the bolts has to to be at least 1-1/2" long. If your existing bolts are not 1-1/2" long, you can pick up longer bolts at any hardware store.
Many customers think that since one bearing or bushing was used with one spring, they certainly will need two bearings for two springs. This is not the case. As long as you use one spring anchor bracket to hold the two springs, only use one bearing. When you insert the bearing in the stationary cone of the torsion spring and slide it to the spring anchor bracket, the exposed part of the bearing rests in the slot of the bracket. This helps to keep the torsion springs centered on the shaft. If you install a second bearing, the stationary cones will be under extra stress when you secure them together. You will likely break one or both stationary cones.
As with any torsion spring replacement, you may need to replace other garage door parts. Cables and bearings for the end bearing plates should be examined and replaced as necessary.
How it Works: Two Springs Instead of One
Many customers want to convert over to a two-spring system, but they do not know what springs they need. Furthermore, they often do not understand how two springs work together to lift the garage door. The following will explain how we convert from one torsion spring to two.
The Physics
Every torsion spring has a torque rating called the IPPT, or inch-pound per turn. The IPPT tells you the torque that the spring exerts for each turn that is put on the spring. A spring on a 7' garage door, for example, typically has 7.5 turns. The torque, then, is the force exerted by the garage door at a given distance from the center of the shaft, as this is the location on which the spring acts. The distance from the center of the shaft to the center of the cable peeling off of the drum is called the moment arm, which is used in calculating the lift of a spring.
We can calculate the IPPT for your single spring based on its dimensions. To have two springs with equal lift that will work with your garage door, we divide the IPPT by 2. This yields the goal IPPT for a pair of new torsion springs. We can then find a pair of springs that match this IPPT that will work with your garage door.
How the Springs Work on Your Door
When you purchase a pair of torsion springs, you receive both a right and a left wind spring. The wind of the spring determines the direction the coils are wrapped. The right wind spring goes on the left side of the spring anchor bracket, and the left wind spring goes on the right side when looking from inside the garage. Since the two springs are essentially mirror images of each other, you wind up on both springs. When the springs are wound and secured to the shaft, they both pull down, which pulls upward on the cables that attach to the bottom bracket of the door. Often times people think that one spring pulls the door up while the second spring pushes it down. Rather, both springs work together to balance the door weight as it opens and closes.
One advantage of having two springs instead of one is that each one lifts half of the weight. As a result, each spring is only half as strong when fully wound with the same number of turns as your single spring. This means that it only takes half as much work to wind each spring. Ultimately it will take the same amount of work to wind one strong spring as it does to wind two springs that are half as strong. By winding two springs, however, you can take a break half-way through winding.
Determining what Springs You Need
If you are still unsure of whether or not to switch to a two-spring system, the following may help. If your spring inside diameter is 1-3/4", 2" or 2-1/4" and your wire size is at least 0.250, 0.262, or 0.283, respectively, we suggest that you switch to a two-spring system and follow the steps below. If you decide to keep the single-spring system, we suggest that you go to our standard torsion spring page for information on determining what spring to purchase.
Making Measurements

Measuring the Track Radius: Hold the top of a level at the track junction, measuring the distance from the bottom of the horizontal track to the top of the level.
You will also need to know the garage door height. To have a better idea of how many cycles your new springs will get, you may also want to measure your track radius. It is also a good idea to weigh your garage door, as this will allow you to verify that each of your new springs will lift half of the door weight. In order to make sure that the new pair will balance your garage door, you will also need to measure the track radius.
Finding the New Torsion Springs
Once you have your torsion spring measurements and your garage door height, go to our Find My Spring Database™ and click on the "Convert from One Spring to Two" tab. After entering your spring information, you will see your old spring and then a pair of springs (one left-wind and one right-wind) that is compatable with your garage door. Each of these springs has at least the same number of cycles as your previous spring. Beneath this pair of springs, you will see several other pairs of compatable springs, each with a different cycle life. The cost per cycle decreases when you purchase springs with more cycles. Note: If you do not have a 4" diameter cable drum, the lift and cycle life of the springs will not be accurate, but they should still work on your garage door.
You are responsible for making sure that your two new springs will fit on your shaft. Because we try to match or better the cycle life of your new torsion springs, the pair we suggest may be too long for your shaft. In order to make sure that the new pair of springs fits on the shaft, the combined spring length plus 18" should be equal to or less than the distance from one end bearing plate to the other.