One-Piece Single Panel Garage Door Extension Springs
Extension springs on one-piece single panel garage doors are unique, and it is important that you order the proper springs so that your door will function normally. These are called single panel one-piece garage door extension springs. They are to be distinguished from sectional garage door extension springs because they are made differently. Springs for one piece garage doors are wound more tightly and they do not work the same as sectional door extension springs.
To see how springs are replaced visit our One Piece Single Panel Garage Door Extension Spring Replacement instructions.
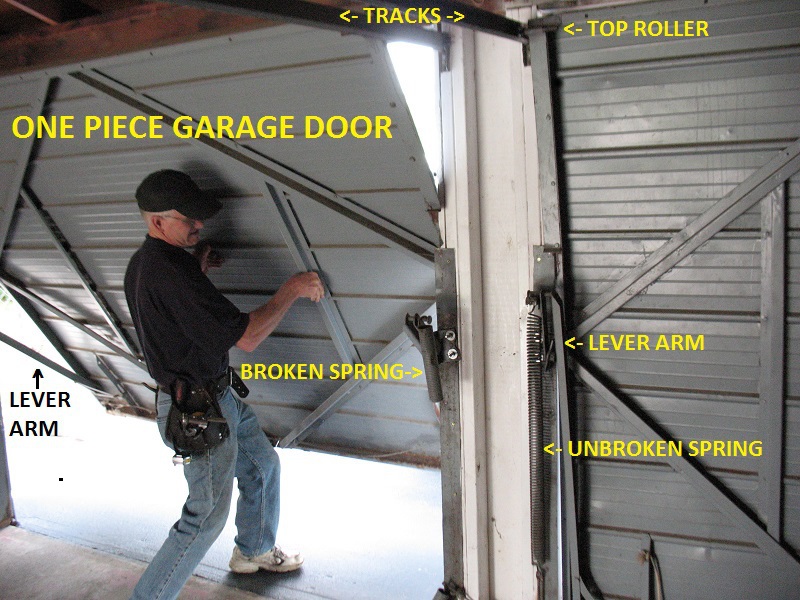
There are two main styles of one-piece springs. The first is the standard spring. This spring is used by a variety of door manufacturers. If the top of your door has rollers that move along a metal track that extends horizontally toward the back of your garage as in the picture above, you have standard one-piece single panel garage door extension springs.
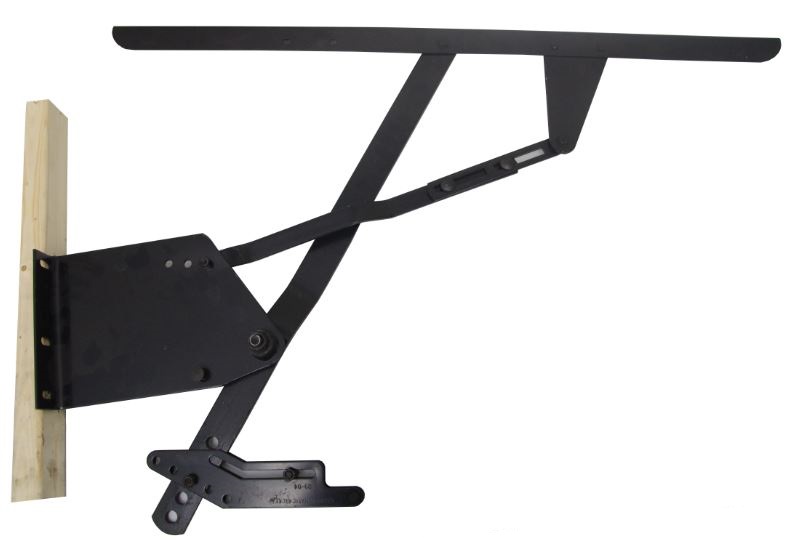
The other style of spring is the Holmes One-Piece or Single Panel Door Spring. These springs are used with different hardware, so the top of the door does not roll along horizontal tracks. The entire door weight is supported by the pivot assembly.
Learn About One-Piece Springs:
Holmes One-Piece Springs:
Standard One-Piece Single Panel Door Springs:
- » Making One-Piece Single Panel Spring Measurements
- » Types of Spring Ends
- » Replace One Spring or All the Springs?
- » How to Order One-Piece Single Panel Garage Door Springs
Other Useful Links:
Introduction to One-Piece Single Panel Door Springs
When the one-piece, single panel door is fully closed, the extension spring is stretched to its longest length. The bottom of the spring is held stationary while a piece of the hardware secures the top of the extension spring to the lever arm.
The single panel door spring pulls down on the lever arm. The opposite end of the lever arm attaches to the end of the garage door near the floor. One location on the lever arm acts as a pivot point, meaning that it remains stationary when the door opens and closes.
When you lift the door to open it, you do not feel the full weight of the door. Instead, the spring helps you lift the door weight. As the one-piece door opens, the extension spring continues to pull down on the lever arm. When you help raise the bottom of the door, you raise one end of the lever arm. The extension spring pulls on the other end, helping the door open.
As the door opens, the extension spring contracts and loses its pull. Meanwhile, the angle between the lever arm and the door changes, such that pivot point holds more of the door weight. When the door is fully open, the small amount of stretch that remains in the extension spring holds the weight of the door that has not been transferred to the pivot point.
Most one-piece single panel doors are not quite as basic as described above, though their design functions following these principles. While some doors use a horizontal track to control the top of the door, other hardware fully supports the door without needing the track.
Standard One-Piece Single Panel Door Springs
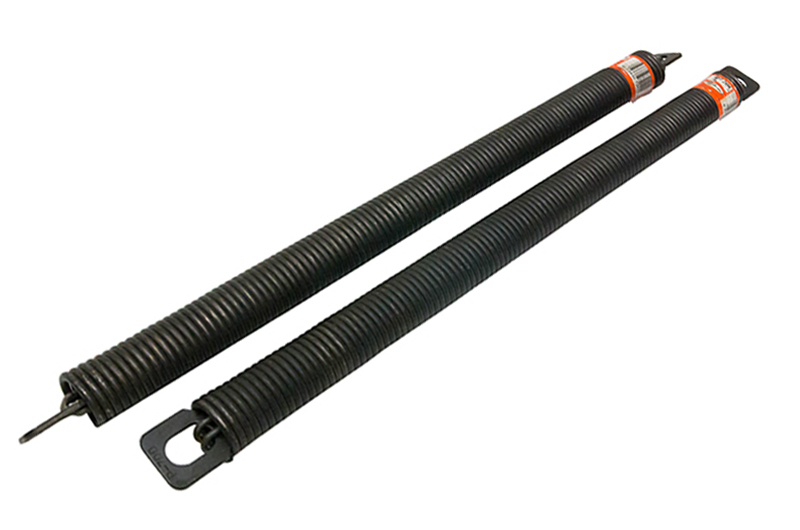
Standard single panel door extension springs look very similar to the extension springs on sectional overhead garage doors. One visible difference between these springs, however, is that one-piece door springs are shorter than sectional extension springs. Yet at the same time, single panel springs can have a few of the same types of spring ends.
If your hardware includes horizontal track that supports the top of the door when it opens, you will need to make some careful measurements. Some of these measurements will be most accurate if you use a caliper, while others will require the use of a tape measure. If you do not have the horizontal track, jump down to our section on Holmes One-Piece Single Panel Door Springs.
Making Spring Measurements
There are three important measurements of your spring that you will need to take. These measurements need to be accurate, or your door may not operate properly. The measurements are: length, wire size, and inside diameter. Read the instructions below to ensure that you properly measure your one-piece spring.
After you have made these measurements, be sure to follow our instructions to ensure that your measurements are accurate. Due to the nature of this product, we do not accept returns on standard one-piece extension springs except in the case of a manufacturing defect or an error for which we are responsible.
Spring Length
Measure the length of the coils on the spring to the nearest 1/8". If the coils are gapped press the ends of the spring toward the center of the spring to get the correct length. Your spring will have a clip, a metal strap, or some sort of loop on each end. Do not include these in the spring length measurement.
Wire Size
| 10-Coil Measurement | 20-Coil Measurement | Wire Size | ||
| in | cm | in | cm | |
| 1 1/4" | 3.18 | 2 1/2" | 6.35 | 0.125 |
| 1 3/8" | 3.43 | 2 3/4" | 6.86 | 0.135 |
| 1 7/16" | 3.61 | 2 7/8" | 7.21 | 0.142 |
| 1 1/2" | 3.77 | 3" | 7.53 | 0.1483 |
| 1 9/16" | 3.97 | 3 1/8" | 7.93 | 0.1562 |
| 1 5/8" | 4.11 | 3 1/4" | 8.23 | 0.162 |
| 1 11/16" | 4.32 | 3 3/8" | 8.64 | 0.170 |
| 1 3/4" | 4.50 | 3 1/2" | 8.99 | 0.177 |
| 1 7/8" | 4.76 | 3 3/4" | 9.53 | 0.1875 |
| 1 15/16" | 4.88 | 3 7/8" | 9.75 | 0.192 |
| 2" | 5.08 | 4" | 10.16 | 0.200 |
| 2 1/16" | 5.26 | 4 1/8" | 10.52 | 0.207 |
| 2 3/16" | 5.55 | 4 3/8" | 11.11 | 0.2187 |
| 2 1/4" | 5.72 | 4 1/2" | 11.45 | 0.2253 |
| 2 5/16" | 5.95 | 4 5/8" | 11.90 | 0.2343 |
| 2 7/16" | 6.19 | 4 7/8" | 12.38 | 0.2437 |
| 2 1/2" | 6.35 | 5" | 12.70 | 0.250 |
| 2 5/8" | 6.67 | 5 1/4" | 13.34 | 0.2625 |
| 2 3/4" | 6.93 | 5 1/2" | 13.87 | 0.273 |
| 2 13/16" | 7.19 | 5 5/8" | 14.38 | 0.283 |
| 2 7/8" | 7.34 | 5 3/4" | 14.68 | 0.289 |
| 2 15/16" | 7.49 | 5 7/8" | 14.99 | 0.295 |
| 3 1/16" | 7.79 | 6 1/8" | 15.57 | 0.3065 |
| 3 1/8" | 7.94 | 6 1/4" | 15.88 | 0.3125 |
| 3 3/16" | 8.12 | 6 3/8" | 16.23 | 0.3195 |
| 3 5/16" | 8.41 | 6 5/8" | 16.81 | 0.331 |
| 3 7/16" | 8.73 | 6 7/8" | 17.46 | 0.3437 |
| 3 5/8" | 9.21 | 7 1/4" | 18.42 | 0.3625 |
Be sure to compress the coils of the spring. If there are any gaps between the coils, you will have an inaccurate measurement, and your spring probably will not work.
Pull the tape measure tightly toward the end of the spring. Measure the length of 10 spring coils.
Be sure the pull the tape measure. The hook at the end of the tape measure is slotted to allow you to measure both inner and outer dimensions. Since you are measuring the outside dimension for the spring coils, you need to pull the tape measure away from the end of the spring. Pushing the tape into the end of the ruler will usually give you a length 1/16" shorter than the actual length.
Measure the length of 20 coils using the same process as in the 10-coil count. The two measurements are to make sure that you did not count the incorrect number of coils for either measurement. Compare your 10- and 20-coil counts with the chart on the right. If they do not indicate the same wire size, remeasure.
You may notice that the measurements in the chart are not exact, but rounded to the nearest 1/16" or 0.01cm. For example, measuring 20 coils of 0.192 will be 3-7/8" when rounded to the nearest 1/16", but not exactly 3-7/8". Dividing 3-7/8" by 20 will give you 0.19375, not 0.192.
It is better to make this measurement using the 10- and 20-coil counts than using a micromerter or caliper, as these tools tend to be less accurate. When you use a micrometer, you have to place it around a curved portion of spring wire. As a result, there is usually a gap that is several thousandths of an inch thick.
Inside Diameter
The inside diameter is a measurement of the distance across the inside of the spring. This measurement needs to be done with a caliper. In order to ensure that your new springs will work on your door, the inside diameter measurement needs to be accurate to 1/32".
To check the inside diameter, measure the outside diameter. This dimension is the distance from the outside of the spring on one end to the outside of the spring on the other end. Subtract twice the wire size from the outside diameter. If this calculation does not yield your inside diameter, measure your inside and outside diameters again. Check your wire size measurement if necessary.
To check the wire size, count the number of coils in the spring. Divide the length of the spring by the number of coils. This should equal your wire size.
To check all of your measurements, measure your other spring. The spring dimensions of your broken spring should match the spring dimensions of your unbroken spring. Caution: Stay out of the path of the extension spring! If the spring is stretched at all, assume that the spring is going to break and go flying!
Types of Spring Ends
Originally there were six options for spring ends: no end, open loop, closed loop, clip (no hole), clip with hole, and strap. The last two options are no longer available; if you have clips with holes or flat clips with holed you can either reuse your existing hardware or you can order springs with the standard clips and add an open eye bolt for securing the bottom of the spring and adjusting the tension. Each of the one-piece spring ends have their own advantages and disadvantages.
Open loop springs ends can make changing your springs a simple task. Since the loop does not completely close, you may not need to disassemble as much of your hardware to swap the broken one-piece spring with your new spring.
Closed loop spring ends may be slightly more safe than open looped ends because the end of the spring wire wraps into the spring. The disadvantage, though, is that spring with closed loops may take longer to replace.
Clips (no holes) on spring ends are more durable than the previous two end types. The spring clips put less stress on the ends of the springs to help lengthen the spring life. Because these springs have clips on the ends, it tends to require a little more time and work to replace springs with clipped ends.
Clips with Holes on spring ends are only used on the bottom end of the one-piece spring. These are no longer available. This would allow a bolt to tightly hold the bottom of the spring in place. The clip is durable, but it make changing the spring more difficult.
Straps, like the clips mentioned above, have a hole allowing a bolt to secure the spring. These, also, are no longer available. The straps were only found on the bottom of the spring. Straps are durable, but their position on the spring end makes it difficult to install the bolt.
No end springs, as the name suggests, are springs with no special ends. The spring wire just ends. Ordering springs without ends on one or both sides allows you to reuse the strap or clips from your old springs. While this option requires more work, you do save on cost.
You will need to determine which type of end you want for each end of your one-piece spring. You can pick any of the four spring ends above for the bottom of your spring, and one of the following for the top of your spring: open loop, closed loop, clip, or no ends. Some end options are more expensive than others.
Replace One Spring or All the Springs?
When one of your one-piece springs breaks, we recommend that you replace both of them, or all four if you have four springs on your door.
One reason for this is that if you change the spring on one side of the door and not the other side, the springs will not pull evenly because the new spring is stronger than the older fatigued spring. As a result the door may bind as it opens and closes.
A second reason is that springs usually break within a few months or a year of each other because the steel fatigues evenly on both springs. By the time one of your one-piece springs breaks, the remaining spring or springs will be ready to break.
You'll also save on shipping cost. Sometimes the shipping costs more than the spring.
If you have a second or third one-piece garage door, you can wait to replace the springs on that door until one of them breaks. Typically, homeowners do not use each of their doors the same amount, so one of the doors will have a broken spring before the other door. However, if you are interested in saving on shipping costs, you may be interested in purchasing extension springs for the other door. You'll want to confirm that the spring dimensions are the same for both doors.
How to Order Standard One-Piece Single Panel Door Springs
To order, enter your spring dimensions in the form below, and then click the green "Go!" button. You will then see our part number, your spring dimensions, drawings showing the ends of your springs, and prices. To order the springs, click the green "Buy" button.
More information is on our blog titled "One-Piece Garage Door Spring Modification."
Note: Standard one-piece garage door springs are not returnable. Be sure you properly measure your springs!
SHIPPING DELAYS: PLEASE NOTE: Due to manufacturing delays, please allow one to two days for manufacturing one-piece garage door extension springs.
Find My One-Piece Extension Spring
Holmes One-Piece Single Panel Door Springs
The hardware that accompanies Holmes one-piece single panel springs has a unique design, which keeps the top of the door from needing a roller to slide along a section of horizontal track. If a roller on the top section slides along horizontal track, you do not have the Holmes one-piece hardware or springs.
Determine Which Spring You Have

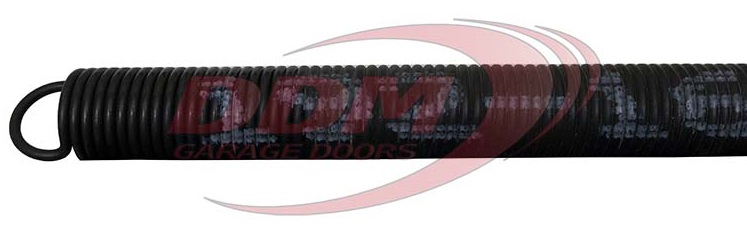
Holmes springs have a tag, which looks like this one, on each of their springs.
Replace Just One Spring?
If you have one spring on each side of your door, and if one of your springs breaks, the spring on the other side will probably break soon. If you only replace the broken spring, your old spring will be weaker as it will have lost some of its pull. As a result, you may run into balance issues if you replace only one spring.
If you have two springs on each side of your door and only replace one broken spring, you can run into more problems. Since this spring is stronger, it may keep the door from opening evenly by pulling harder on one side of the door than the other. Additionally, the new spring will be responsible for lifting more of the door weight. This extra stress can shorten the life of your new spring.
Ordering Holmes One Piece Single Panel Door Springs
Please note: Most of the Holmes springs have been discontinued. The only springs that are now available are the P928C, P728C, P528C, and the P328C. Below you can use our "Find My Holmes Spring" form to find the price of your spring. Start by selecting the letter or letters at the beginning of the tag. The next part of your tag has three numbers. Select the first number. Next, select the other two numbers.
If your spring tag has no letters at the end, select "None" for the last box. Otherwise, select the letter(s) at the end of your tag. Finally, enter the number of springs you need to purchase, and click the "Go!" button.